Make your own Boho Pottery Dishes

This post brought to you by ACTIVA Products–makers of the best air dry clays!ACTIVA PRODUCTS Boho Dishes with black Plus clay17
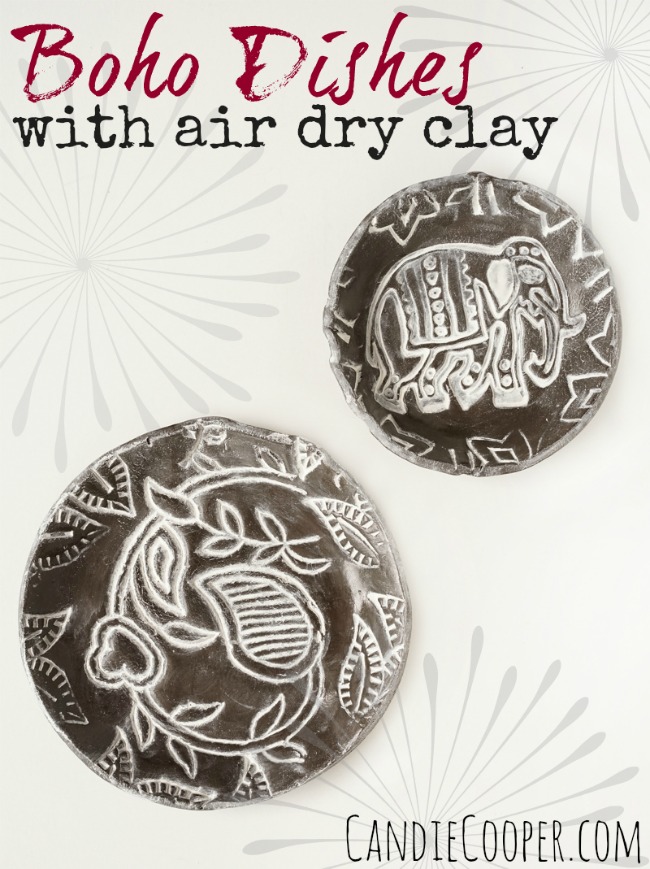
In college, I took a few courses in ceramics.  I had the best instructor–Dana.  She got me hooked on “hand-building” which simply means using your hands to construct a piece from clay instead of the pottery wheel. This is a really easy project that you can do at home.
ACTIVA PRODUCTS Boho Pottery with black Plus Clay--airdry clay
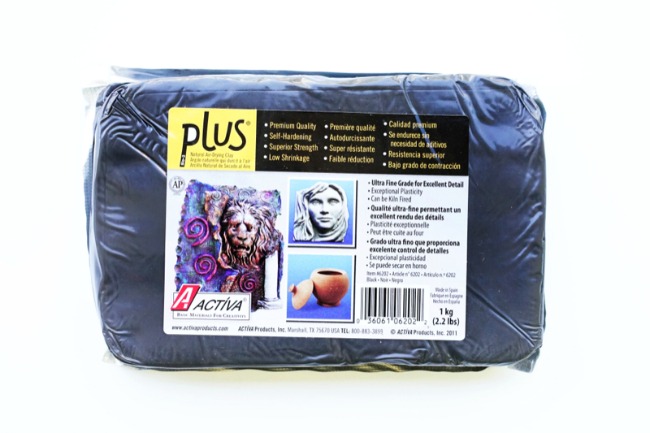
I’m using ACTIVA Plus clay in jet black.  You can buy it at your local craft store or online and it comes in other colors; white and terra cotta.
Air Dry clay Idea - ACTIVA PRODUCTS Boho Pottery with black Plus clay4
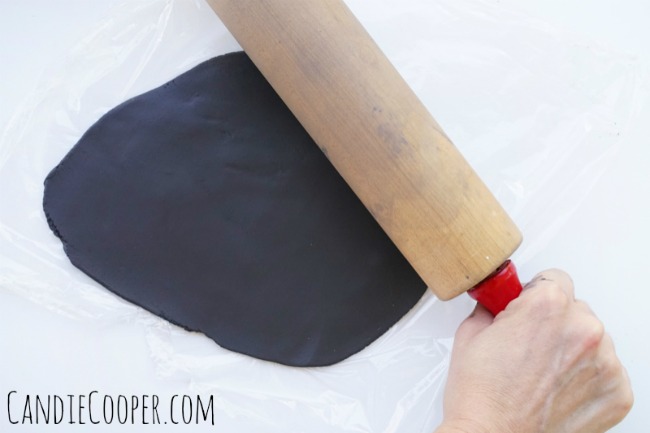
This is my craft-only rolling pin.  I roll the clay out to about 1/8-1/4″ thick.  It may take a couple tries to get it just right.
ACTIVA PRODUCTS Boho Pottery with black Plus clay-texture with @plaidcrafts wood block stamps
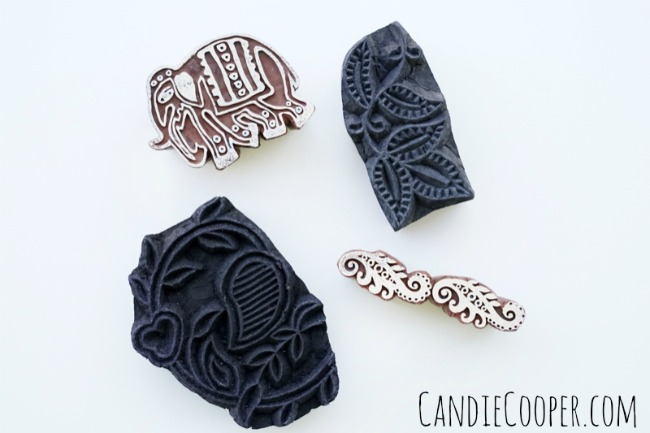
For texture and design, you can stamp it with these wood block stamps.  The black ones are the real deal from India.  The white ones are from Plaid Enterprises–I saw them in Hobby Lobby or you can get them online. Stamped-ACTIVA PRODUCTS Boho Pottery with black Plus clay
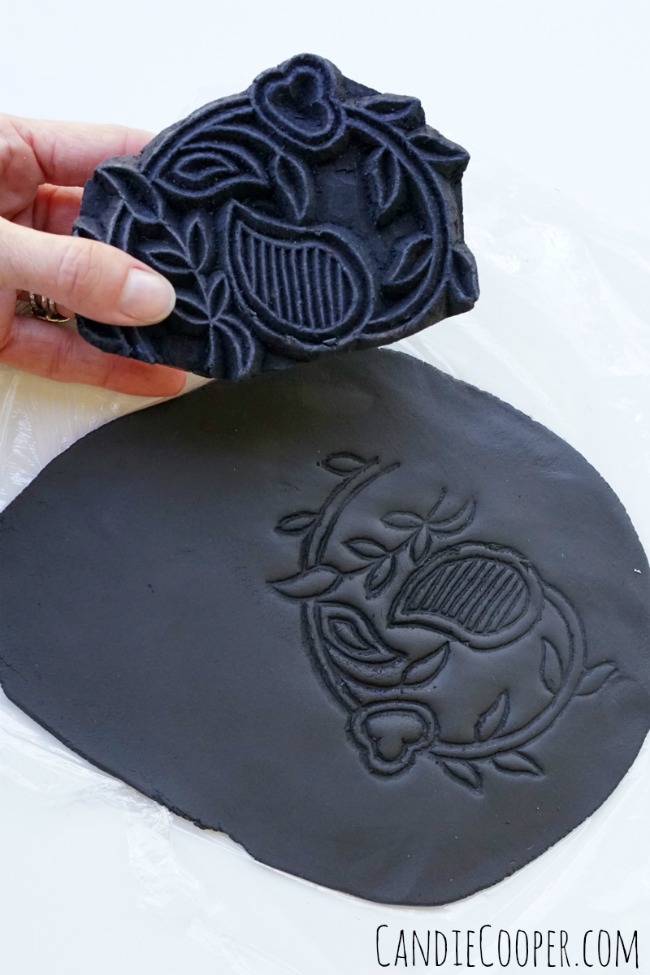
Stamp your piece so you get an all over pattern.
Making bowls with ACTIVA PRODUCTS Boho Pottery with black Plus clay
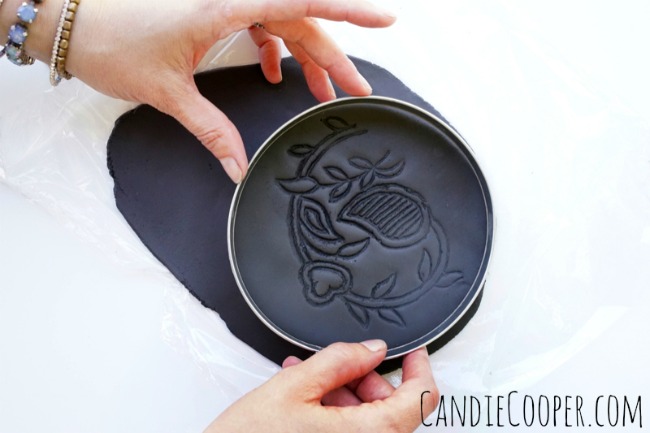
You can use an extra large circle cookie cutter to cut out a circle or use a knife with round template (like a plate).ACTIVA PRODUCTS Boho Pottery with black Plus clay--stamp the edges to add textureStamp the edge a little more if you like…
ACTIVA PRODUCTS Boho Pottery with black Plus clay--smooth out the clay with a little water and your finger
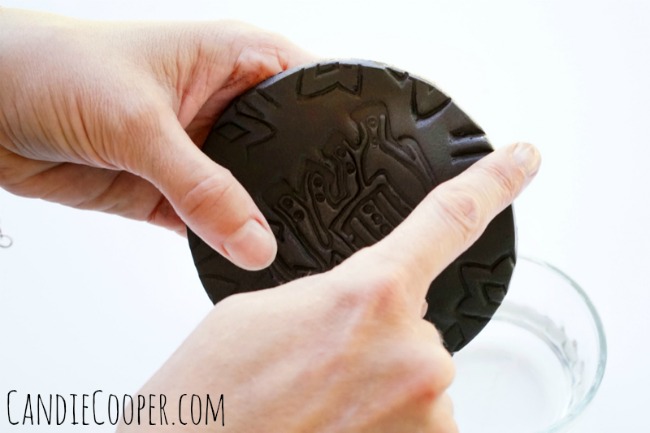
then dip your finger in water and run it along the edge of the clay to smooth out.
ACTIVA PRODUCTS Boho Pottery with black Plus clay--pat the clay into the bowl form (pie plate)
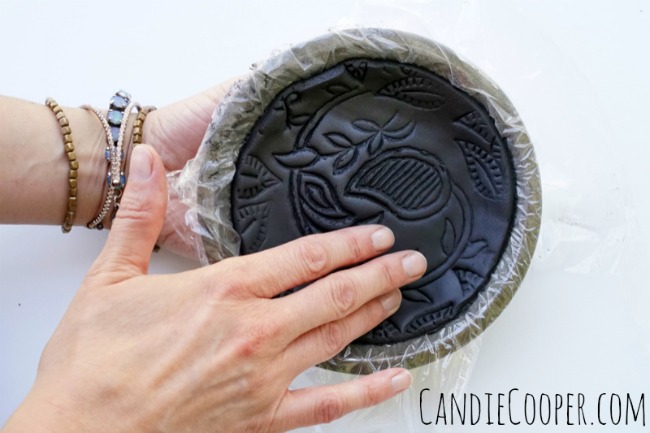
Drop your piece into a plastic lined mini pie plate (or other bowl form) and set in the sun to dry.
ACTIVA PRODUCTS Boho Pottery with black Plus clay-dry the bowls in the sunshine
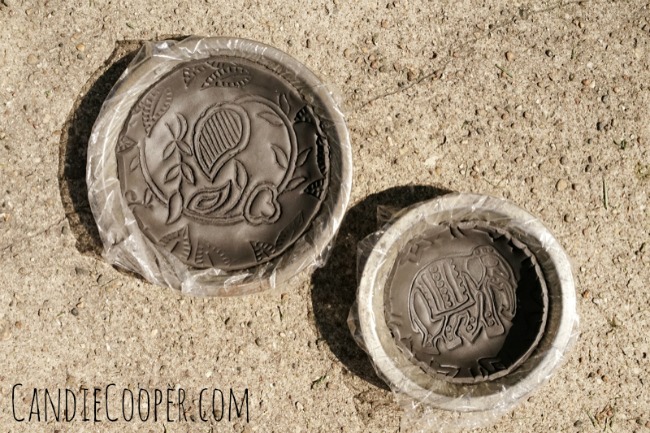
Once the front is set up, you can pull them from the pie plate, flip over and leave to dry completely.  You could also put them by a heater.
ACTIVA PRODUCTS Boho Pottery jewelry dishesTo finish, I sprayed them with clear Krylon gloss spray paint.  Then, I dipped a paper towel in water and Apple Barrel white acrylic paint and rubbed over the surface of the bowl.  Use a dry paper towel to wipe up excess paint.  Optionally, you can seal them again with the Krylon gloss paint.

Why spray them with gloss first?  Because this seals up the clay surface so the paint doesn’t get too settled into the porous surface.ACTIVA PRODUCTS Boho Dishes with black Plus clay17You know I love jewelry–and these bowls are just the thing to keep on my dresser to hold it all.  Now I only need about seventy-five more.

**These are not food-safe.  For pretties only.
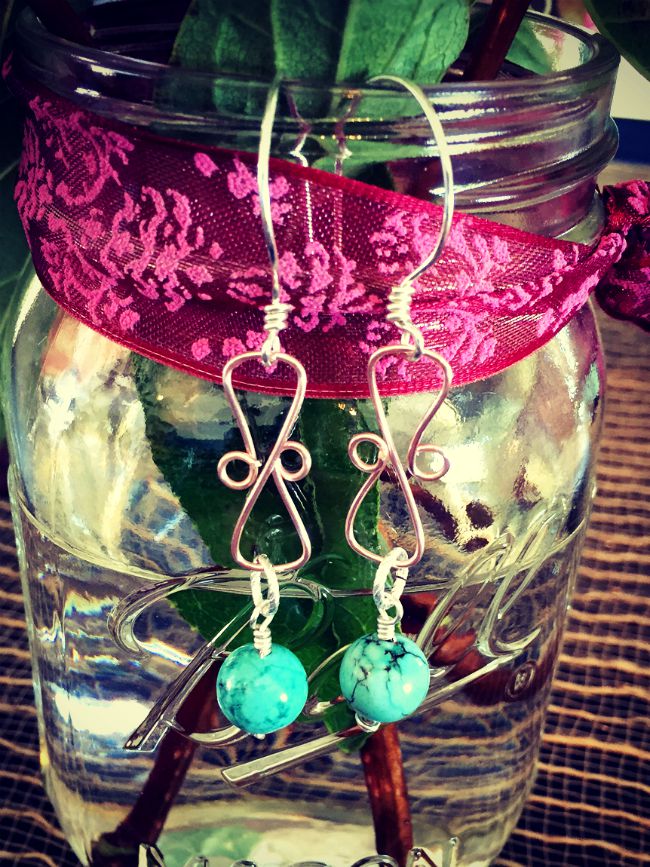
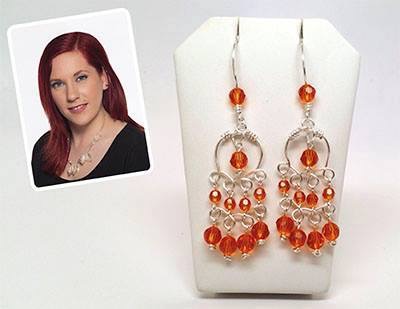
DIY Bolo Cord Leather Jewelry Making

This post brought to you by LeatherCordUSA.com.LeatherCord USA red leather bolo cord for leather jewelry making and craftsGolds and antique brass are in and I am embracing it!

I recently returned home from two different filming trips.  One for Beads, Baubles and Jewels and another for ArtBeads.com with LeatherCordUSA.com.  Both very good trips, but not much time for blogging with all the prep that is involved.

If you find yourself with not much time for making, you’ll like this necklace because it goes together fast.  Really fast.LeatherCordUSA.com bolo cordRound Braided Bolo cord from LeatherCordUSA.com comes in all different colors and diameters.  You know this if you’ve read any of my LeatherCord USA posts here.  But I’m a good squeaky wheel and will keep reminding you.Leather necklaceHere’s the secret for making this piece fast: wire wrapping.  You can string all the beads and charms onto the bolo cord and then wrap it up.  Literally.

I’m into over-the-head necklaces right now and so I cut the cord and the chain to the length I wanted, threaded the bolo cord through the ends of the chains and then folded the cord over.  You could add a touch of adhesive or just wrap it with Beadalon 20g. wire.

Done.DIY Jewlery Making  Working with red leather bolo cord from LeatherCordUSA.comI do like to give it a little smoosh with chain nose pliers to crimp the wire a bit.how to layer jewelry ideasNow let’s talk a minute about how to layer these bad boys.LeatherCordUSA.com single red bolo necklace for layeringYou could wear it alone.  But why?  Well with a t-shirt and boots, I think.  That would be a good reason why.  Maybe a jean jacket too.Layering jewelry ideas on candiecooper.comYou could also add a knotted strand of crystals that’s a bit shorter to add another texture.  This piece has brass chain so it works with the first leather bolo necklace.LeatherCordUSA.com Red bolo necklace for layeringAnd then you could go big, adding a chunky flat brass chain.  Go big or go home.  I would probably wear this look with a t-shirt too.  I like my accessories.

P.S.  This is my vintage Dianne VonFurstenburg shirt I found thrifting for $3.50 a few years back.  If there were other shoppers there, I probably would’ve held my hand up and started giving high fives.  That was a good day.Necklaces for Layering ideaIs anyone else hungry?  Three more days until Thanksgiving.

Wishing you a happy one!

How to Use the Conetastic Inverted Attachments

This post brought to you by BEADALON!Wire Working-Sandra Lupo's Conetastic Tool for Jewelry MakingAre you into wire working?  Then you need to know Sandra Lupo!
Sandra Lupo demoing her Conetastic tool at the Beadalon Tent SaleShe is the inventor of the Conetastic tool for Beadalon.  The Conetastic is a fun tool that makes wrapping wire into well, a cone shape!  I’ve gotten to know Sandra over the last year and she is one of the most delightful people in the DIY jewelry making industry.  That makes using her tool that much nicer, doesn’t it?Conetastic tool invertedFor the tent sale, Sandra showed off her new Inverted Conetastic attachment pieces.  Now you can make two bead cones at once OR a cool bead piece like she did for this tutorial.  Remember those Steampunk earrings I made about a year ago?  Those were made with Conetastic 1.0 attachments.
Inverted Conetastic Tool how toJust like before, the inverted version comes in multiple sizes, so pick your size and attach one end to the Conetastic handle piece and the opposite cone piece threads onto the tip.  It should look like an hour glass shape.

These are the days of our jewelry making lives….

Sorry, I couldn’t help it.
Wire working-make bead cones wth the Conetastic toolAnchor your wire in the hole at the base of the cone (see the arrow?) and start turning that wire!  For this one, Sandra made a long coil in pink thin Artistic Wire using the Coiling Gizmo (also by Beadalon) and slid them onto the copper colored wire to add a second layer.Conetastic bead cone making tool in actionKeep wrapping through the hourglass shape.
Jewelry Making Conetastic tool with Coiling Gizmo coilsShe pulled the coil out so you can see some of the metal underneath.  I was loving all of this layering action!
Conetastic tool for making jewelry findings by BeadalonThen she snipped the pink wire and finished wrapping how she started with only the copper wire.
Inverted Conetastic tool from BeadalonThe variation in copper and layered pink is really fun right?  The possibilities! Conetastic bead cone makerNow to free your coiled bead from the Conetastic tool, cut the anchor wire…
Jewelry Making - Inverted conetastic maker tool from Beadalon and Sandra Lupoand unscrew the top cone attachment piece.
Wire working for jewelry makers - Inverted Conetastic Tool to make beadsShore up the wire ends and tuck them in with pliers.  Ready to string.  You guys, this thing took seconds to whip up!  Amazing.  Here are a few ideas from Sandra’s stash on her table.
Sandra Lupo for Beadalon using the Conetastic toolCheck out how she stacked the cones on top of each other?  Also, how about that twisted Artistic wire in the bottom bracelet??  Hot.Using the Inverted Conetastic tool by Sandra Lupo with flat Artistic WireAnd for this one she used Artistic Flat wire.  The beads nestled down in had me at helloooo.

Good stuff Sandra!  Thanks for showing us how to use the Inverted Conetastic tool!  Here’s a link to Sandra’s website so you can see more Conetastic inspiration!

Artistic Wire JIG Mini Tutorial

This post brought to you by BEADALON!Beadalon Tent Sale Post PartyDay 2 of the Beadalon Tent sale post party is here and I want to introduce you to Sara Ellis!Sarah Ellis for BeadalonSara designs all sorts of intricate pieces and at the tent sale, she was working with Beadalon’s Artistic Wire Findings Forms.  You can see them all here.  Here’s a quick little tutorial we shot from her demo table.  I think you’ll find it gives you some ideas from making clasps to links!  And if you’re like me and struggle with wire working, you’ll like the findings forms because they keep everything nice and consistent.
Jewelry Making Beadalon Artistic Wire jig Make clasps or linksSo on the left we have the findings form and on the right the finished product.  I’m not going to lie–I’m dying to hammer one of these with a chasing hammer.
Artistic Wire jig tutorialYou start by poking your wire through the hole from the front to the back.  This anchors it while you wind and wrap on the front.
Artistic Wire jig link tutorialEach form comes with a nice set of instructions with ideas of where and what direction to wrap the wire.
Artistic Wire jig tutorial from Beadalon.comJewelry Making Artistic Wire jig from BeadalonFor this link, she used 20g. Artistic Wire in bright silver.
Jewelry making Artistic Wire link tutorialWhen you come to the end, slide the wire link from the form and trim the ends.  Now, you can hammer the link or add more wire wrapping.
Artistic Wire earrings made by Sarah Ellis for Beadalon.comHere’s a sweet little pair of earrings Sara made with pink wire and beaded drops.  I do believe this would be a really great activity for teens looking to get into jewelry making!
Beadalon crew Sarah, Yvette, Katie and SandraJust another peek at the fun after work.  Sara, Yvette, Katie and Sandra at the top!  Haha!
IMG_0877This is the class that Sara taught while at the tent sale.  It features this findings form.

I asked Sara what some of her favorite jewelry techniques were and she said:  wire wrapping and stringing!

Then I asked what some of her hobbies are and she said: painting, decoupage, shopping and writing.

Be sure to check out and subscribe to Sara’s amazing YouTube channel where she has lots of tutorials featuring many Beadalon products!

And for sure enter to win some Beadalon goodie swag below!  Winners announced next week!
a Rafflecopter giveaway

Stringing Magazine plus a GIVEAWAY

Jewelry Making Candie Cooper featured in Fall Stringing MagazineIt’s an honor to be featured on and in the Fall issue of Stringing Magazine!It’s been many years since I submitted designs to Stringing and I was so touched to have four designs in this issue (including the one on the cover!).  Big humble THANK YOU, Interweave/F&W Media.Stringing magazine tassel necklace how to from Candie CooperThis is a slightly different version that I’m wearing versus the one on the cover which is one of the reasons I love this design so much—You can adapt it however you like.

Speaking of design, this is definitely one from my heart.  You guys know my love for fringe…and leather…and a touch of sparkle.  I was diddling (is that really a word?) around one morning, working on classes for Jesse James Beads for Bead Fest April and I thought, I’m making myself a necklace. There is always a small (ok, really huge) collection of Jesse James Beads laying around and I have a few strands that I hoard because I LOVE them.  These teal and brown Inspiration strands were part of that hoard.  The wood beads were some I found in Tucson and Sarah from Jesse James Beads really loved them too, so they were added to the JJB site.  For me, designing jewelry is all about mixing and matching surfaces with color. This piece went together really fast.  I was in the flow for sure and that’s how I knew it was a good one (if I do say so myself…and I am)!Jewelry Stringing Magazine Candie Cooper's cover necklaceCandie Cooper featured artist in Stringing Fall issueRemember those beading videos I did with Interweave?  There is also a little feature article about those in this issue.  PLUS!  A bonus project from the Leather Cuffs video.Jewelry Making Candie Cooper and JesseJamesBeads.com projects in Stringing Fall 15 magazineMost of the projects in this issue feature beads from JesseJamesBeads.com so guess what!?!Cherries and Chocolate Giveaway kit from Candie Cooper, JesseJamesBeads.com and Stringing Magazine!You can win a kit of one of my projects in Stringing thanks to JesseJamesBeads.com!  PLUS!  Stringing magazine is throwing in a copy of this issue!cherries and chocolate kitHere’s a close up of what you’ll win.  It’s the Cherries and Chocolate kit featuring one of JesseJamesBeads.com’s soutache necklace!  Enter the rafflecopter below for a chance to win!

a Rafflecopter giveaway

DIY Team Spirit Bracelets

This post brought to you by Leathercord USA.LeatherCord USA Team Spirit Jewelry with kidsKids are heading back to school this week where I live.  Admittedly, I’m sad for them and their parents.  We didn’t start school until the third week in August when I was little.  But!  I try to focus on the positive so with school starting, that means football season is upon us too.  Let’s make some team spirit bracelets!LeatherCord USA printed cord for jewelry makingWe will be using Leathercord USA printed leather round cord.  It’s good stuff and you can buy it in 2 meter packs.  Pick your colors.  You’ll also need some round end findings.
LeatherCord USA Team Spirit Jewelry3The clasp end findings are made in the USA.  Go team! Adults can do the gluing while kids can string the beads.  Use this glue for leather and metal connections.
LeatherCord USA Team Spirit Jewelry4I had two helpers making these bracelets with me.  I found the large hole pony beads at the craft store.LeatherCord USA team spirit braceletsWhen you’re finished stringing, glue the opposite end in the finding.
LeatherCord USA Team Spirit Jewelry9That orange and black one is for my momma.  She works in the school here and every Friday they wear orange and black.  Apache pride!  That leads me to think these would be a good teacher gift idea.
LeatherCord USA Team Spirit Jewelry11Sending you good thoughts for a smooth reentry to school!

🙂 Candie

Locomotive No. 765

Locomotive no. 765 in WabashLocomotive no. 765DSC_21211Locomotive no. 765 in Wabash, IndianaLocomotive no. 765 came through town a couple weeks ago.  It’s a passenger train.  My mom was having a fit I was standing so close to the tracks taking pictures.  I turned to get out of the way and then she was the one standing too close.  Ok kettle.  The whistle was exactly how you want a “choo-choo” train to sound.  It rained tiny crumbs of coal.  The passengers waved.  We waved back.  Drones flew overhead. Pennies were smashed.  Needless to say, times have changed…but not.

There were people from all over th midwest to see this train pass through town.  Remarkable.

The dog days of summer are here and things have slowed down as much as they will with travel.  We are living on sweet corn and tomatoes (and a little ice cream…ok a lot says the girl who had a diet coke float for lunch).

Follow “candiecooper” on Instagram for day to day peeks.

I’m off to get ready for our yard sale!