Down in the Desert-Kids Sand Art Terrarium with Glow Creatures

This post brought to you by ACTIVA Products.  Love Sand Art?  You’ll love ACTIVA–makers of radiant colored sand and air dry clays!Tucson hot air balloon in desert via Candie Cooper
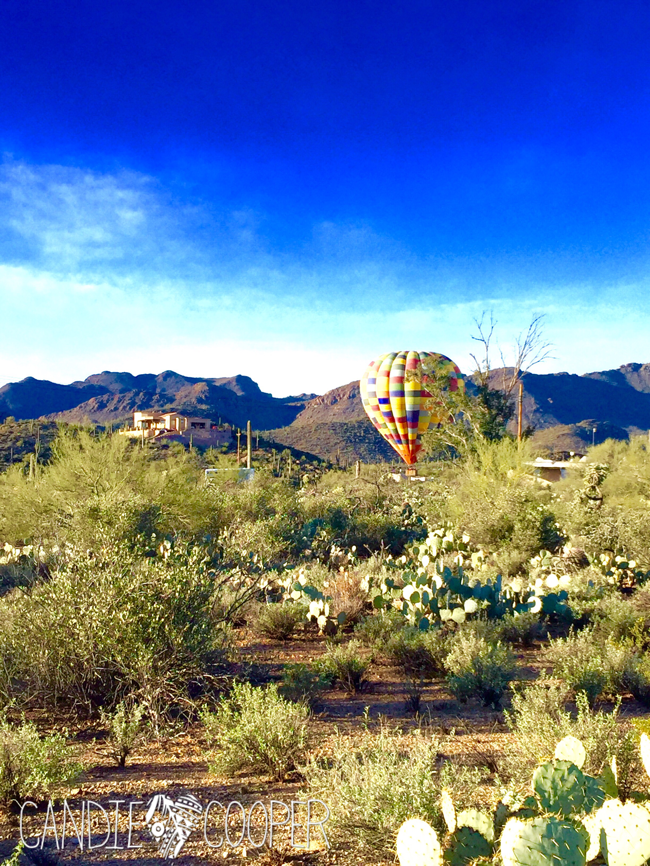
Would you like to riiiide in mah beautifulll baloooon?!

Sorry.

Guys, it’s winter here.  These posts could get cheesier and cheesier as the snow and cold drag on.  I took a photo of the snowy backyard yesterday for my friend that’s in Florida.  When I looked at it, I literally had to check to see if I accidentally hit the black and white filter.  THAT is how gray it was.

Speaking of backyards, let’s rewind to two weeks ago when I was in sunny Tucson for the gem show.  Calgon, take me away.  Look at all this sunny desert!?  Those snowbirds are livin’ right!  One day on our way to work, we saw a hot air balloon pretty low to the ground.  Sure enough, it landed in the road because there wasn’t enough wind.  Seven people piled out of that thing!  It was beautiful in that brown desert.  HUGE!
ACTIVA Sand Art Terrarium Kids Craft Idea with glow in the dark creatures7
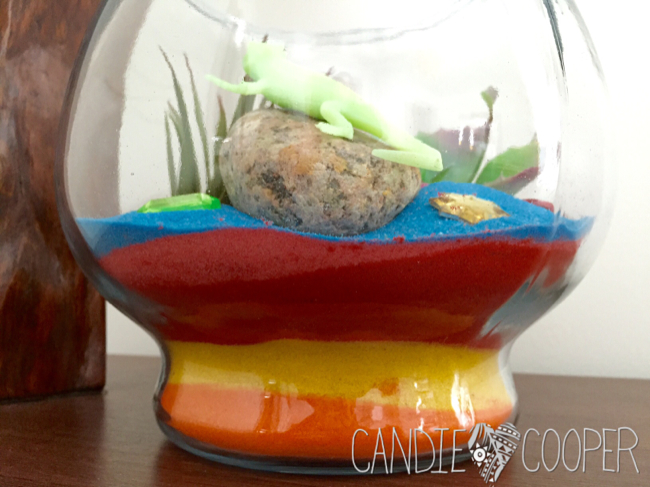
When I came home, I was ready to bring a touch of desert home and make a fun kids project.  Plus, it never hurts to bring some color inside during winter!
ACTIVA Sand Art Terrarium Kids Craft Idea with glow in the dark creatures21
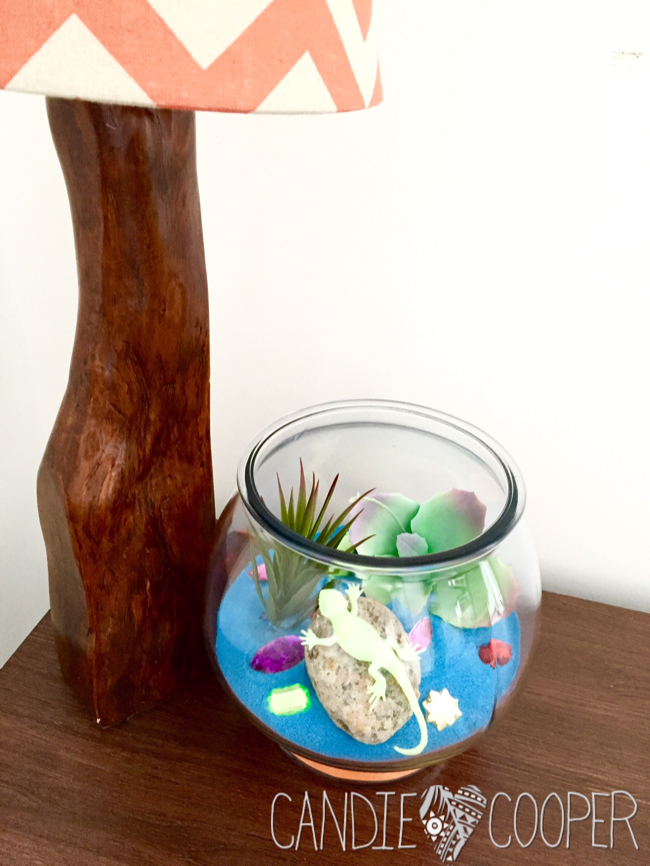
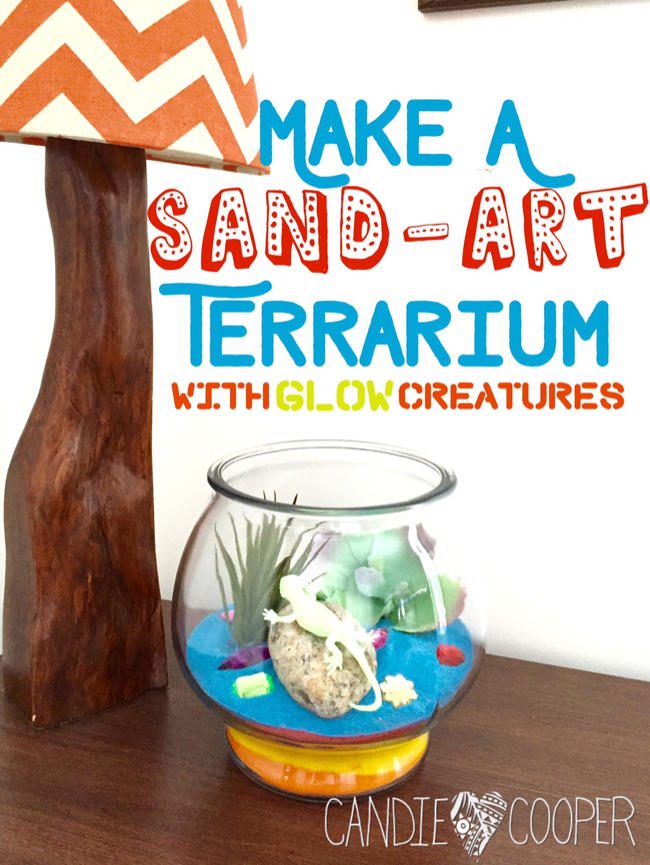
This faux terrarium goes together in a snap!  The best part is you can’t kill the plants or the pets!  I’m all for low maintenance these days…
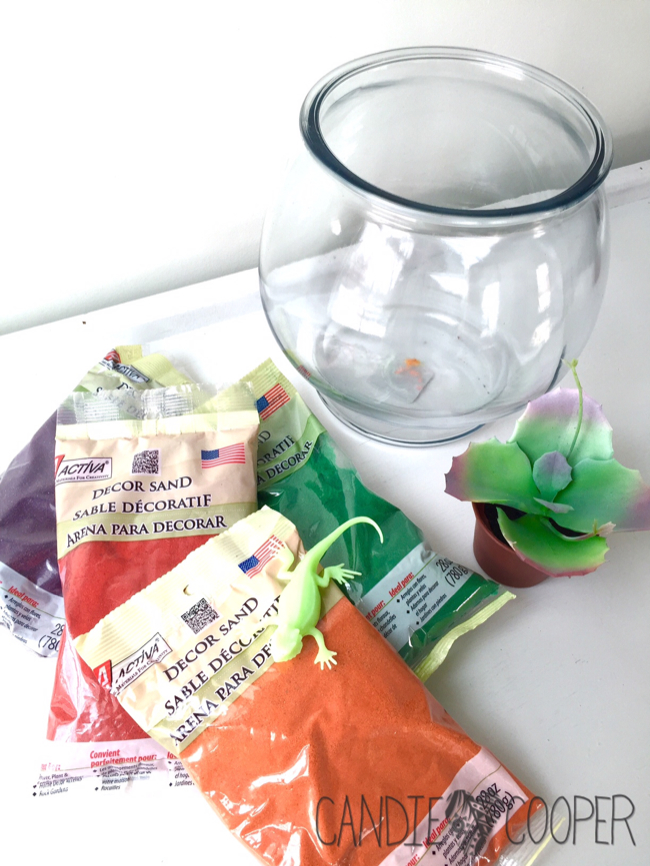
ACTIVA Sand Art Terrarium Kids Craft Idea with glow in the dark creatures20Materials List:

ACTIVA colorful sand in desired colors (1 lb bags).  I love that this product is made in America by the way!

-Fish bowl or jar

-Glow creatures

-Plastic Succulents

-Large flatback gems

-Rocks or twigs

*You can find the glow creatures and faux succulents at the Dollar Tree
ACTIVA Sand Art Terrarium Kids Craft Idea with glow in the dark creatures19
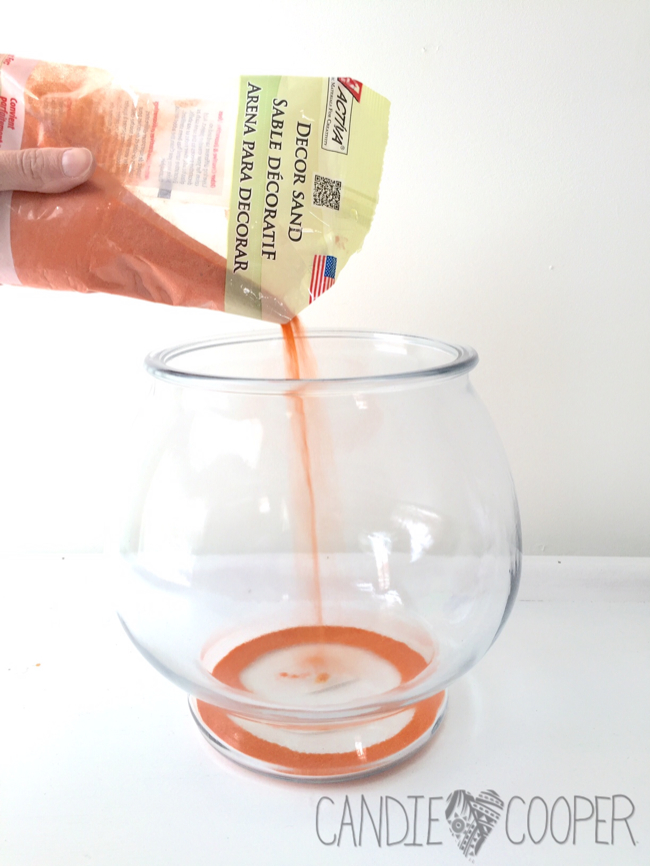
First, cut a corner from the package and pour in the sand–so fun watching sand drizzle out of a bag.

These are the days of our crafty lives…

You can tap the glass bowl down on the table to gently level out the sand.
ACTIVA Sand Art Terrarium Kids Craft Idea with glow in the dark creatures18
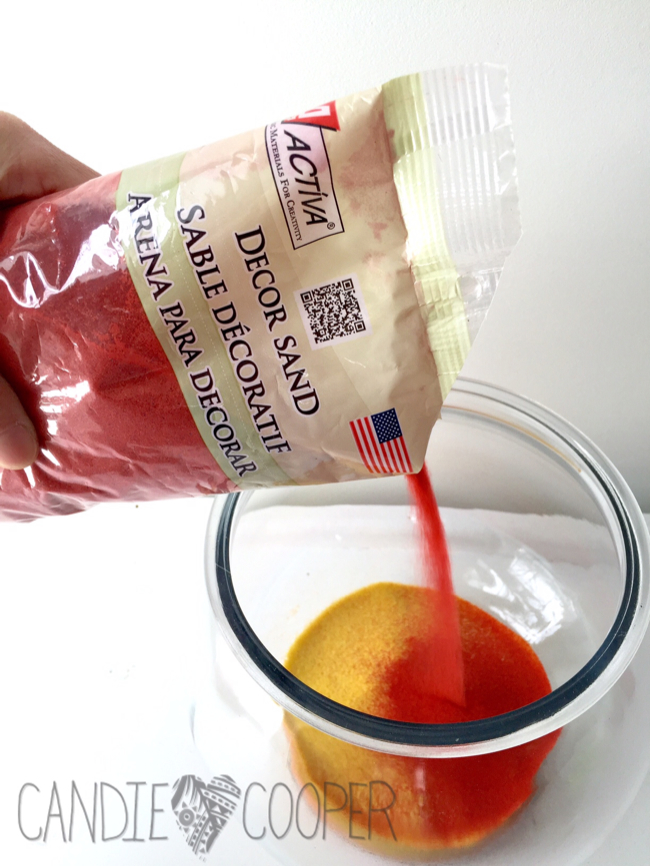
Repeat adding more layers/colors of sand.
ACTIVA Sand Art Terrarium Kids Craft Idea with glow in the dark creatures17
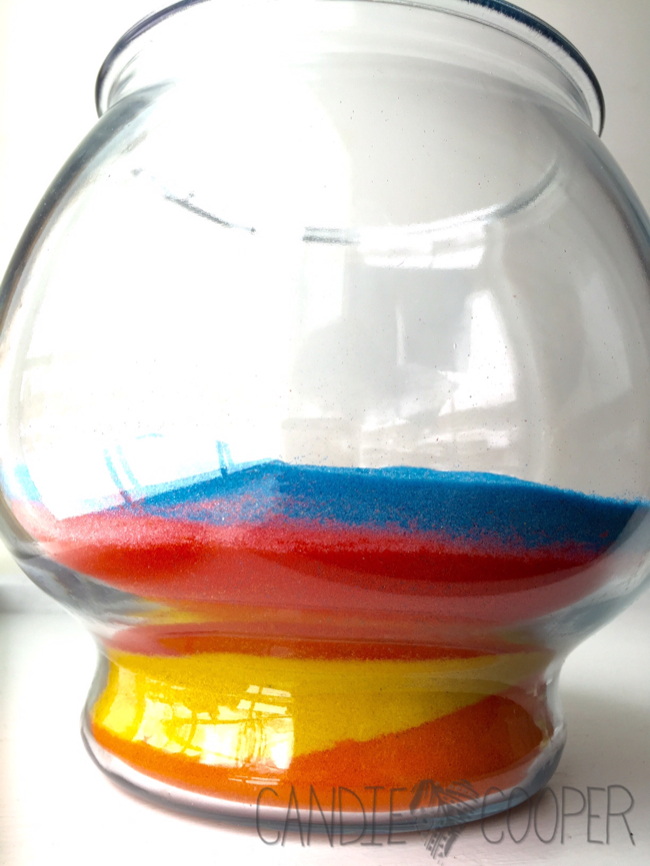
Looks like the painted desert right?
ACTIVA Sand Art Terrarium Kids Craft Idea with glow in the dark creatures16
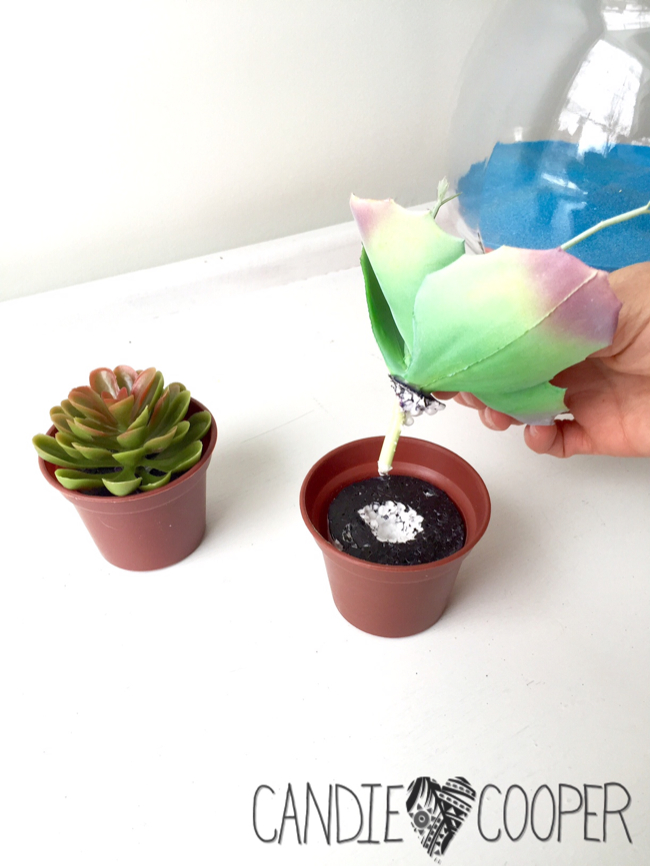
Remove the plants from the pots by plucking them out of the foam.
ACTIVA Sand Art Terrarium Kids Craft Idea with glow in the dark creatures15
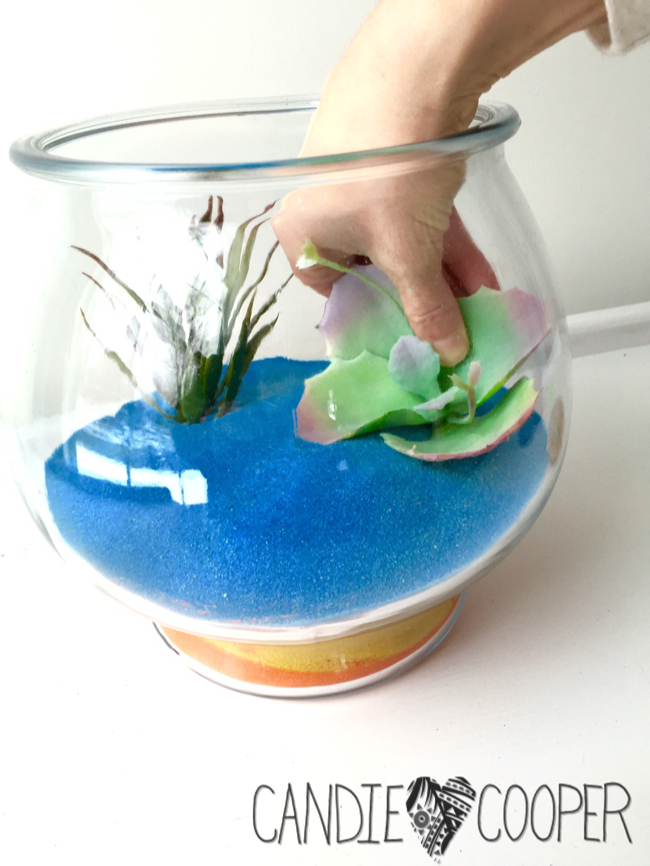
Nestle them down in the sand where you like.
ACTIVA Sand Art Terrarium Kids Craft Idea with glow in the dark creatures14
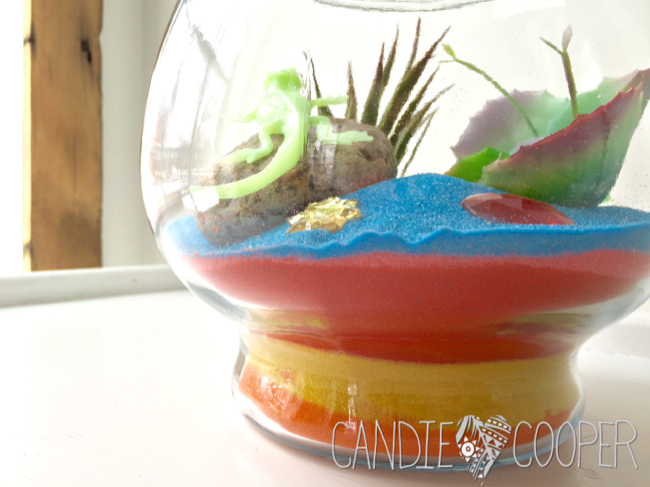
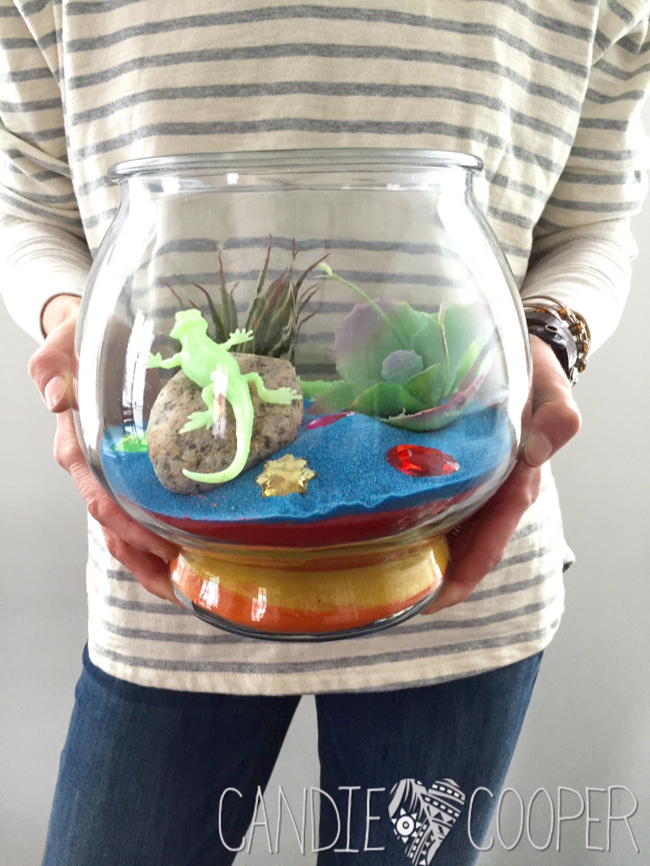
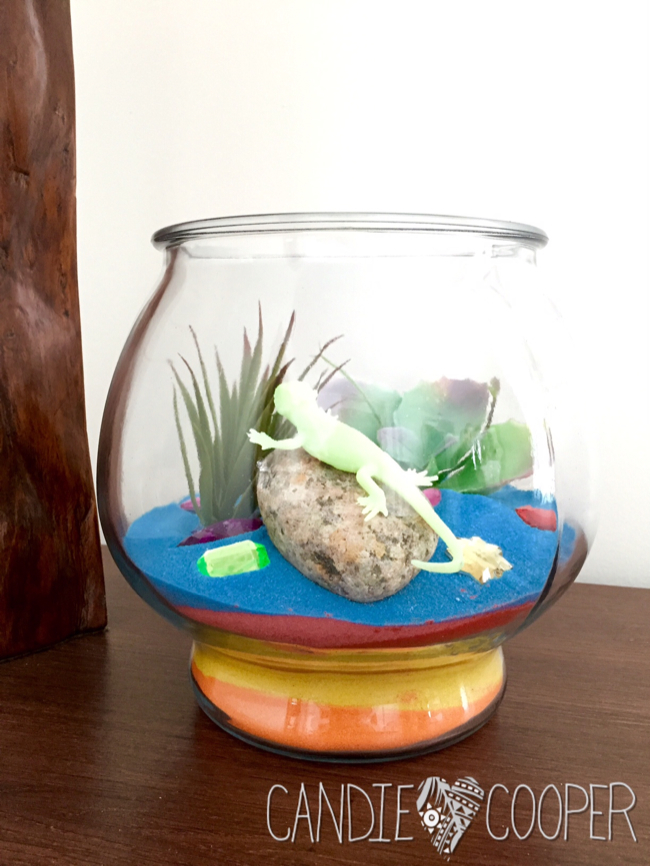
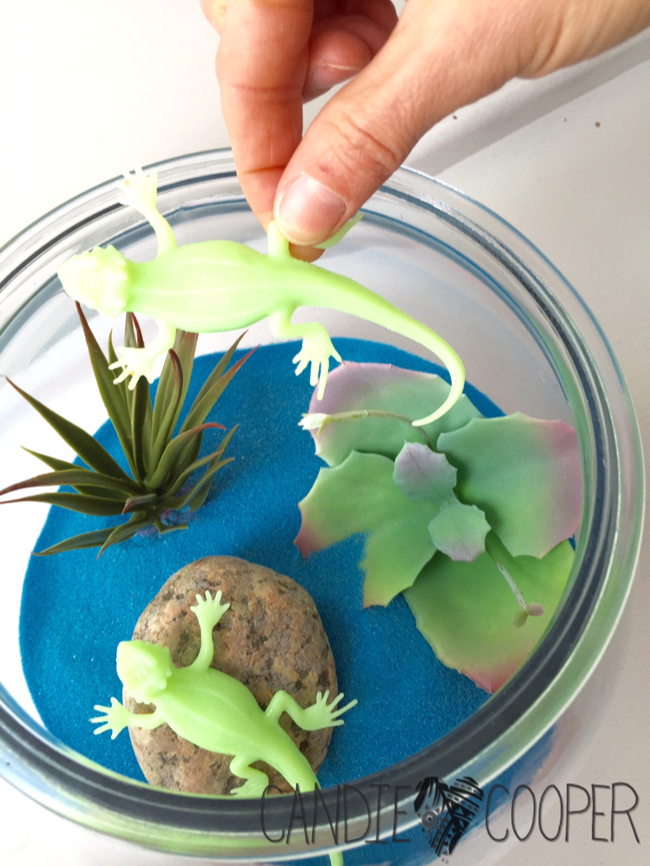
Add rocks and glow creatures!
ACTIVA Sand Art Terrarium Kids Craft Idea with glow in the dark creatures12
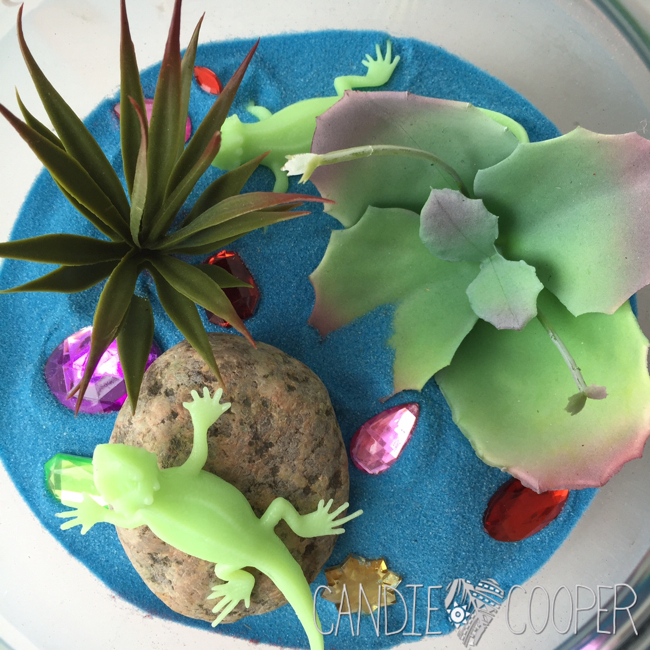
And gems!  A little sparkle ain’t ever hurt nobody!
ACTIVA Sand Art Terrarium Kids Craft Idea with glow in the dark creatures13There are lots of craft supplies that would be fun to add to the terrarium.  Little signs, pom poms, glass pebbles….  Look around the house and see what you have.  You could paint the rocks to add even more color.
ACTIVA Sand Art Terrarium Kids Craft Idea with glow in the dark creatures10
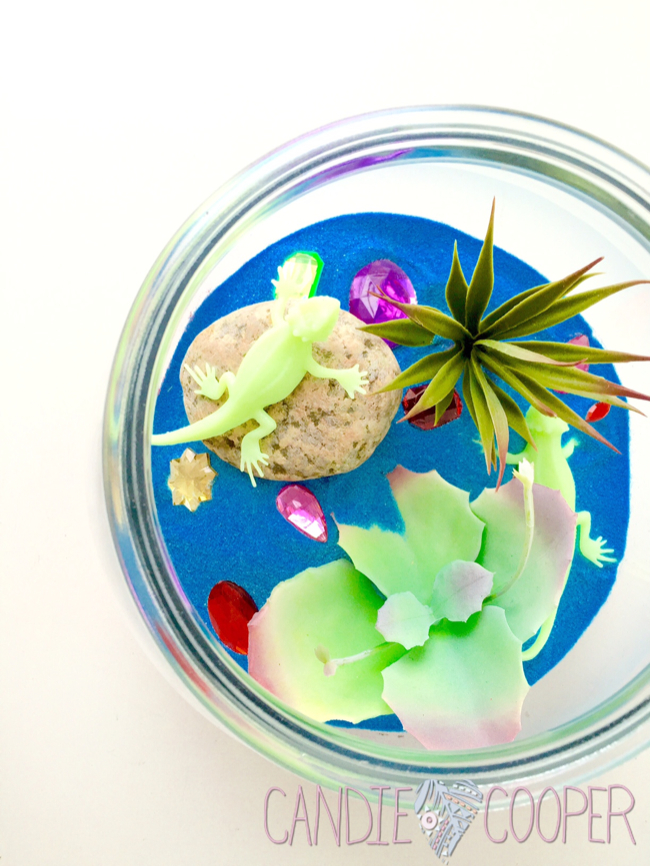
SO fun!  I know this is a kid project, but I had a blast putting it together.
ACTIVA Sand Art Terrarium Kids Craft Idea with glow in the dark creatures9ACTIVA Decor Sand comes in a ton of colors too.  You can find it in the floral section of the craft store or online.
ACTIVA Sand Art Terrarium Kids Craft Idea with glow in the dark creatures5ACTIVA Sand Art Terrarium Kids Craft Idea with glow in the dark creatures1ACTIVA Sand Art Terrarium Kids Craft Idea with glow in the dark creatures3ACTIVA Sand Art Terrarium Kids Craft Idea with glow in the dark creatures6ACTIVA Sand Art Terrarium Kids Craft Idea with glow in the dark creatures7
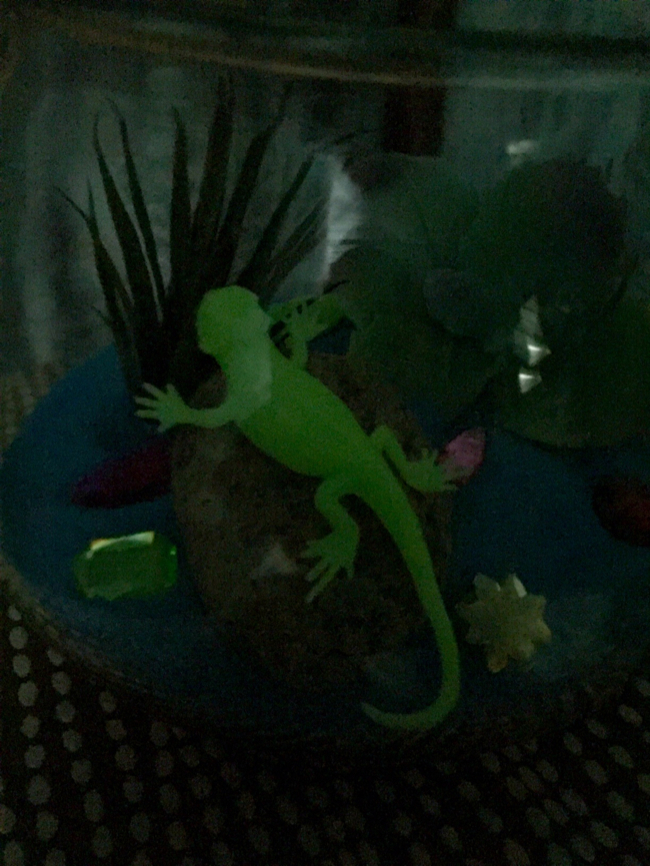
Optionally, you could add a blacklight to make the terrarium glow even more.  Can you tell I’ve really thought about this?

ACTIVA for American made colorful sand.

Until next time!

New Kids Jewelry Craft Videos Available Now!

kids jewelry craft ideaYou guys know I have a passion for teaching children how to make things–jewelry especially because I started making it in sixth grade!  That was practically yesterday (cough-cough, eye roll).

I’m excited to announce one of my new videos with Interweave called Rainy Day Projects:  Bead Crafts with Kids.  These videos take you step by step how to make three projects as well as give you ideas for choosing materials and avoiding craft fails. kids jewelry craft ideaEven though the projects are geared towards kids, I think you might want to make a couple of the projects yourself!  Macrame bracelets with buttons, hammered pendants, and rubber band and bead bracelets.

We all know the pressures that kids are under these days and I always think it’s a good idea to encourage making things with their hands.  Allowing children to be creative, make their own color choices in a positive environment also helps boost their self-esteem.  It’s good for everyone.  I could go on, but I’ll get off my soap box here.kids jewelry craft ideaI hope you’ll check it out at the Interweave Store here.  Thanks in advance 😉

3 DIY Valentine Ideas

3 DIY Valentine Ideas from @candiecooper.I’ve had this project in my stash for almost two years!  It all started when Canson sent a box of their amazing  printable papers.Canson watercolor paperDefinitely the watercolor paper is my favorite to print on, but they come in all sorts of papers.DIY Valentine idea with Canson paperThe first photo I altered in PicMonkey, adding the Polaroid frame.  It came out distressed like this.  So easy to mount with the Canson photo corners onto scrapbook paper.  Then I added the XOXO embellishment.  Sweet and simple.DIY Valentine with photoSame idea here except this time I punched holes around the edge and laced it with chunky yarn.  Lacing.  This simple stitched border makes my heart flutter in all it’s homemade-ness.  Perfect for grandma!Handmade Valentine's IdeaThe last idea is a fave.  My friend sent some scans of a little bug drawing by her daughter, Lily.  I printed them and colored with Koi watercolor markers from Sakura.DIY Valentines with children's artYour kids would have a blast coloring their own art work (obviously)!Hand drawn valentinesBecause these were intended to be Valentines (and that I love layers and hearts and needed an excuse to add more), these little love bugs got a set of heart wings made from scrapbooking paper.Homemade Valentines IdeaMount them on solid paper and you’re ready to rock, Valentine!

Making Halloween Jewelry Crafts with Kids

Halloween Jewelry Making with KidsFor First Friday at the Wabash White House (our little gallery in town), we host children’s creative make and takes and activities.  One of the things we did this month is an easy kids halloween craft making skull necklaces.  I thought you might want to make your own!
Quick DIY Skull Necklace from CandieCooper.comYou’ll need some skull beads, 20g. Artistic Wire, Jesse James Beads, pre-made ribbon necklaces or cord, a hammer and steel block, and some basic jewelry making pliers.
Jewelry making stationWhen working with kids, I like to keep things pretty tidy and organzied so it’s easy to see what we are doing.  Is it me, or are these beads, good enough to eat?!
Skull beadsI buy skull beads at bead markets/festivals, but you can find them in Etsy shops and sometimes in the craft stores.
Hammering wire for jewelry makingUse round nose pliers to twirl the end of the wire around in a spiral.  Hammer the spiral so it stays nice and rigid.
Easy Jewelry Making for Halloween!String your beads!
Jewelry Making Wire wrapped loopFinish the end of the wire with a wrapped loop, attaching it to the ribbon before closing up the loop.  Pipe cleaners would also work for necklace making.  That could be really fun!
Jewelry Making Halloween Kids Craft Idea!
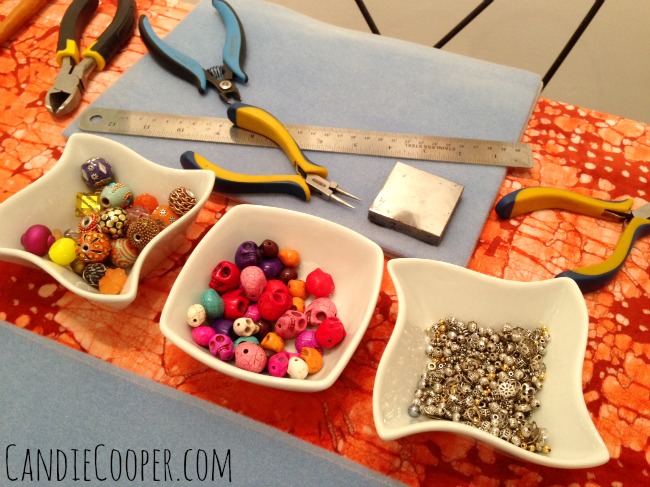
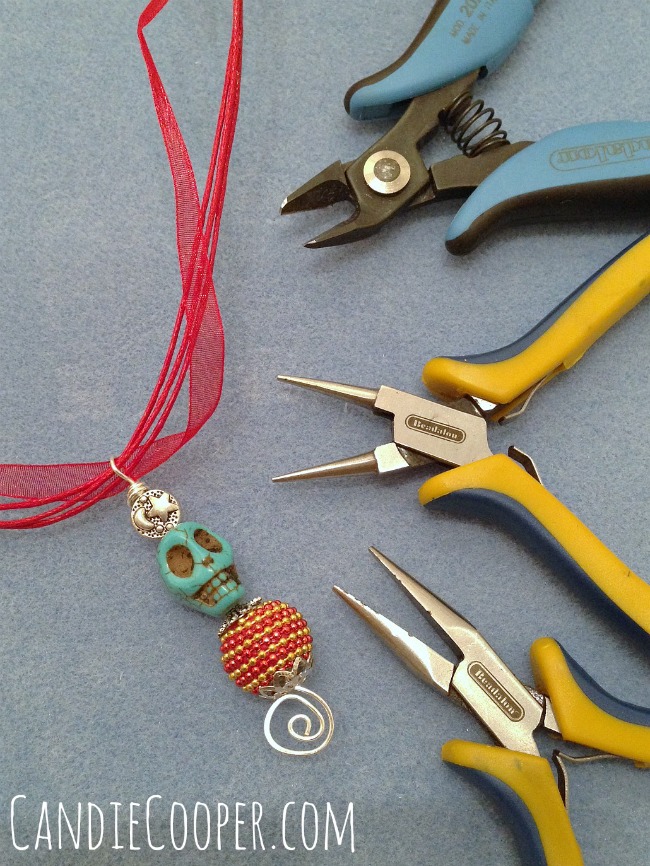
Here’s a closer peek at the tools I used.  Top: wire cutters.  Middle: round nose pliers.  Bottom:  Chain nose pliers.

Check out these cute examples that some of our guests made that night!

Easy Halloween Jewelry Making with Kidsphoto 2-3

DIY Clothespin Fairy Doll Tutorial

Clothespin Fairy dolls from CandieCooper.comWanna know the way to my heart?  Nostalgia.  These little dolls are so sentimental to me.  My mom used to make them when we were little.  I think they were ornaments.  She and I worked this little pair of acorn fairies up together actually.  She paints.  I add the 3D embellishments.  Yin and yang.  It’s a good thing.

For the paints, we used acrylic Folk Art paints and Extreme Glitter.DIY clothespin doll tutorialBase coat the little bodies however you like.  We love denim A LOT, so naturally our boy got denim trousers.  Our girl is outfitted with a ruffly skirt.  Keep it simple.  Or at least try.  We find it very VERY hard to keep it simple.Painted Clothespin doll tutorial from Candie CooperHere’s a detail of those ruffly paint lines sealed with Extreme Glitter paint to add sparkle.  You could also spread Mod Podge onto the clothespin and dunk in glitter if you want more sparkle!  THAT would be pretty.Easy painted faces on clothespin dollsAlso, keep it simple when it comes to painting faces.  Blushy cheeks can be done with a Q-tip and pink paint, while the face could be done with a fine tip pen.  Mother Jean has the steadiest hand this side of the Mississippi so she always does the faces with paint and brush.  My clothespin doll faces would wind up looking more like Tammy Faye Bakker in a rainstorm if I allowed myself to use a brush that tiny with black paint.Make an acorn fairy dollNow comes my part of the party–the embellishments!  Leaves for wings, little acorn cap hats, a few seed beads strung on thread for a necklace, ribbon scarf and skirt, I could go on AND on.Acorn hat on clothespin dollOptionally, you can seal your acorn hats with Mod Podge or clear acrylic varnish so they are nice and shiny.  Actually, the whole doll can be sealed if you like.Clothespin Fairy Dolls from Candie CooperPut it all together and here’s what you get!  You can use tacky glue, a glue gun, or even a kids glue gun to add the embellishments.

How to Make a Button Bracelet

How to Make a Button Bracelet for tweensYesterday around 3pm when I should’ve been writing this post, I decided to skip town and go to a quilt show (and spend all my yard sale money).  Fat quarters are the devil.  They’re so perfectly sized and for someone who loves scrappy quilts, they’re a problem.  I had the best time looking at the quilts and pretty fabrics, leaving mega inspired ready to sew everything.  Never mind, penniless too!AudienceEarlier in the day, I snuck outside to take pictures for this button bracelet tutorial.  It was so pretty and not humid so I had to soak some of that up.  Had to.  No choice.  This is always my audience when making tutorials.  Meet Rocker and Bebe.Button Bracelet MaterialsMaterials for this little button bracelet are from Dress It Up Buttons (found in all the craft stores and lots of independent quilt shops as I learned yesterday), Beacon Adhesives Dazzle Tack, and the bracelet with glue pads from Rings and Things.  The reason I really love this bracelet finding is because you can remove links and make it smaller.

*A word about gluing:  Even though this project looks kid friendly, this adhesive is for grown ups and should be used in a well vented area.  If you want to make it with smaller hands, I suggest a game of “jewelry designer and jewelry manufacturer.”  In other words, grown ups do the gluing wherever the designer tells them to. 😉How to Make a button braceletLay out the pieces along the bracelet.  There are two choices for gluing buttons with shanks:  cut the shank off with heavy wire cutters and glue on the silver disc/glue pad OR don’t cut the shank and glue it so the button uses two silver discs.Jewelry Making GlueThis glue comes out fast!  Less is more too!  My philosophy is, you can aways add more glue, but dang it’s hard to get off when you have it oozing from every angle, on your fingers, etc…etc…  You know what I’m talkin’ about!  So go easy.Kids Jewelry Making IdeaOnce you’re finished gluing, double check no buttons have slid out of place and set this little cutie aside to dry!

Now, I gotta get back to petting my fat quarters (that doesn’t sound right, but you know what I mean).

Have a great day!

<3 Candie

Kids Watercolor Art Project Idea

Paul Klee Kids Art Project via CandieCooper.comI’m just going to start this post off by saying, I just watched the ZEDD concert on #GMA this morning.  He’s only 24.  He had the Central Park crowd so pumped up.  It gave me goosebumps.  But the part that made my eyes tear is when after the song Clarity was over…HE clapped for his audience.  Am I getting old if stuff like this warms my heart?  Gratitude really is beautiful.

Ok, Cooper, get it together.

In my past life, I went to school to be an art teacher.  I never ended up in the traditional classroom, but have always enjoyed keeping my foot in the children’s art world.  I’ve done that through a variety of ways the past few years, designing kids art and craft projects for the industry, teaching at the Honeywell Center (our local art center) and hosting a children’s craft show on PBS.  I’ll show you more later, but the primary focus of the newly renovated White House is to create experiences for children to make things.  Creativity builds self esteem and good for problem solving skills (plus a whole. lot. more).  I want to promote this!  Once a week, I’d like to share a kids project over here on my blog.  I hope it inspires you to make things along side your children, grandchildren, nieces and nephews, bible school groups, or even at lunch time with your colleagues simply to take time to play.

This project requires: Oil pastels, Watercolor paper, a pencil, tube of watercolor pigment, soft large paint brush, a pencil and eraser.

These are the brands I use when making this project.  To be totally honest, I’ve worked with both of the below companies in the past through different projects.  However, neither are paying me to promote them right now.  I use these companies art materials because I know they work.  The paper isn’t going to fall apart if it gets a little too wet and the oil pastels are going to be bright and go on easy.  I also believe it’s better to create within your budget than to not create at all.  Ya feel me?

Here are some Amazon links:

Sakura Craypas and Koi Watercolors

Canson Watercolor PaperPaul Klee Kids Art Project with Water Color and Sakura CraypasThese are a few shots from a class I taught at our local art center.  We worked with about 45 kids at a time in a big gymnasium.  Sometimes I forget to take pictures with all that excitement.

This class started out by discussing Paul Klee’s Sun and Castle.  We talk about what shapes they see and then what they think those shapes might actually be.  I love hearing their answers.

Then they set to drawing their own geometric town or neighborhood or castle or a house (or whatever the painting just inspired them to do).

I’ll insert a video of this project at the end so you can get the full skinny.Watercolor Painting for KidsWe had trays of Craypas on the tables and then one big long table set up with bowls of watercolor wash ready to roll.  You’ll also want to have paper towels on hand in case they want to blot some of the excess wash off.  When it comes to mixing a watercolor wash, I go pretty strong with the pigment/water ratio.  Start with a teaspoon of watercolor and add a 1/3 cup of water, mix and see if you like the effect on a scrap piece of paper.  Adjust if needed.  I store leftover washes in the fridge in tupperware (probably should label them too).  Craft supply hoarders unite!Paul Klee Kids ARt Project ExampleThis class had 5 year olds up to teens making it.  That’s one of my favorite things about this project in that a wide age range loves the art making process.

Paul Klee Kids Art Project Example 2Alrighty–now here’s the video how to.  Message me if you have questions!  Thanks for peeking and happy creating!

And please don’t judge for that Diet Coke I accidentally left on the stove during the video taping. Momma needs her caffeine.