The Leather Scout Bracelet

This post brought to you by LeatherCordUSA.com.
Jewelry Making-leather stitched bracelet on @candiecooper blog
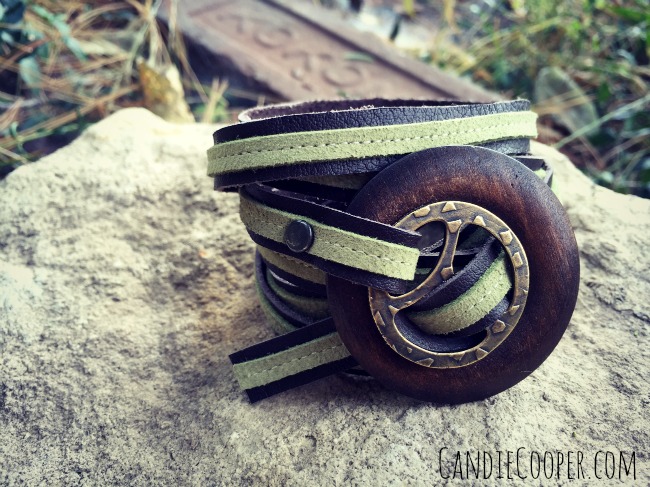
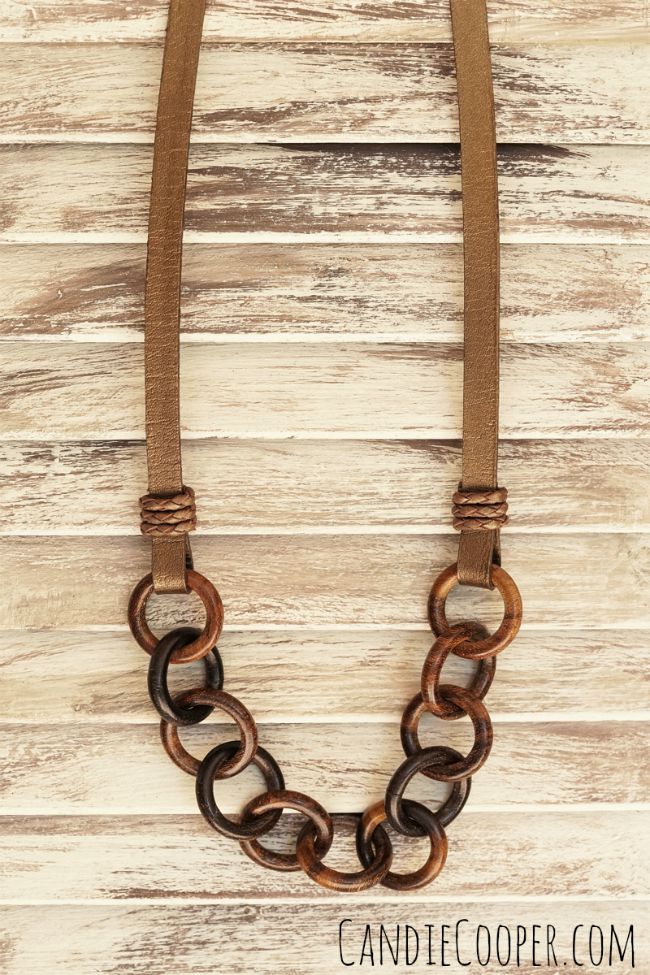
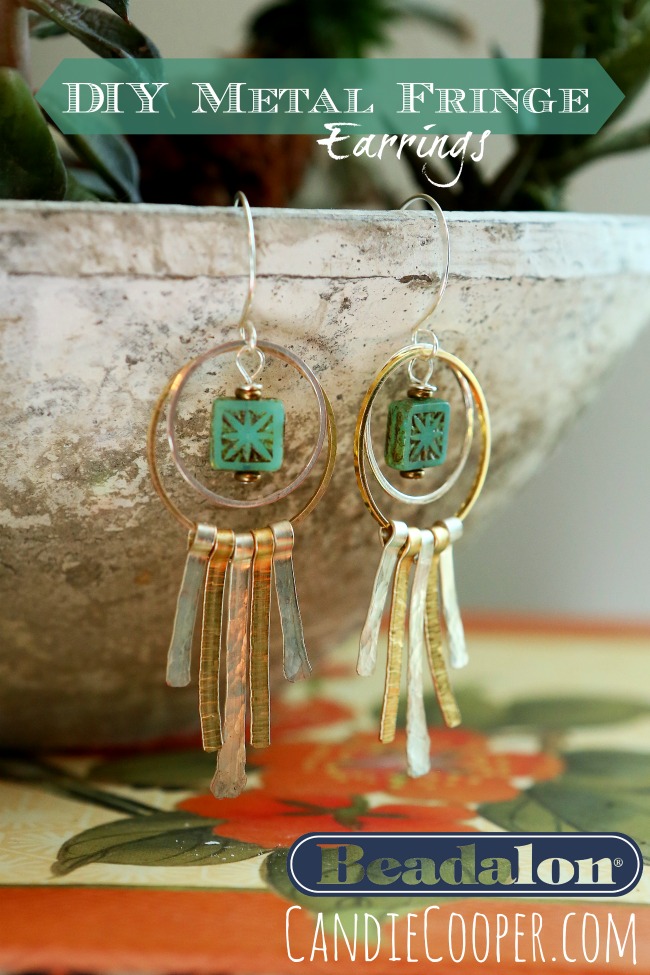
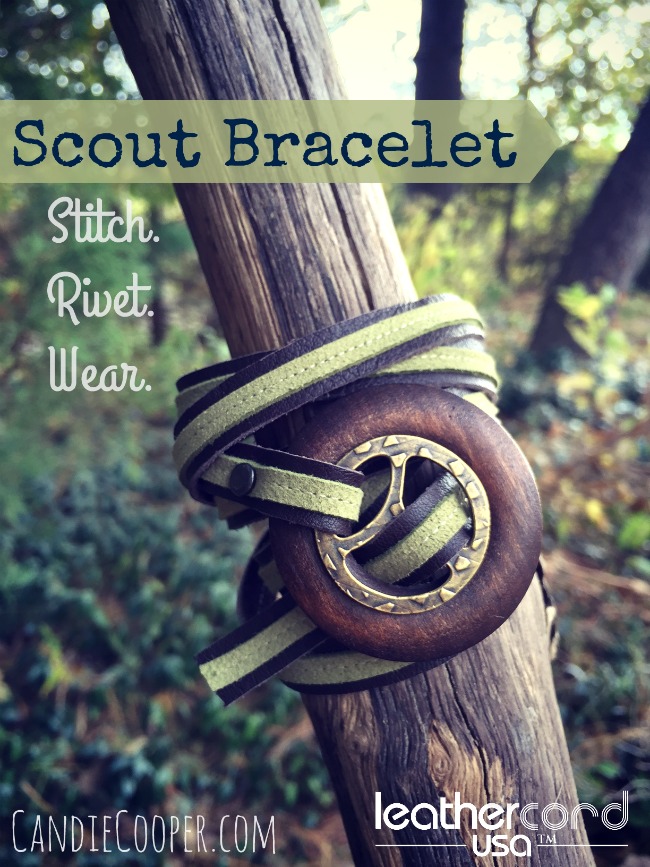
Good morning, campers!  Autumn is here and the mornings are brisk, making that hot coffee taste extra amazing.  I call this the scout bracelet because of the colors, textures and the fact that it seems kind of multi-purpose:  you can wear it as a bracelet, a necklace, or tie the tent pulls together (you know, if you need too).
LeatherCord USA leather
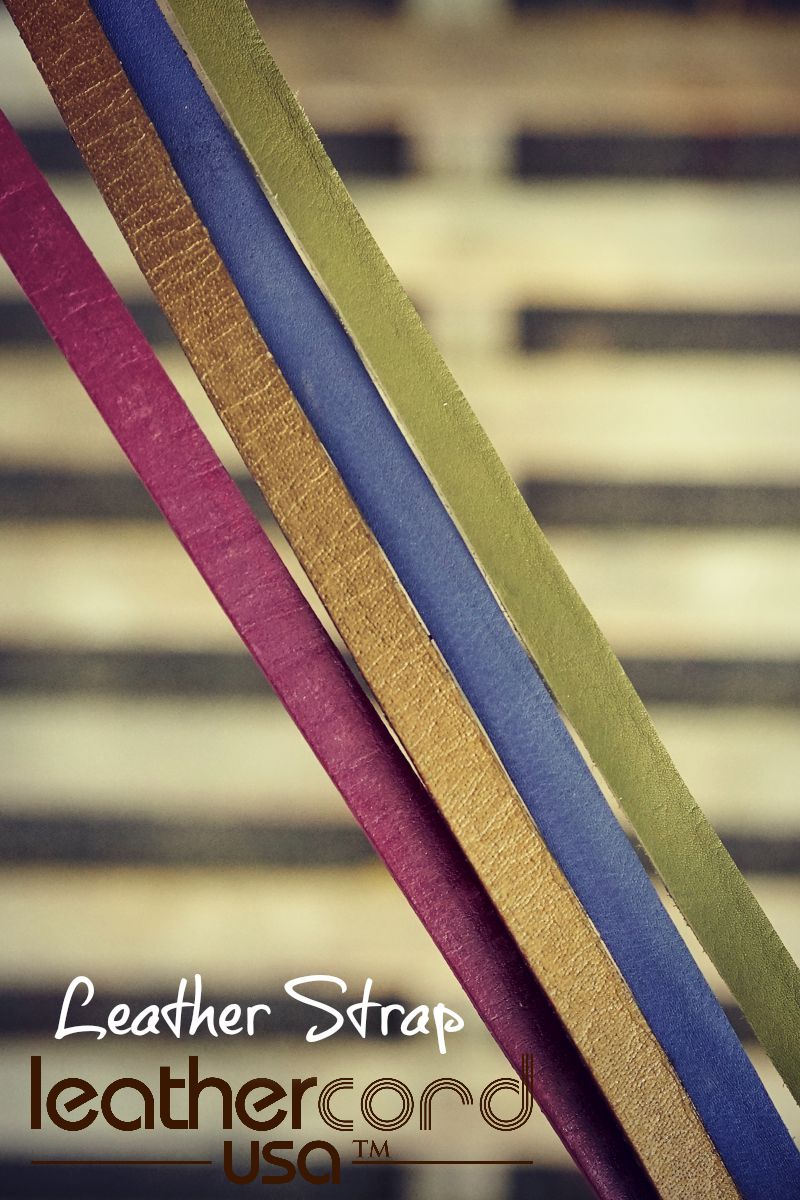
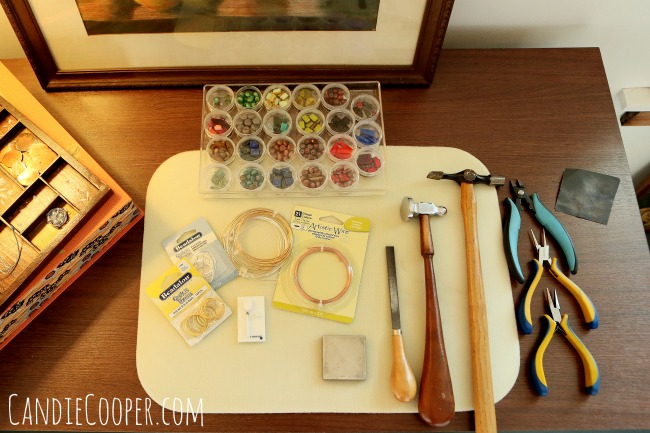
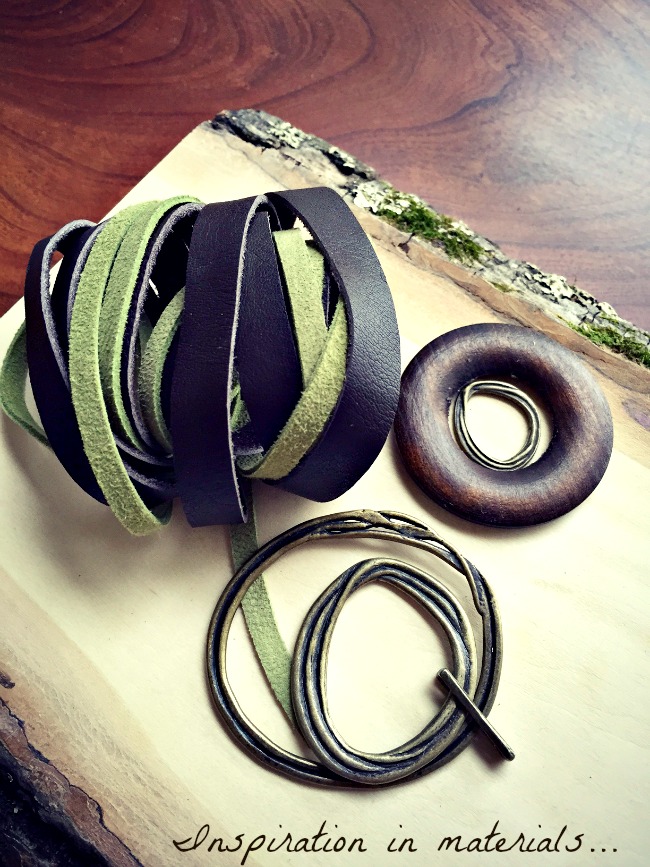
Where do you find inspiration?  For me, it’s often in the materials.  I was collecting and gathering things around my studio to use with the LeatherCord USA  suede and 10mm wide deertan lace.  It comes in a ton of colors, but this green and brown combo was perfect for a fall statement bracelet.
Jewelry Making  Stitching on leather - Steampunk Jewelery
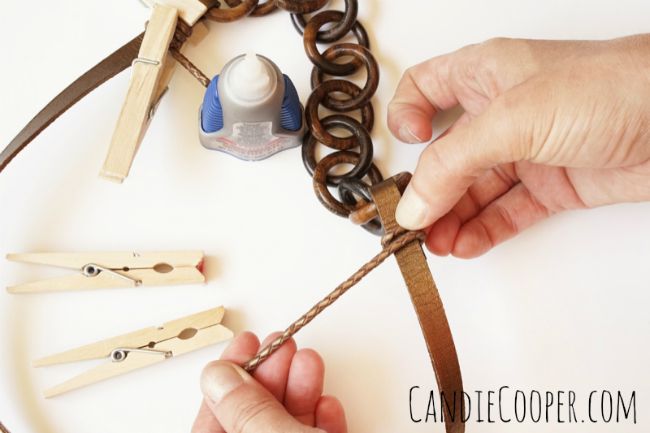
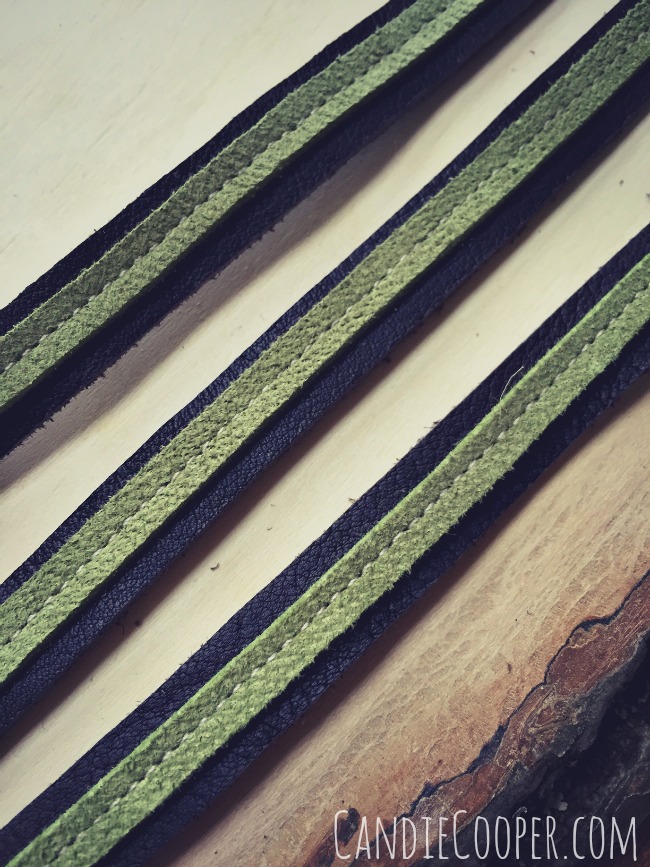
I really didn’t want to cut this nice long piece of lace so the first thing I did was experiment with stitching the two leather types together.  The pair has a nice contrast with the matte suede and smooth deertan lace surfaces.
Sewing on leather with LeatherCord USA strap and suede
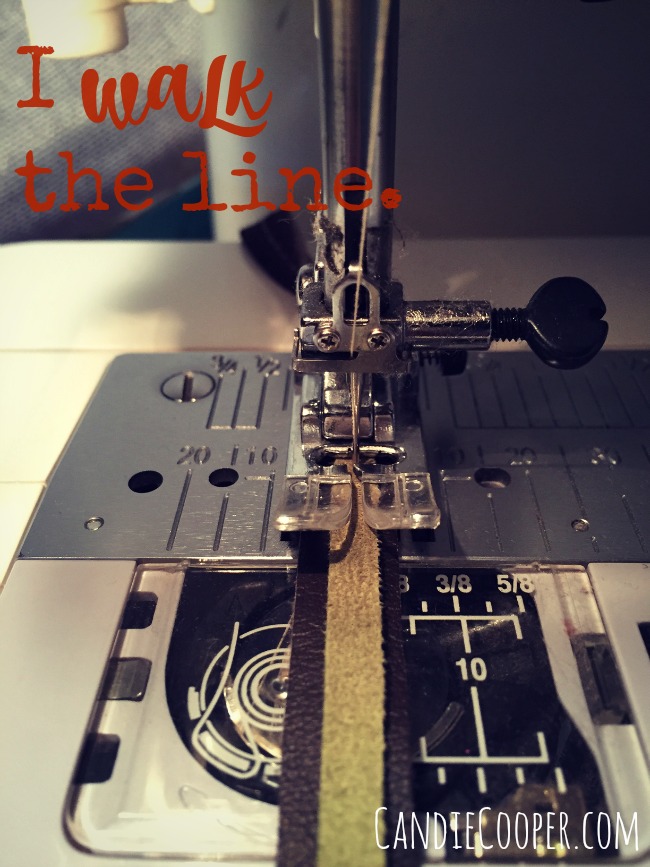
Not going to lie—it was tricky keeping the leather and stitches in the center.  I slowed the machine to “as slow as it would go” speed.  This is an all purpose needle, but I plan to put a new one in before I start piecing fabric together again.  After a yard of sewing leather, it’s sure to be dull.
Making a leather bracelet with a rivet and buckle
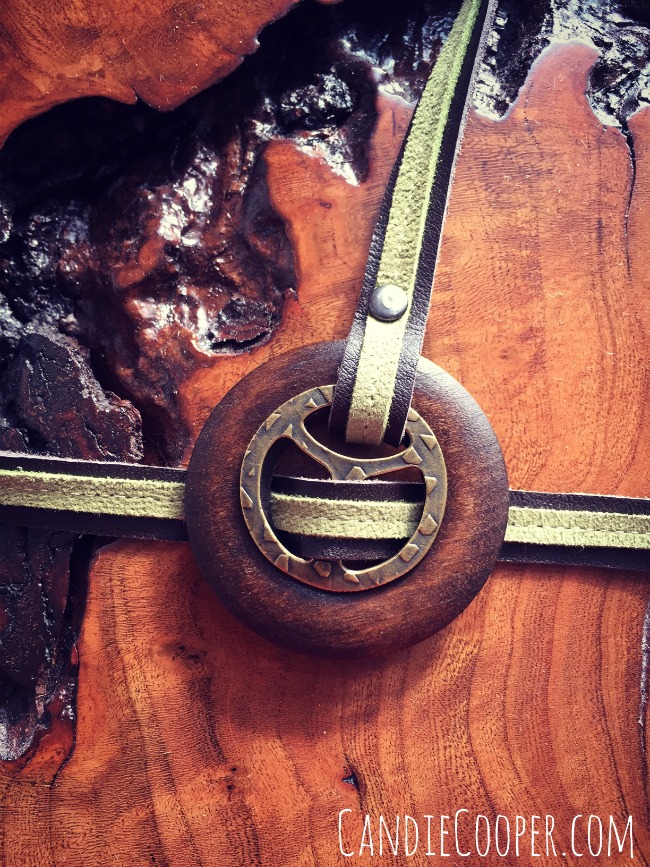
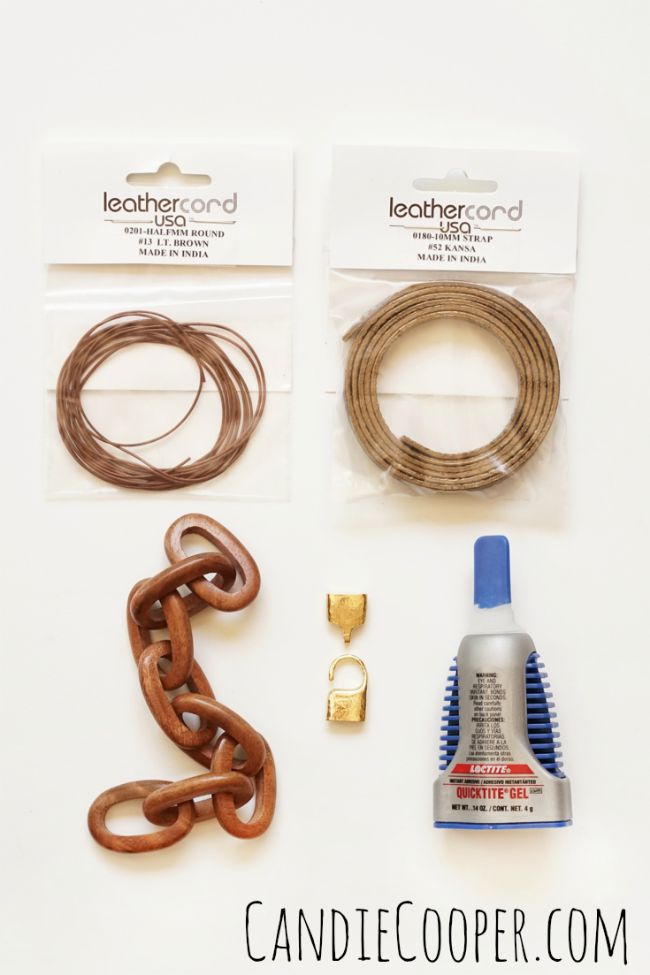
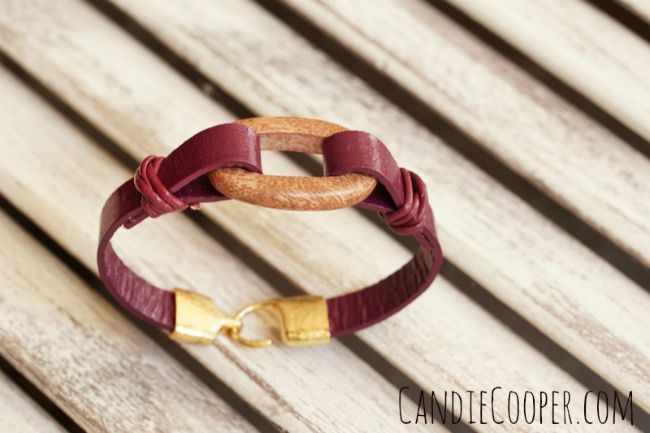
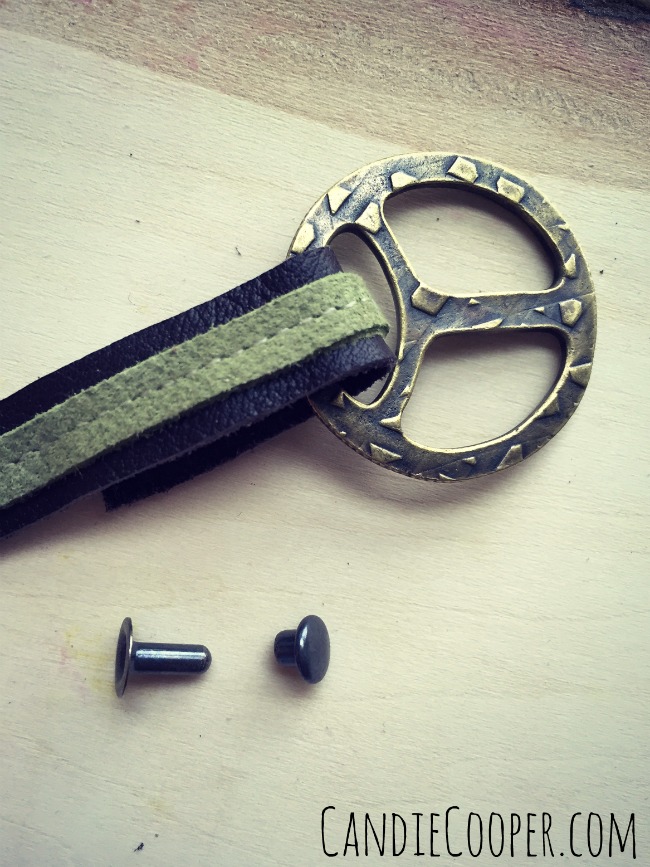
Not in the photo is this buckle clasp and rivet from Tierra Cast.
Riveting Leather in Jewelry Making
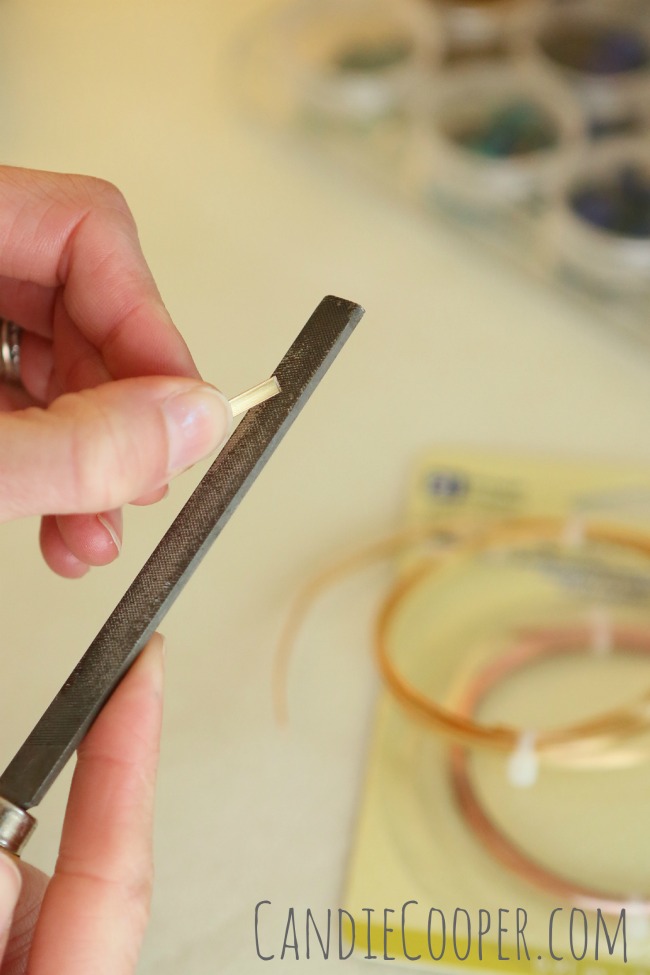
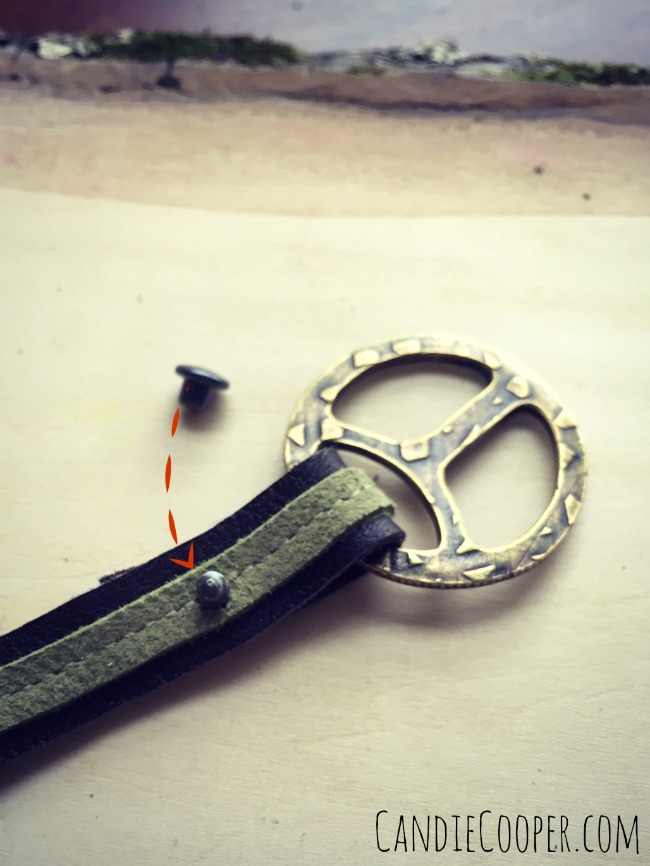
You’ll need to hole punch the leather so it fits perfectly with the rivet diameter.  Put the skinny part in through the layers back to front and top with the mushroom piece.
Riveting leather together how-to
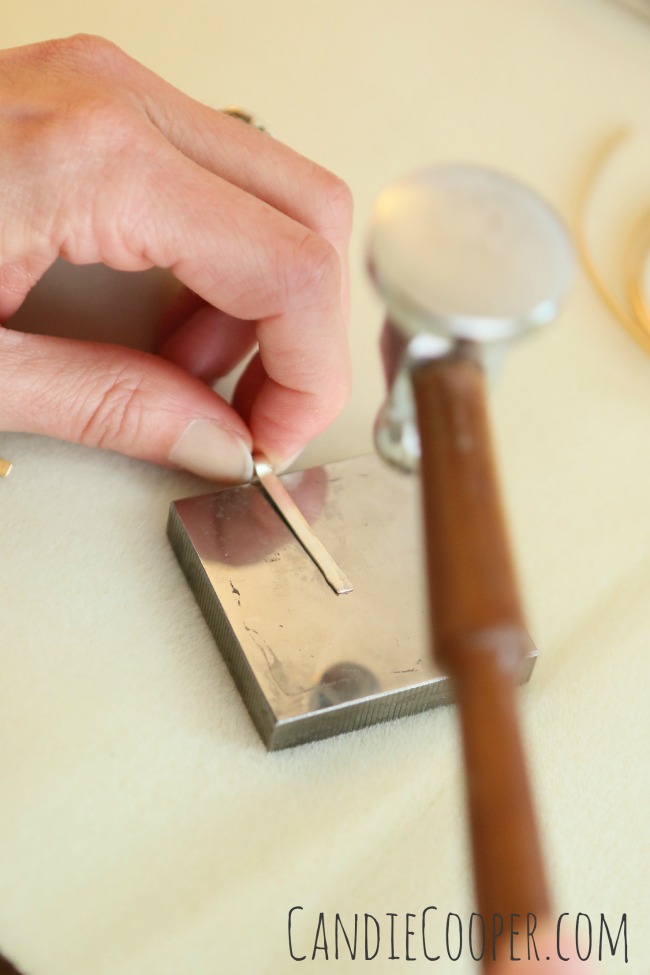
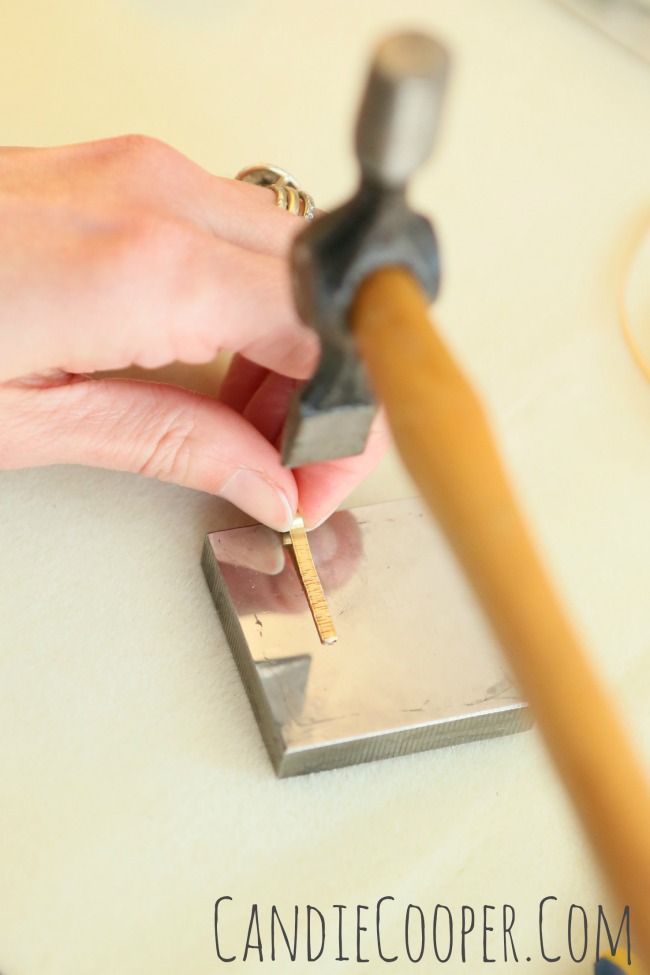
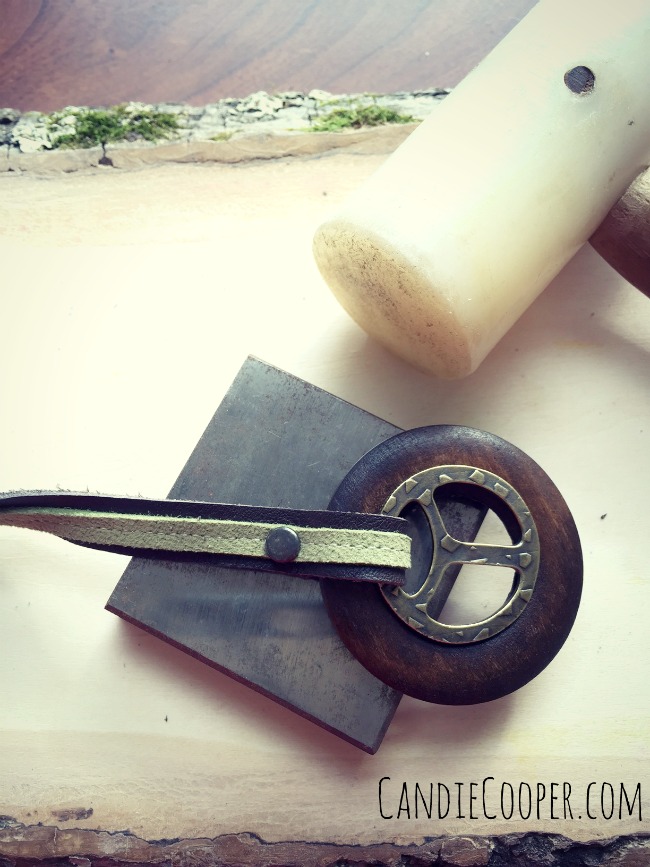
I changed the buckle piece up a bit by adding the wood ring to make the bracelet a little more chunky.  Place the rivet section on top of a steel block and tap the top of the rivet with an eyelet setter or simply a plastic mallet.

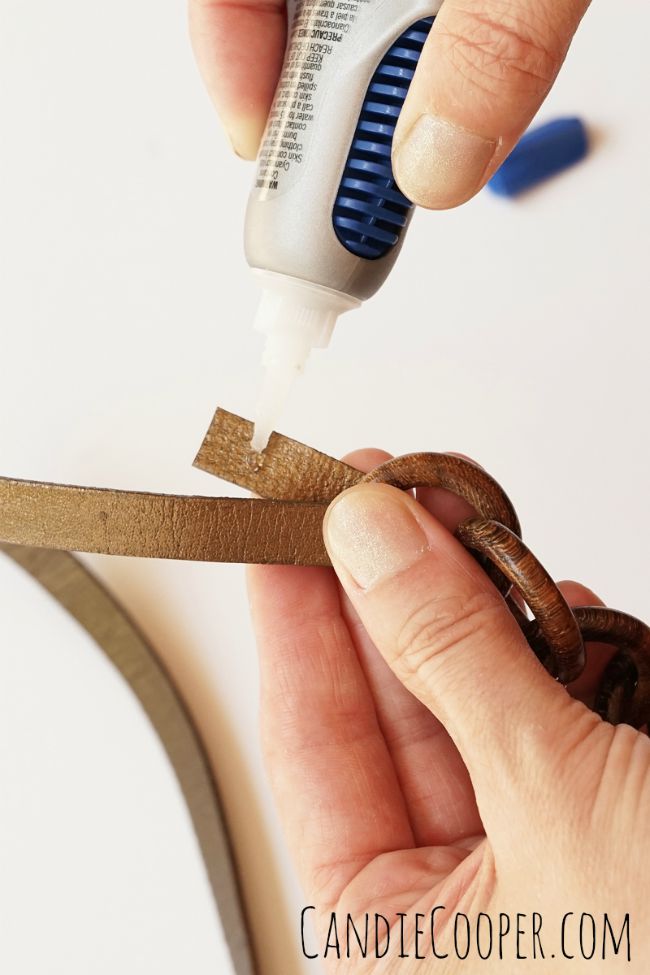
Tip-seal the back side of the leather at the end with Fieblings Leather glue to keep the stitches from unraveling.
Jewelry Making-Wrap Around leather bracelet
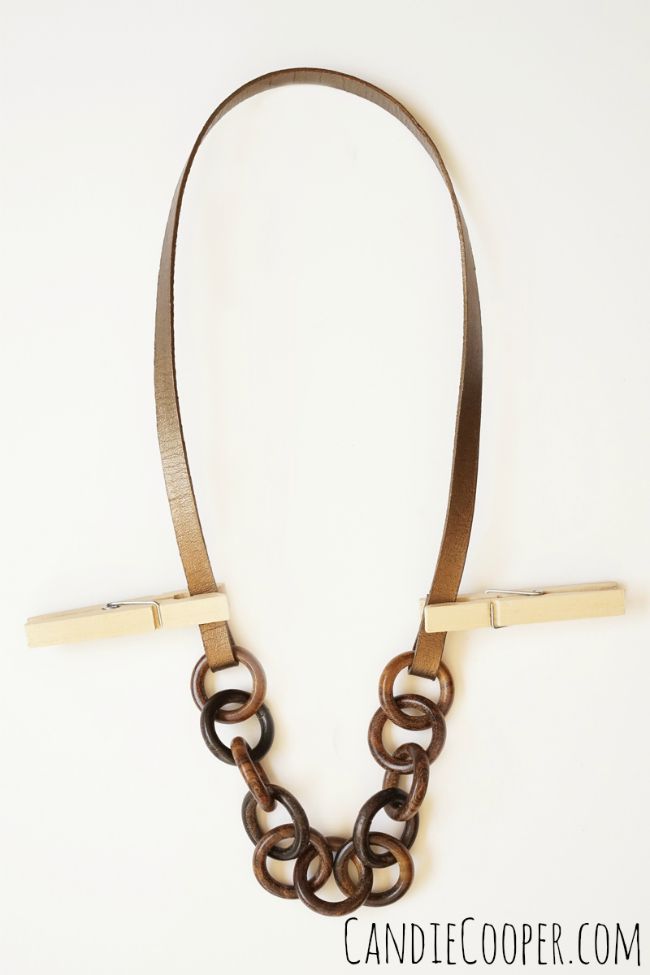
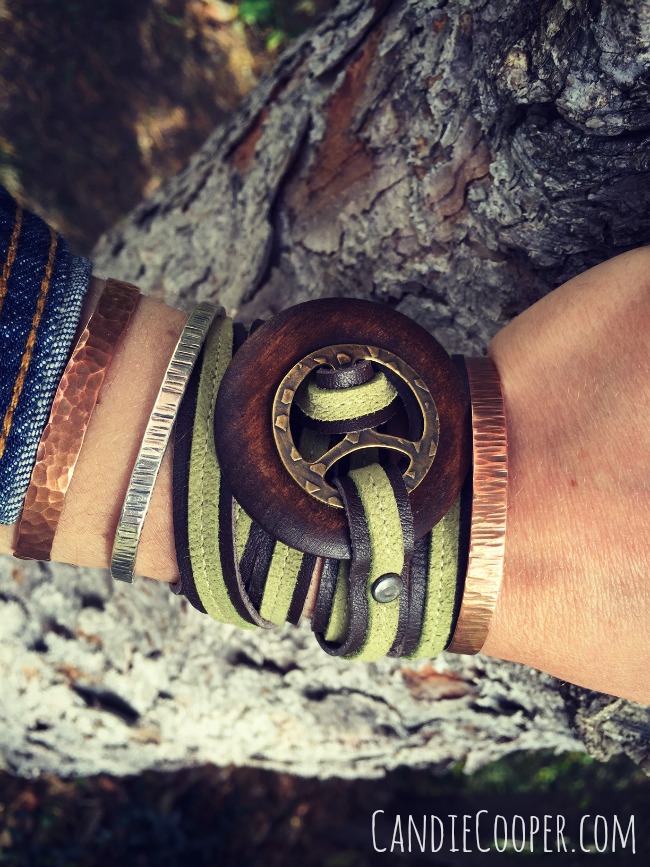
Wrap and roll.  I love lots of wraps, but you could do a couple and trim the leather exactly how you want.
Steampunk Jewelry Idea with leatherLeather wrap around bracelet with LeatherCordUSA.com leather
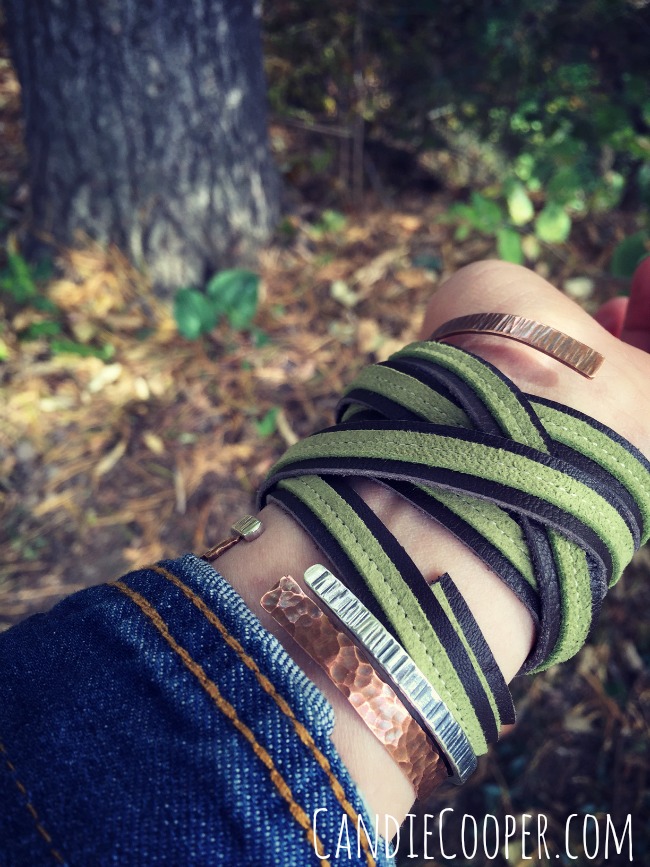
Did I mention I love lots of wraps?
Steampunk Jewelry Idea-Wraparound stitched leather braceletHere’s another experiment with zig zag stitching and colorful leather.  Only a couple wraps here…and you don’t have to “walk the line” while sewing!  For the free spirits in my life.
The Scout Bracelet- Steampunk Jewelry IdeaThis would make a great steampunk jewelry accessory piece too.

Visit LeatherCord USA for great leather products and more ideas.
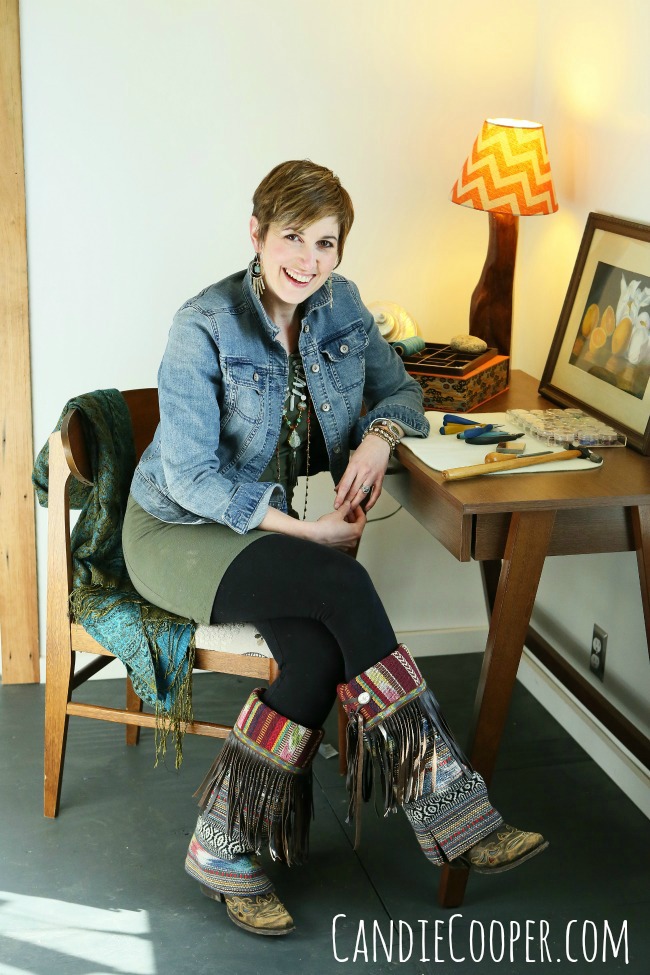
DIY Leather Jewelry

This post brought to you by LeatherCord USA.DIY Leather Jewelry with chunky wood chain  LeatherCordUSA.comLet the good times roll for it is THE weekend!

High fives!  WE made it!

How about another quickie project featuring LeatherCord USA Leather Strap and Bolo cord?LeatherCord USA Leather StrapLeather strap is the main part of this project and LeatherCord USA makes it in a ton of colors.  That’s one of the reasons I love these guys.  For this project I played with the metallic “Kansa” color.  It’s a stiffer leather and softens the more you wear it (like all leather).

LeatherCord USA DIY Jewelry Making with Leather Strap and Bolo Cord MaterialsThese are the basic materials.  Pretty simple:

Leather Strap in Kansa

4mm Bolo Cord in Kansa

Chunky wood chain (or any large link chain)

Adhesive

Somewhere in my excitement I forgot to put the bolo cord into the shot.  I used round cord and the Glue and Go clasp pictured for the pink bracelet variation.LeatherCord USA DIY Jewelry Making  Connecting  Strap to Wood ChainThis is so easy.  I think I’m in love.  The first thing you do is cut the chain with heavy duty wire snips to the desired length.  Then figure out how long you want the strap, add a couple inches and cut.

Thread the strap through one end of the chain and fold it over one inch.LeatherCord USA DIY Jewelry Making  with Leather StrapAdd a drop or two of glue and use clothespins to hold it together while the glue sets up (like in the previous photo).LeatherCord USA DIY Jewelry Making  Metallic Bolo Cord and StrapWrap a few inches of bolo cord around the connection area to add a little something.  You know!  Use the same glue and clips to hold it in place while it dries.  Trim any excess bolo cord after it dries.DIY wood and leather chain necklaceDIY Jewelry Making  LeatherCord USA  Leather and Wood Chain necklace from Candie CooperDIY Leather Strap bracelet  LeatherCord USA  CandieCooper.comJust for fun, you can make a bracelet with pretty much this same technique.  I used the round cord to create a spiral knot instead of wrapping it with bolo cord.  Here’s a link to a spiral knot tutorial from LeatherCord USA.  If you love that clasp–there’s a link to it up in the materials.

Happy weekending y’all!

Just For Fun-Rose Opal Earrings

DIY Earrings from @candiecooperYesterday the rain hammered down on the roof.  I did a bit of housecleaning, picked up some nice things to eat for dinner and then surrendered to the couch.  Oprah’s channel was having a “Where Are They Now” marathon.  I’d never seen it, but watch one episode and you’re hooked.  Seven hours later….  LOL  There were lots of other things I could’ve, should’ve been working on, but instead I just spaced out.  I think I was in need of some couch potato time after working the last two weekends.

I feel better.

Now about these earrings…  Remember those sparkle statement bracelets I made awhile back?  I made some earrings with the same findings.   SO EASY!  You can whip them up in 5 minutes.  Great for DIY brides and party goers.  This is especially on my brain because I’m off to a bridal shower at noon.DIY Rose Opal Earrings

DIY Sparkle Earrings from @candiecooperMaterials from Jesse James Beads:

TUTORIAL

Rose Opal Chain

1 set 13mm Slide Connectors

Ear Wires

Check out the tutorial bove.  For the earrings, remove the clasp findings from the slide connectors.  Slide in chain and trim to desired length.  Open the ear wire and string the focal piece.

Aluminum Fabric Earrings

This post brought to you by Beadalon!Beadalon Break 2015-a week full of DIY Jewelry Making  tutorialsDay 4, Party People!

And that calls for some earrings that are ready to party!  Or go to work.  I like them for both!Aluminum Fabric EarringsOh hey gold and silver.  It’s Candie calling.  Wanna hang?

Sorry,

for the pun.

This girl can’t help herself!
Earring making with Beadalon findings

These earrings are super simple (it is hump day after all) to make.  I used two pieces of Beadalon Aluminum Fabric, Swarovski crystal charms,  a few inches of chain and some cool ear wires from Beadalon.Artistic Wire Aluminum Fabric From BeadalonAluminum Fabric comes in 3 different metal colors as well as sizes.  I’m using the squares.  It is super flexible and really does drape and fold like fabric.

On another note, you’ve probably noticed gold is trending right now and I think you’ll love the warm tone of the gold Aluminum Fabric.  Aluminum Fabric by BeadalonI was looking at this Aluminum Fabric and noticed the back side (on right) is just as cool as the front.  It could be extra nice embedded in resin jewelry or with tiny flat back crystals .Attaching chains with a jump ringCut a couple pieces of chain so they are offset and attach to a tiny jump ring.Aluminum MeshRemove the corner piece of Aluminum Fabric, leaving only a ring where it will hang from.
Easy Earring idea with Beadalon Aluminum Fabric and Swarovski CrystalsHang the pieces of chain and aluminum fabric onto the ear wire.  I love these ear wires because the connection point is hidden. so it gives a really nice finished look.

Also, look how many things you could hang on the loop?!  The wheels are turning…  Stack em’ up!Easy and Sparkly Earring Idea on Candie Cooper's Blog

Aluminum Fabric EarringsI’m ready to hit the dance floor! Who’s with me??

How to Make Easy Ear Wires

This post brought to you by Beadalon!Beadalon Break 2015-a week full of DIY Jewelry Making  tutorialsAnd here we are on Day two of Spring Beadalon Break!

Let me cut to the chase:

My name is Candie Cooper….Candie Cooper, jewelry artist and authorand I am absolutely obsessed with fringe (and jean jackets, but that’s a story for another day).

Have been for awhile, but lately with the fashions it’s gotten extra bad.

So, in this post I’m going to get you to come on over to the dark side and show you how to make fringed metal earrings with Beadalon Artistic Wire as well as how to make easy ear wires with their new Artistic Wire Findings Forms.

Shake it if you got it!

Let’s go!Metal Fringed Earrings from Candie Cooper with Beadalon productsThese earrings go together so fast and you can make the metal fringe as loooong as you like because we are actually using a coil of flat Artistic Wire.How to Make Ear Wires with Beadalon productsMaterials list from Left to Right:  Beadalon Quick Links in gold and silver colors (25mm and 20mm diameter),  20g. silver plated Artistic Wire, Artistic Wire Ear Wire jig, Flat Artistic wire in gold and silver, steel bench block, file, chasing hammer, riveting hammer, Ergo jewelry making plier set, sand paper and a few beads and head pins.Artistic Wire earringsLet’s jump into making the fringe.  Make a loop at the end of the flat wire with round nose pliers.  Trim to the desired length. Flat Artistic Wire You’ll need five pieces per earring so you can decide what colors and lengths you like.  The wire cuts easily with regular wire cutters.Making metal jewelry with Beadalon's Artistic WireFile the corners on the bottom for obvious reasons.Texturing metal with a chasing hammerHammer time!  Hammer the wire pieces on a steel block with the chasing hammer to create dimples on the surface of the metal.  I like to hit the ends extra so it flares them a bit.DIY Metalworking with Beadalon's Artistic WireThis is traditionally used as a riveting hammer.  They make special hammers shaped like this for texturing too if you really get into this.

Now I want to show you how to make easy ear wires!How to Make Consistent Ear Wires with an Artistic Wire jig from BeadalonThis handy dandy Findings Forms jig from Beadalon makes DIY ear wires a breeze.  This one is especially cool because it makes long legged ear wires so you can change the ear wire to suit your design.  For this project, I just need some good ol’ fashioned French ear wires with a slightly larger loop than traditional ear wires have.DIY Jewelry Making How to make ear wiresOnce you’ve wrapped the 20g. wire around, trim the back and pull the ear wire from the jig.DIY Jewelry Making  Making Ear Wires with an Artistic Wire jigLike I mentioned earlier, because of this long leg, you could also add a bead or do an easy wrapped loop closure.  Trim the front…How to make ear wires with 20g. wireand roll it back to create a large loop.  To add some extra strength to the ear wire, hammer the top arched part on a steel block to harden the wire.Making Earrings with Metal Fringe and Quik Links from BeadalonNext open up all the fringe pieces and connect them to the large Quick Link.Making Coachella Inspired Fringed EarringsI created a little Czech bead dangle to hang with my layered hoops.  A little color never hurt anybody!

How to make earrings from Candie Cooper with Beadalon Artistic WireDone and done!

Candie Cooper JewelryTwo metal color jewelry makes me HAPPY!

DIY Coachella Inspired Earrings from Candie Cooper

CandieCooper.comNow go on with your bad self!

I’ll see you tomorrow with another tutorial!


Stone Fringe Necklace

This post brought to you by Jesse James Beads.DIY Stone and Leather Statement Necklace from @CandieCooper #JewelryMakingPurple Rain….sing it with me, people!

No doubt, I am hooked on these fringe focal bead pieces from Jesse James Beads.  They come in a variety of colors and stone types, ready to string into statement necklaces and I’m going to show you an idea for how to use them in your jewelry making.Autumn leavesBut before we get going, I have to show you this leaf blizzard happening in our front yard.  I’m not complaining because I love wading through leaves.  Hopefully the mailman feels the same.

Really, the colors of fall are so inspiring, aren’t they?  That’s where I found the inspiration for the color pallet in this necklace.  Ambers, plum, sparkly orange and rust, it all works together.  Take a peek.Stone beads from JesseJamesBeads.comYou can find all of these magical beads in a kit ready to make right here from JesseJamesBeads.com!Beading materialsYou will also need: crimping pliers, wire cutters, Beadalon beading wire (19 strand, .018 diameter), perhaps some bead stoppers, #1 crimp beads, a piece of leather (8″) and that should do it.  You can find these fine tools and supplies also on JJB.com.How to make a beaded loopString your focal beads separated by hematite beads (I used 3).

String 2 crimp beads, 1 hematite bead,  2 small round beads, 3 hematite beads, round bead, 3 hematite beads, round bead, hematite beads, 2 round beads, hematite beads, round bead, hematite beads, round bead, hematite beads, and round bead onto the wire.  Thread the wire through the first round bead, hematite bead and crimp beads.  Cinch up the loop and  crimp.How to make a statement necklace wtih @JesseJamesBeadsSlide the beads to the finished end and repeat, making a second beaded loop.Jewelry Making tutorial with @jessejamesbeadsSecure a new wire to the middle of the beaded loop by crimping and string the sides in desired order.@JesseJamesBeads necklace tutorial from @candiecooper

Make a loop at the end of the beading wireFinish the ends with small loops, just big enough for the leather to fit through.Leather clasp idea for jewelry makingThis is a nifty closure that I’m also hooked on.  I don’t know why I don’t get the leaves raked?  Thread the leather through both loops and tie in a bow.  How about that easy and unique clasp solution!Jewelry Making Necklace tutorial from Candie Cooper

DIY Stone statement necklace

Stone necklace from Candie Cooper and Jesse James Beads #jewelrymaking

#jewelrymaking tutorial via @candiecooperDon’t stop here–You can attach leather, chain or ribbon to the sides of this focal front piece too!

We’re watching The Voice tonight so if there are typos or errors in this post, please direct complaints to Pharell and Blake Shelton.  Ok?  Ok.

Hammered Metal Earring Tutorial

Jewelry Making  Candie Cooper Hammered Earring TutorialThis is a quick tutorial of the earrings I taught on the Country Music Cruise for Beadalon (makers of great jewelry findings) and Jewelry Television.  One of the things I love most about them is that you can take pre-made findings like Beadalon’s Quick Links and alter them with a chasing hammer to make them your own.  Here we go!
Jewelry Making Texturing with a chasing hammerYou’ll need a steel block and chasing hammer for this step.  The steel supports the metal so that it can take the imprint of the hammer’s round end to make a planished texture.  This is by far one of my favorite things to do in jewelry making!  Just.  Beat. It.  Beat it.
Jewelry Making How to open a pinch bailHere we have a pinch bail.  Use chain nose pliers to open up the bail.
Jewelry Making Closing a pinch bailAttach it to a Swarovski drop crystal so the prongs on the bail go in the holes of the crystal drop and then pinch the bail closed.
Jewelry Making  How to open a jump ringUse two pliers with flat ends to open a jump ring like so.
Jewelry Making  Connecting with a jump ringConnect all the layers of rings and charms.
Jewelry Making  Sparkly Earrings with Beadalon FindingsClose the jump ring how you opened it.
Jewelry Making Connect the earwireUse a second jump ring to attach the first jump ring to the ear wire.  SO fast to make!!  Hello, Christmas presents for everyone you know!
Candie Cooper Textured Earrings How ToSweet.  Sassy.  Romantic.  Just the way I like my earrings as you know!