Stone Fringe Necklace

This post brought to you by Jesse James Beads.DIY Stone and Leather Statement Necklace from @CandieCooper #JewelryMaking
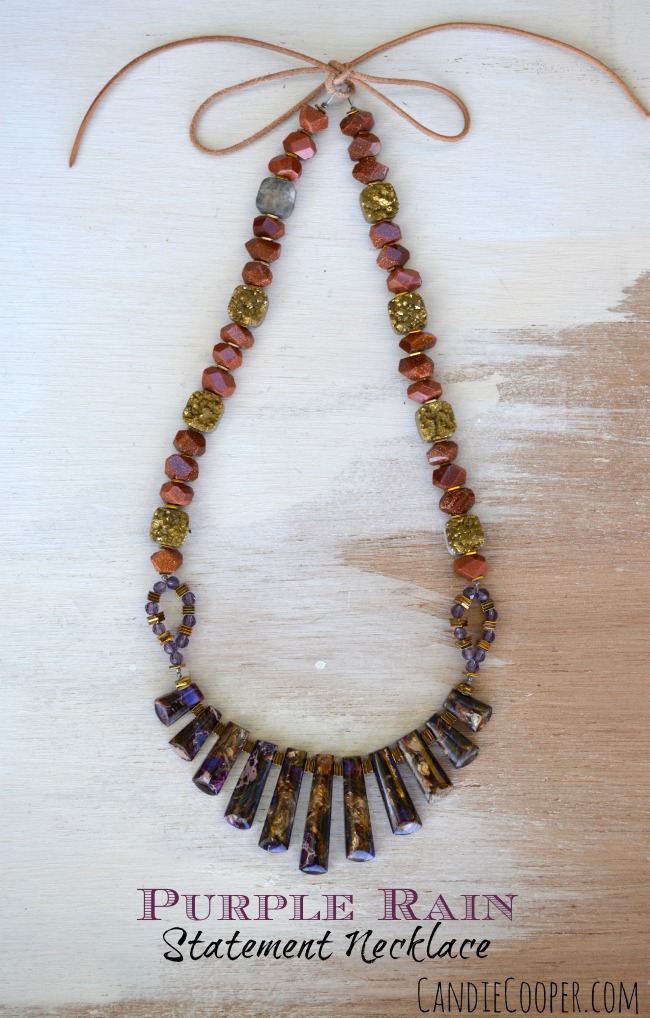
Purple Rain….sing it with me, people!

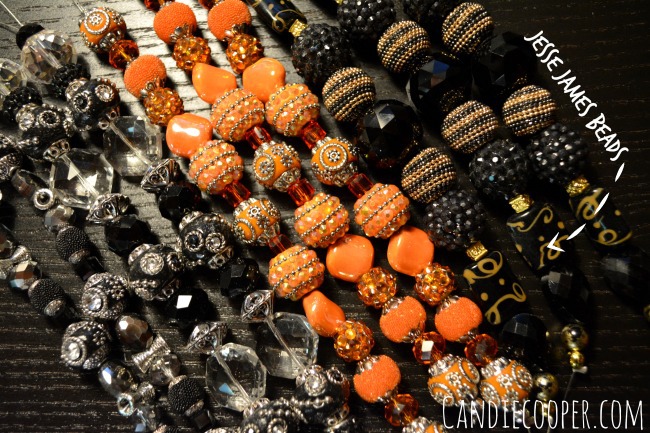
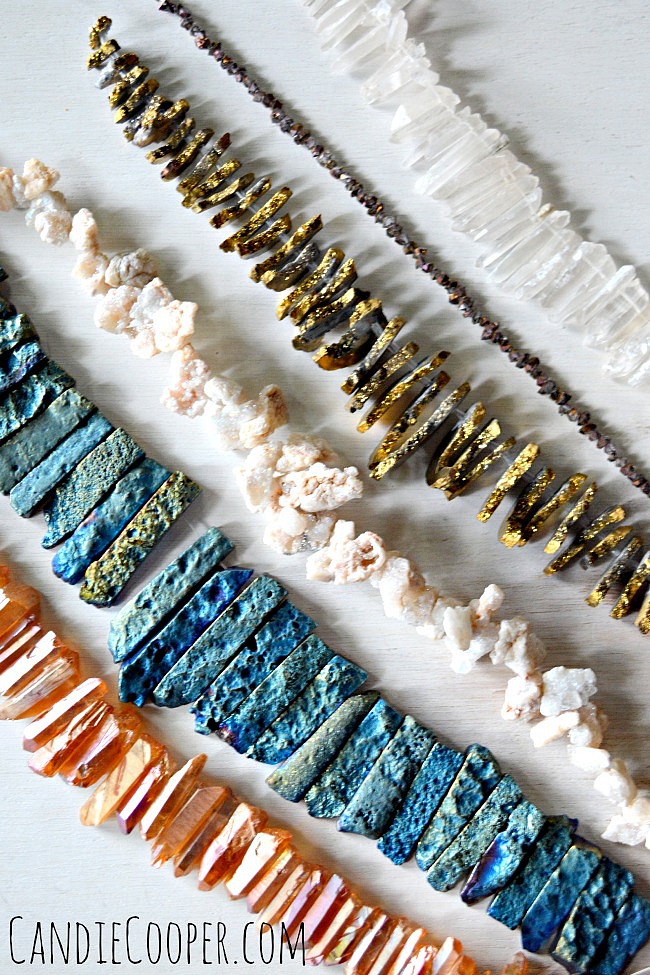
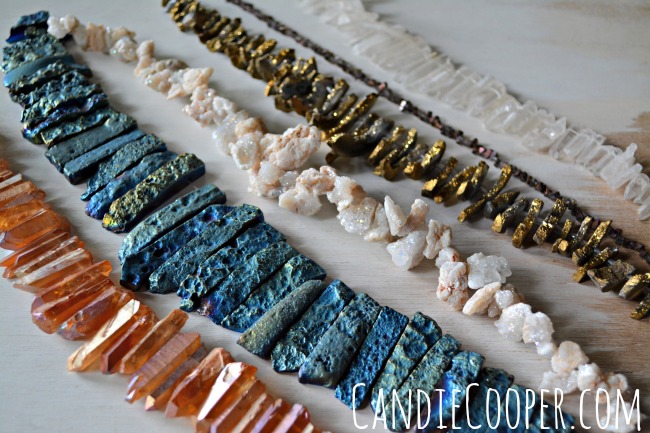
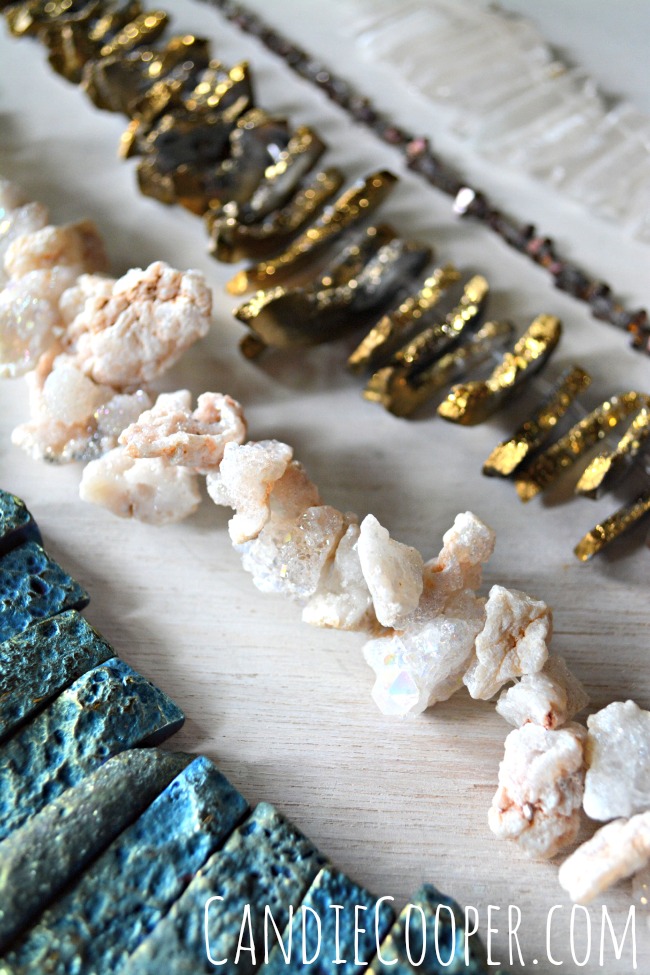
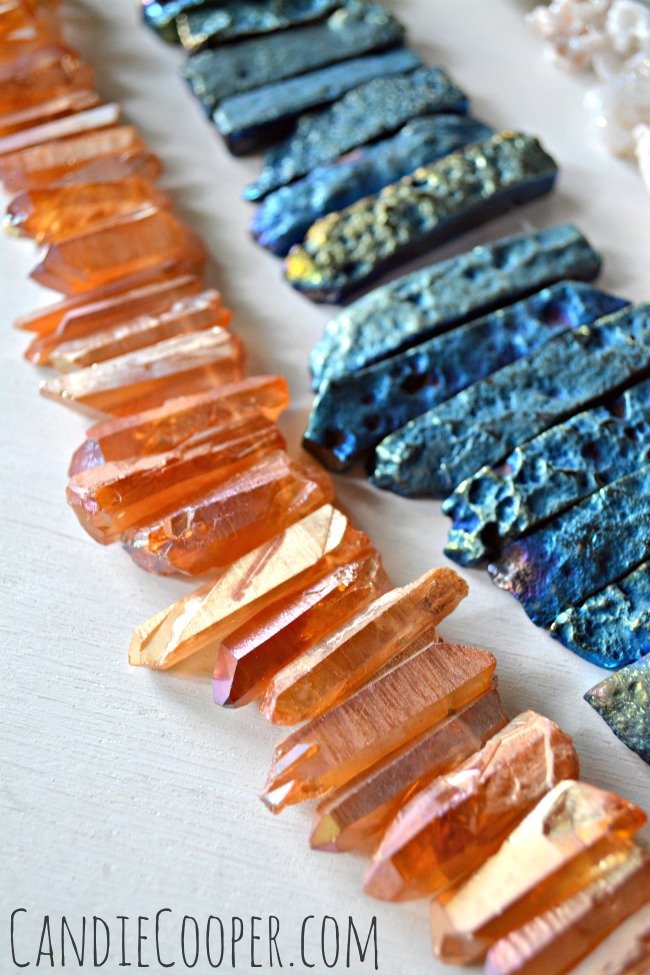
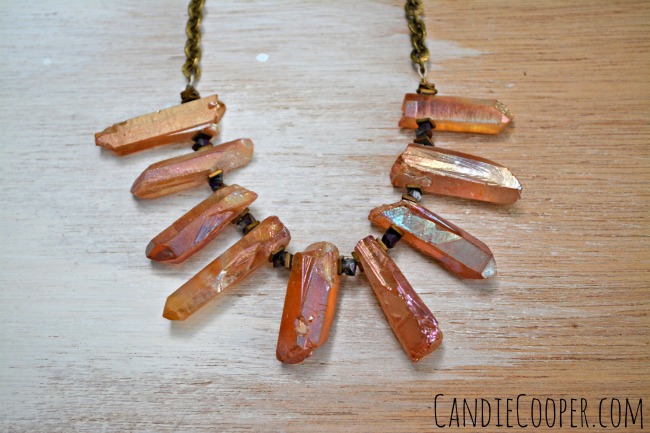
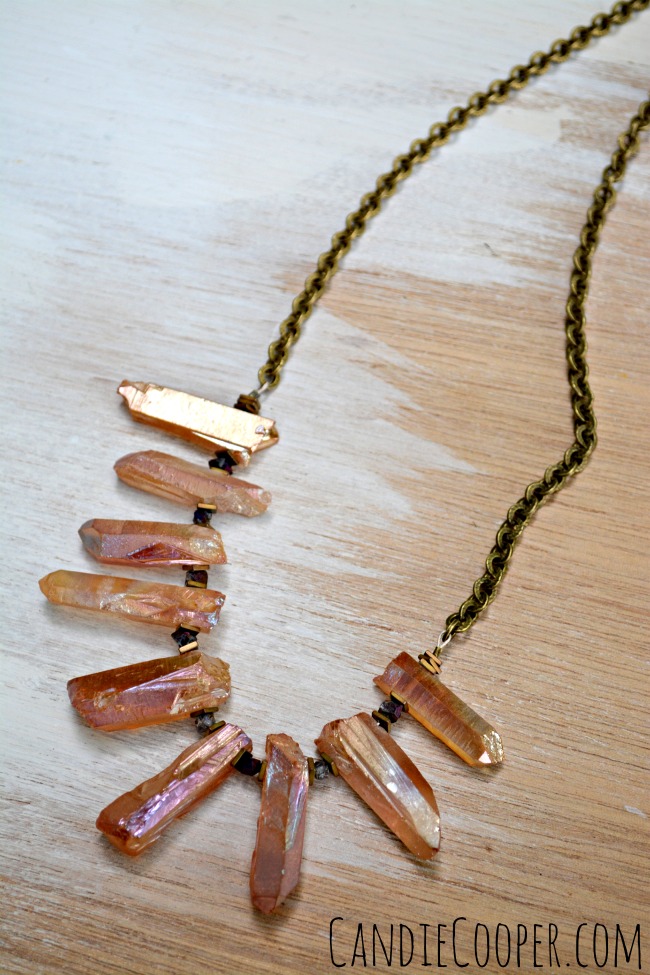
No doubt, I am hooked on these fringe focal bead pieces from Jesse James Beads.  They come in a variety of colors and stone types, ready to string into statement necklaces and I’m going to show you an idea for how to use them in your jewelry making.Autumn leavesBut before we get going, I have to show you this leaf blizzard happening in our front yard.  I’m not complaining because I love wading through leaves.  Hopefully the mailman feels the same.

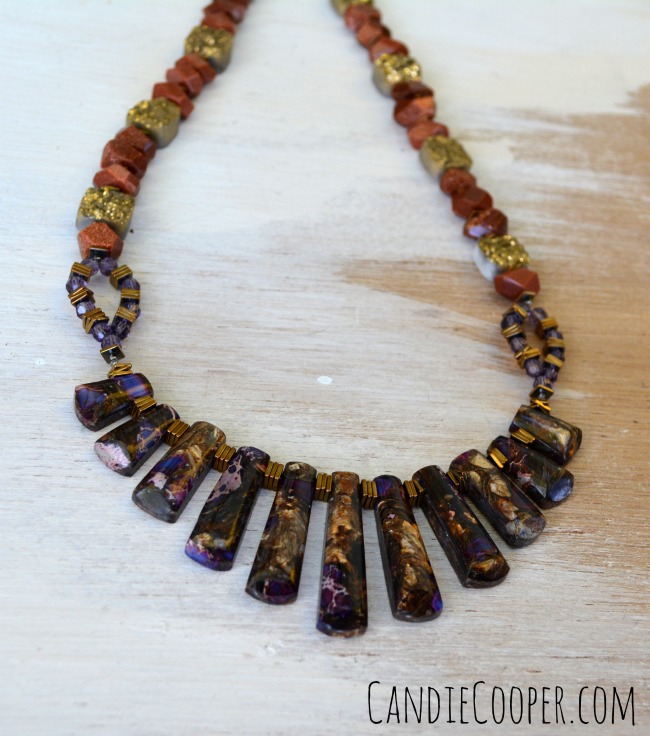
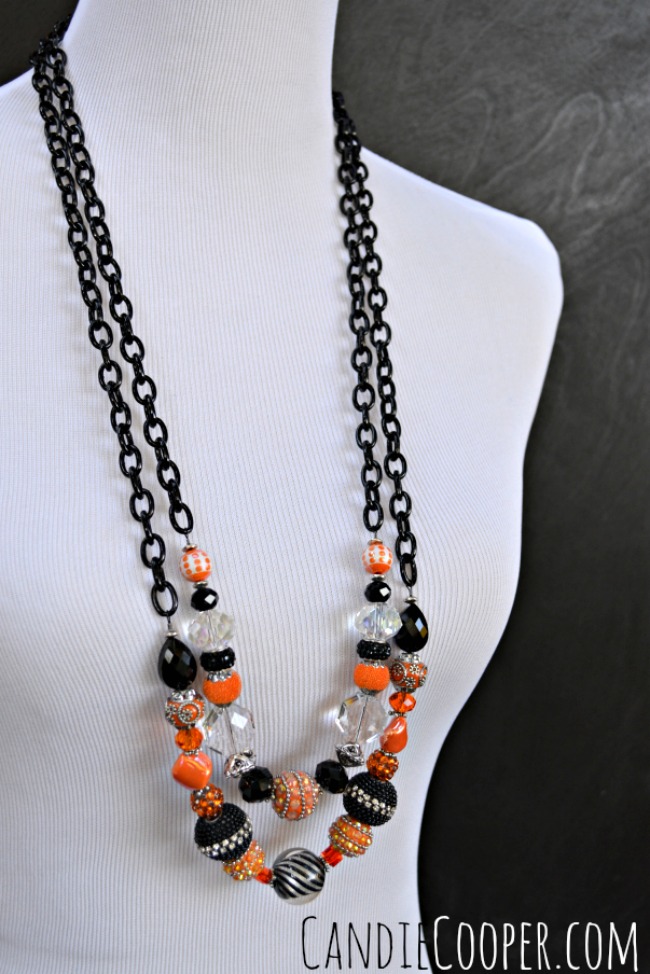
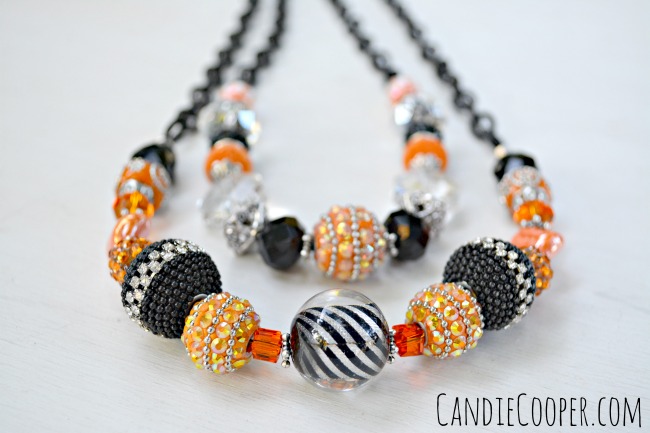
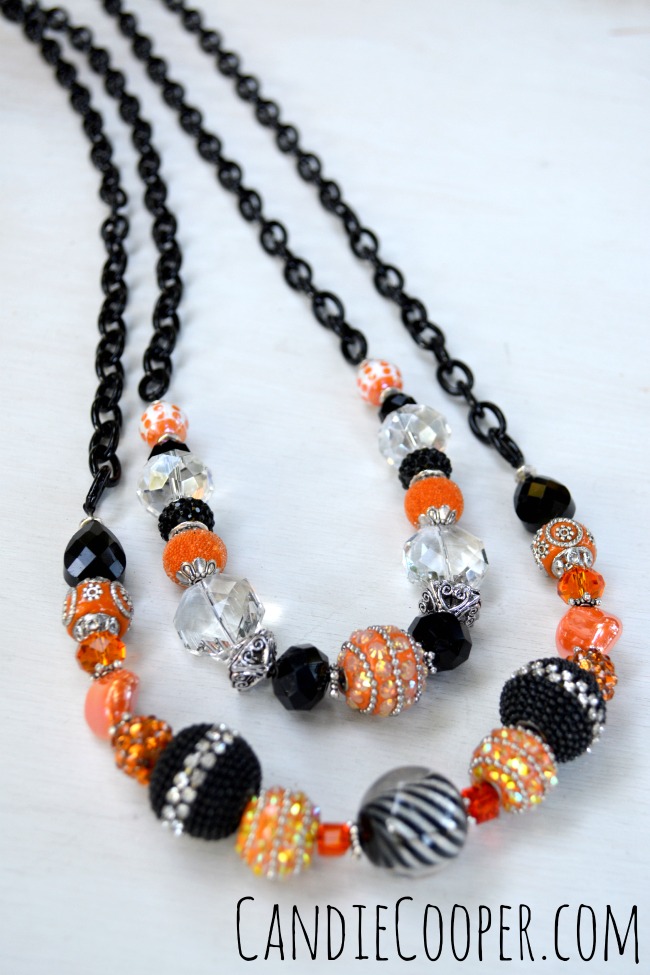
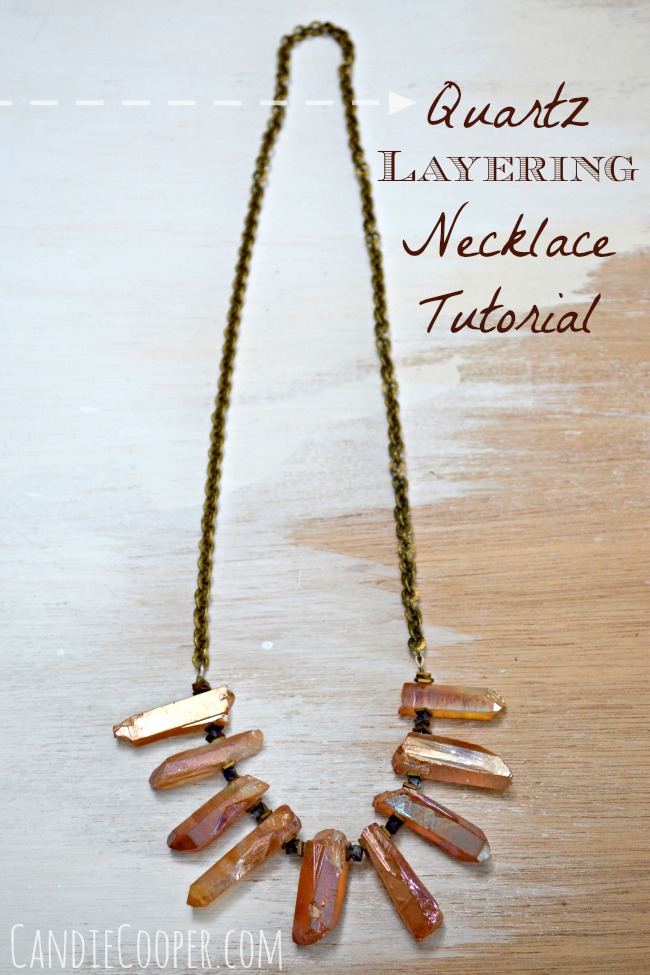
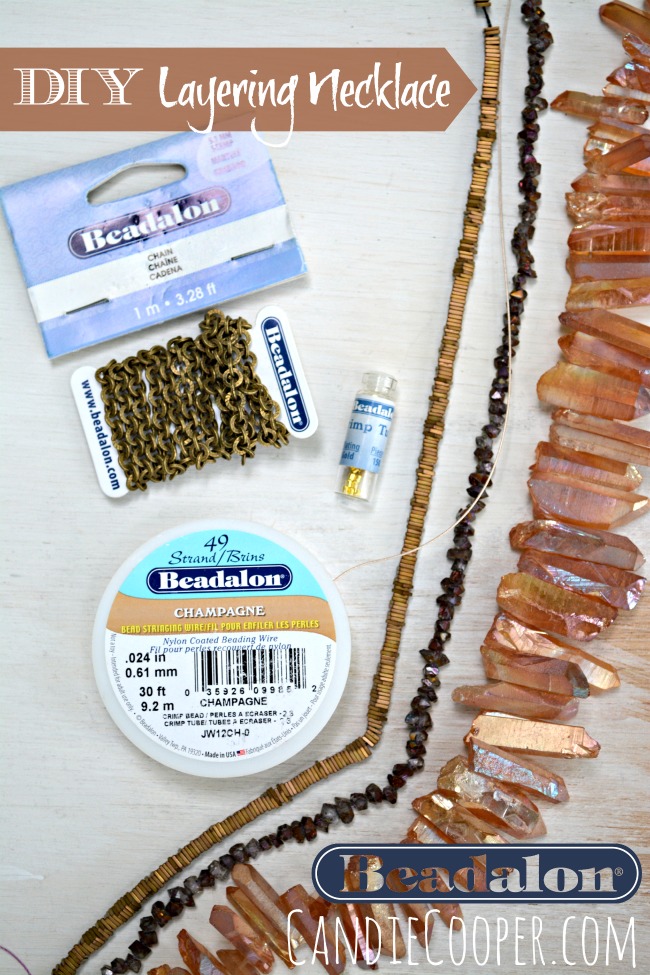
Really, the colors of fall are so inspiring, aren’t they?  That’s where I found the inspiration for the color pallet in this necklace.  Ambers, plum, sparkly orange and rust, it all works together.  Take a peek.Stone beads from JesseJamesBeads.com
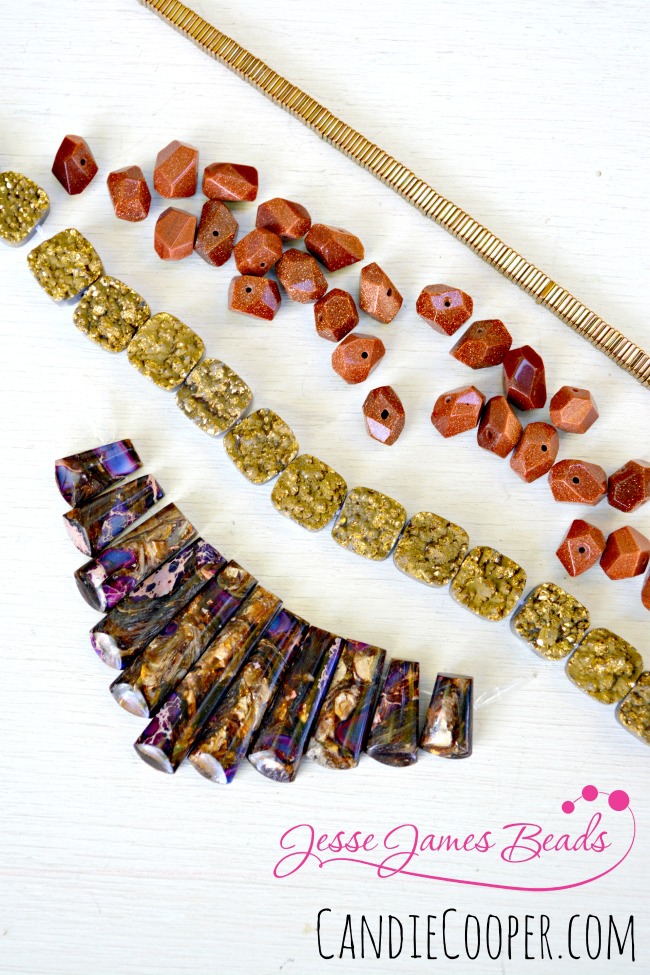
You can find all of these magical beads in a kit ready to make right here from JesseJamesBeads.com!Beading materials
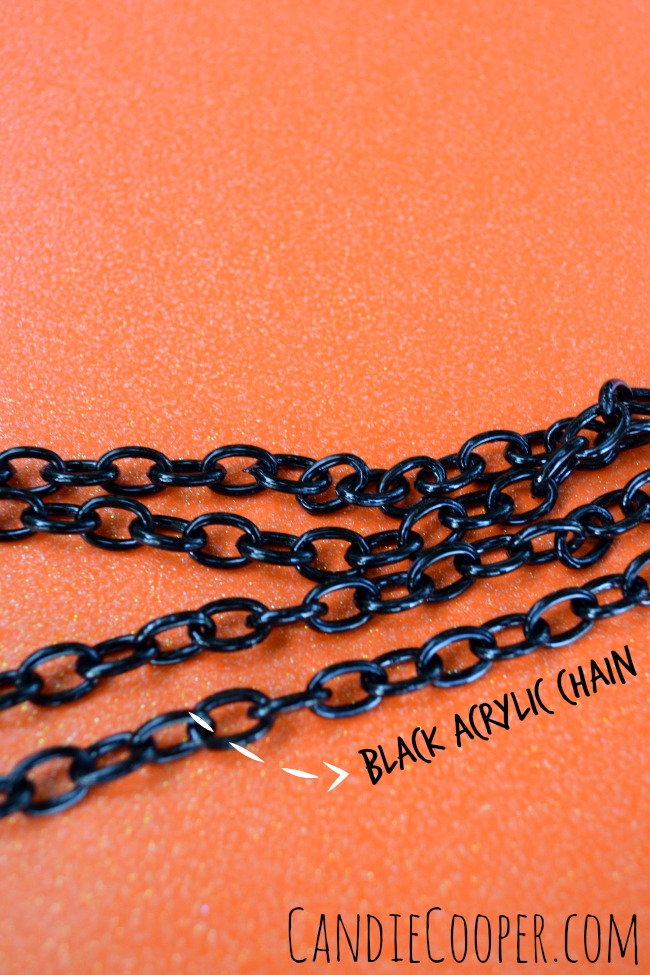
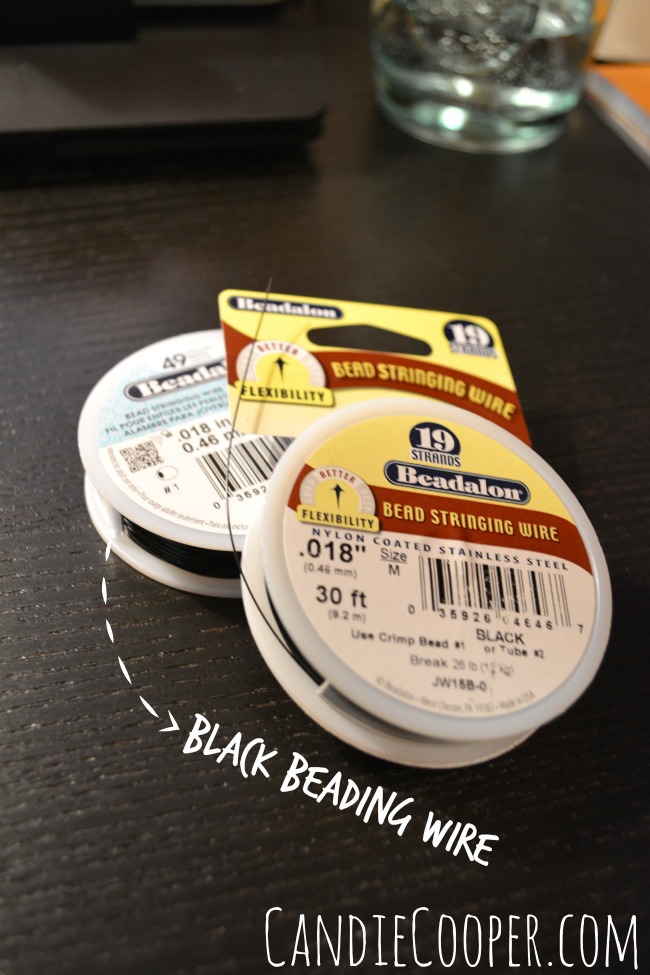
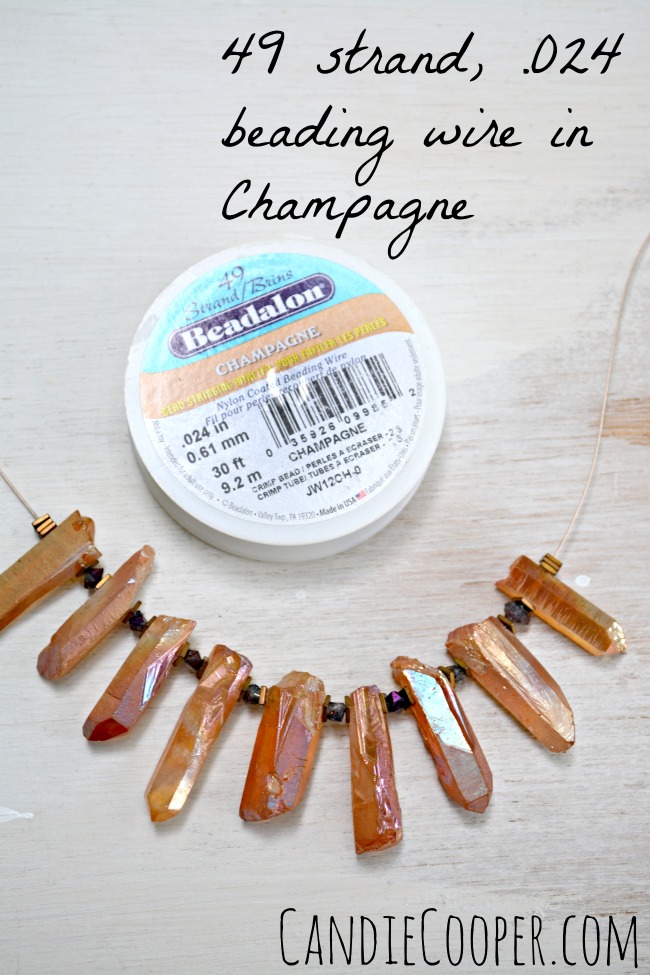
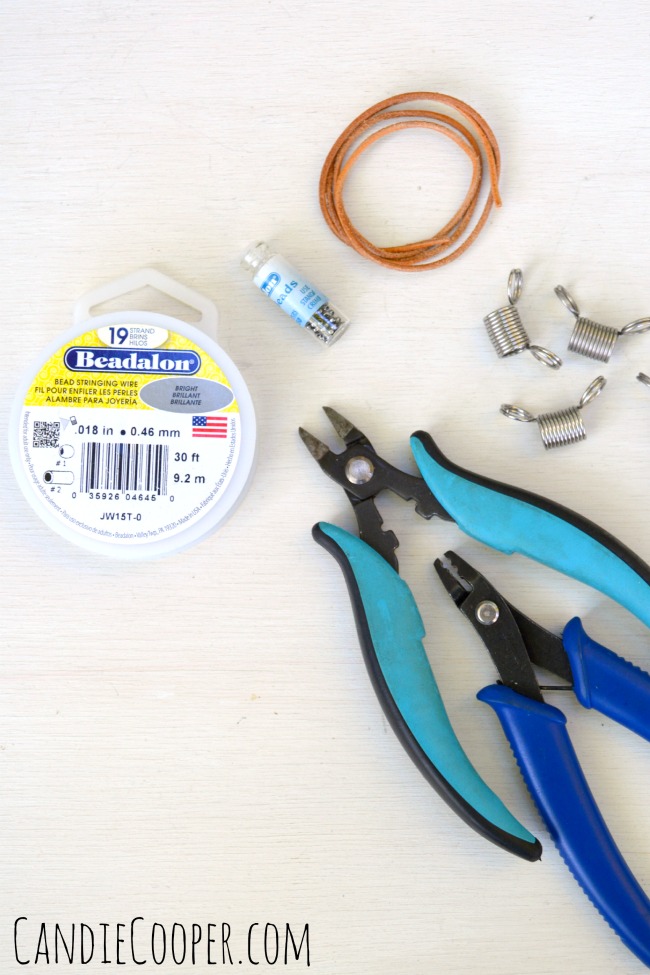
You will also need: crimping pliers, wire cutters, Beadalon beading wire (19 strand, .018 diameter), perhaps some bead stoppers, #1 crimp beads, a piece of leather (8″) and that should do it.  You can find these fine tools and supplies also on JJB.com.How to make a beaded loop
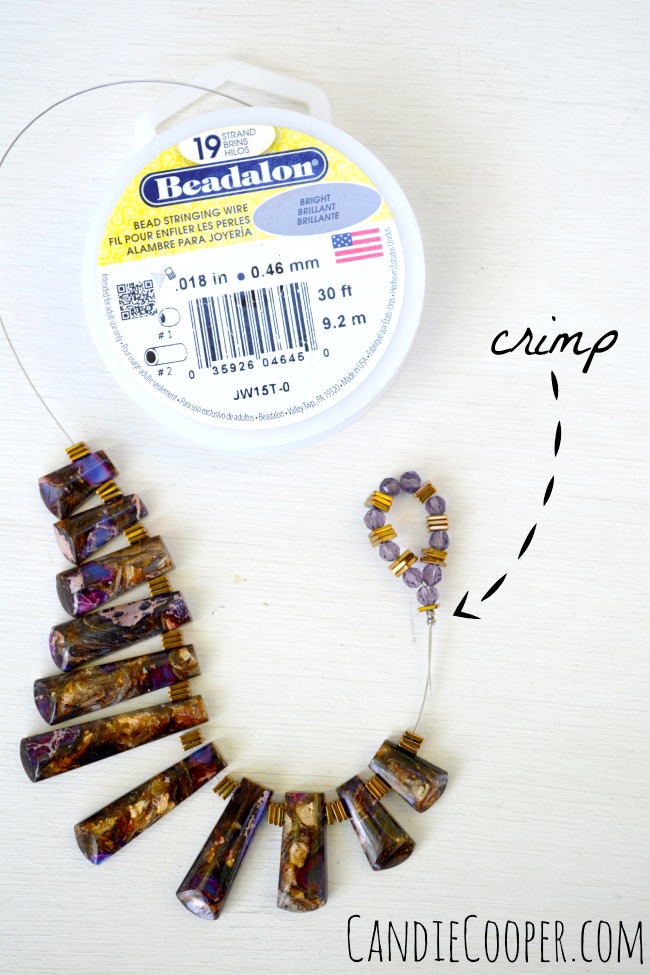
String your focal beads separated by hematite beads (I used 3).

String 2 crimp beads, 1 hematite bead,  2 small round beads, 3 hematite beads, round bead, 3 hematite beads, round bead, hematite beads, 2 round beads, hematite beads, round bead, hematite beads, round bead, hematite beads, and round bead onto the wire.  Thread the wire through the first round bead, hematite bead and crimp beads.  Cinch up the loop and  crimp.How to make a statement necklace wtih @JesseJamesBeads
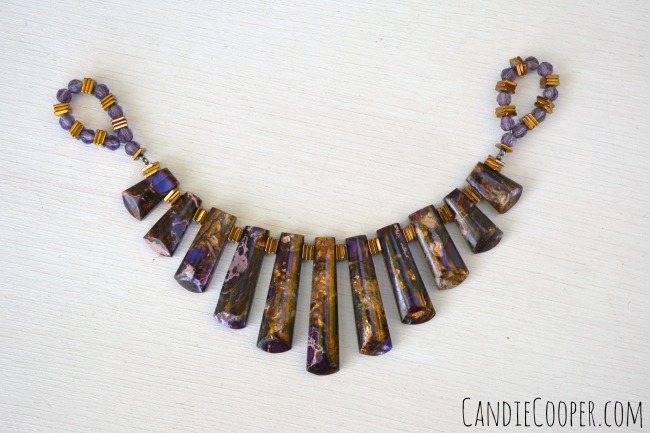
Slide the beads to the finished end and repeat, making a second beaded loop.Jewelry Making tutorial with @jessejamesbeads
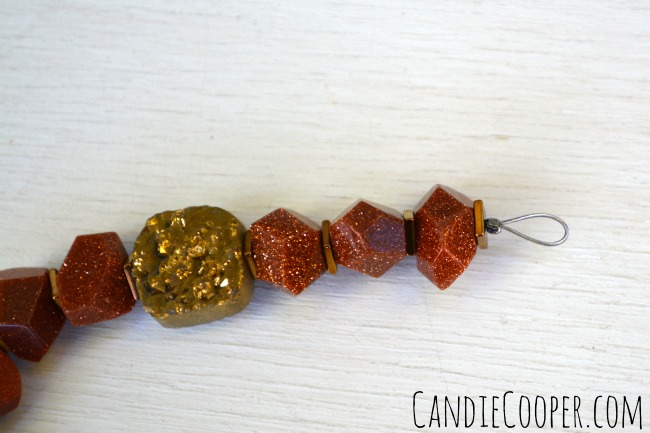
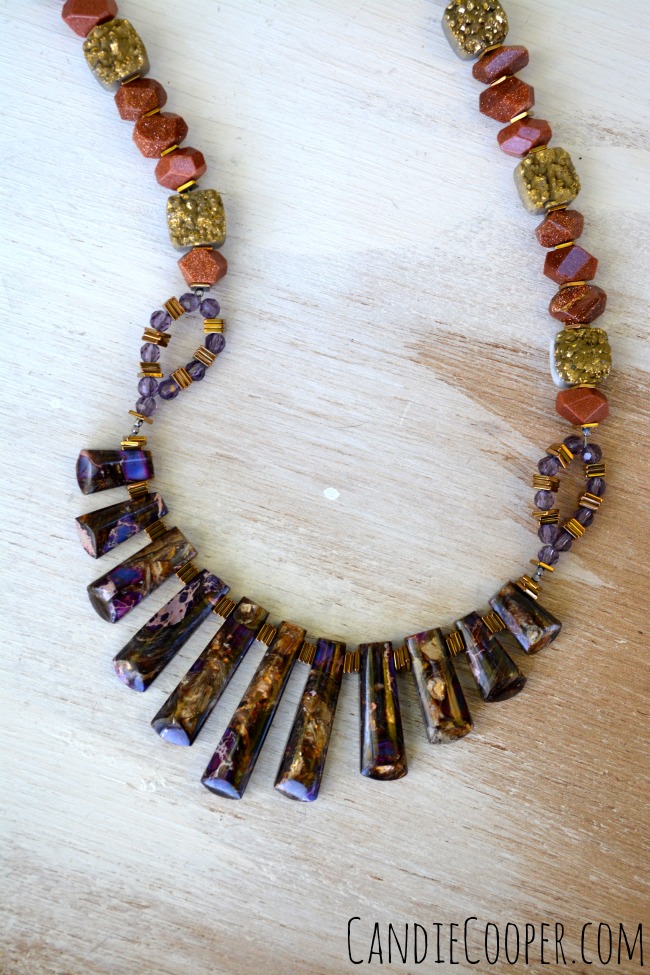
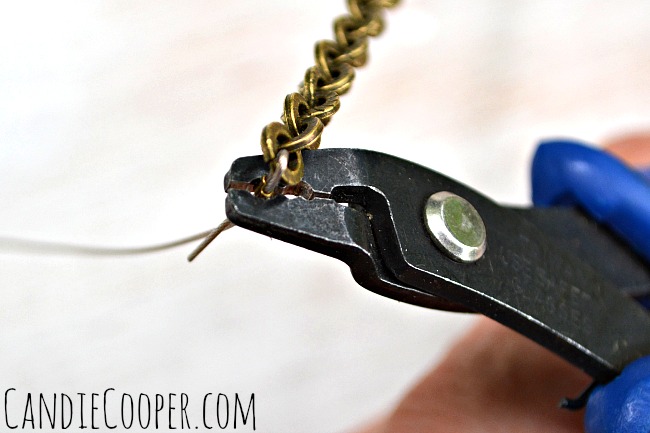
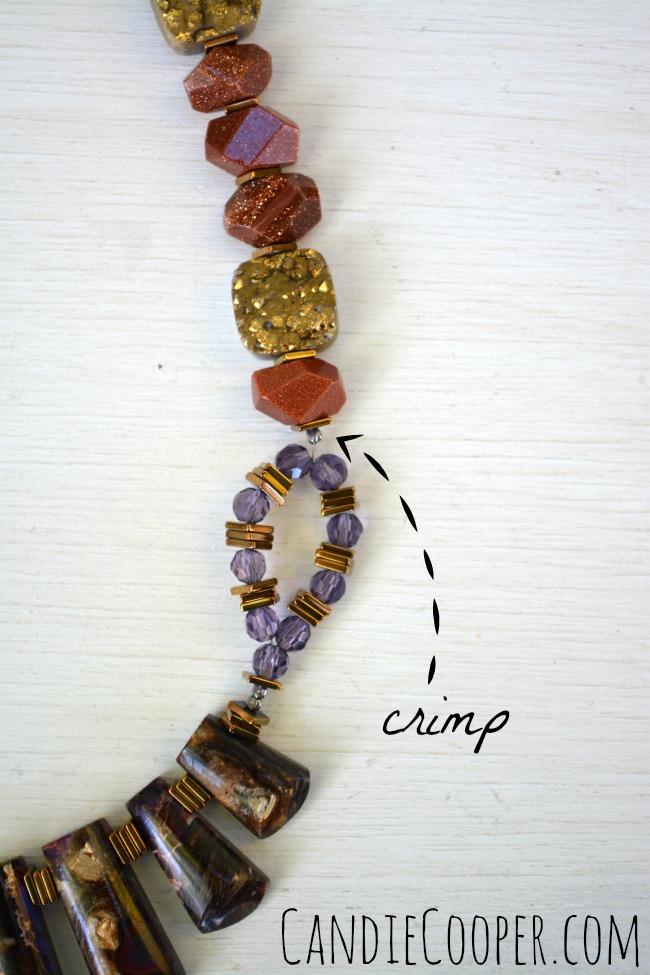
Secure a new wire to the middle of the beaded loop by crimping and string the sides in desired order.@JesseJamesBeads necklace tutorial from @candiecooper

Make a loop at the end of the beading wire
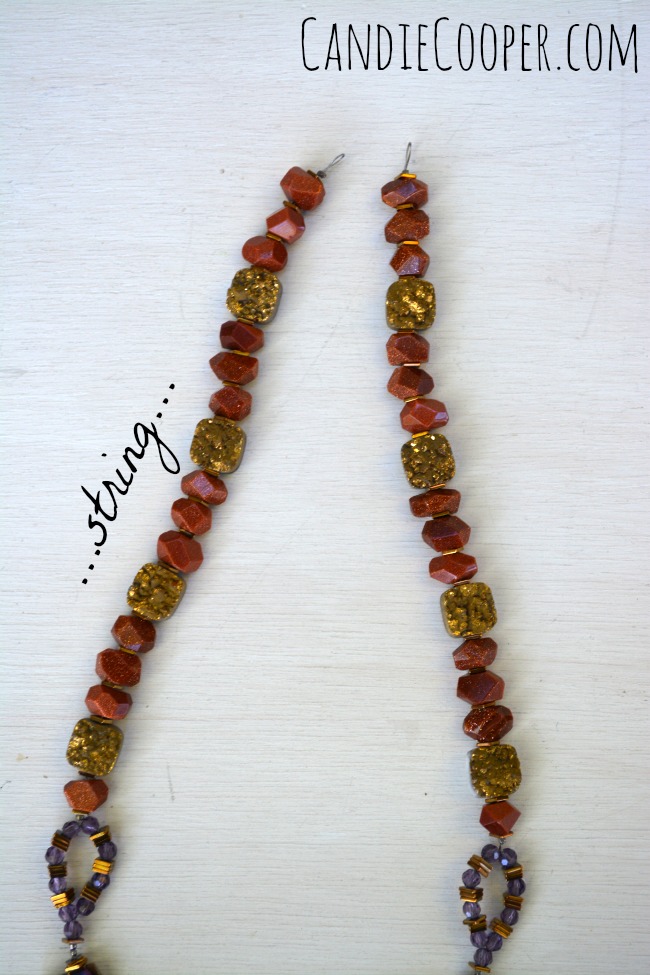
Finish the ends with small loops, just big enough for the leather to fit through.Leather clasp idea for jewelry making
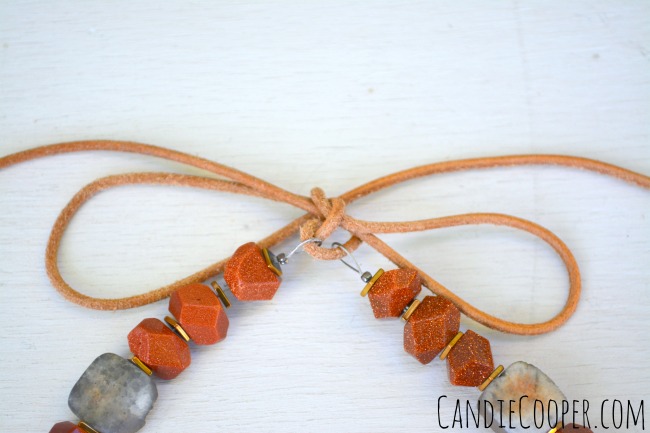
This is a nifty closure that I’m also hooked on.  I don’t know why I don’t get the leaves raked?  Thread the leather through both loops and tie in a bow.  How about that easy and unique clasp solution!Jewelry Making Necklace tutorial from Candie Cooper

DIY Stone statement necklace

Stone necklace from Candie Cooper and Jesse James Beads #jewelrymaking

#jewelrymaking tutorial via @candiecooper
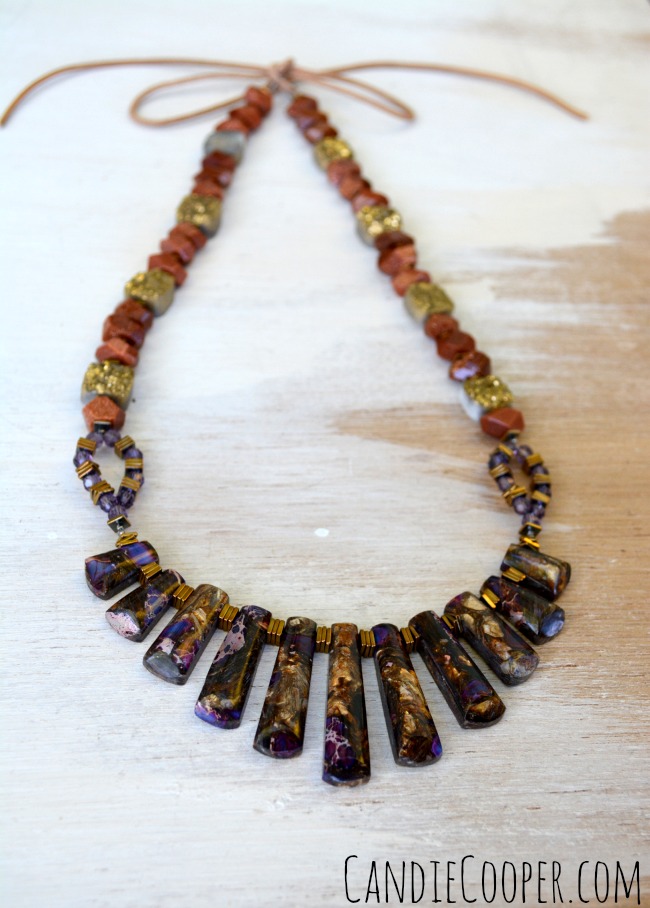
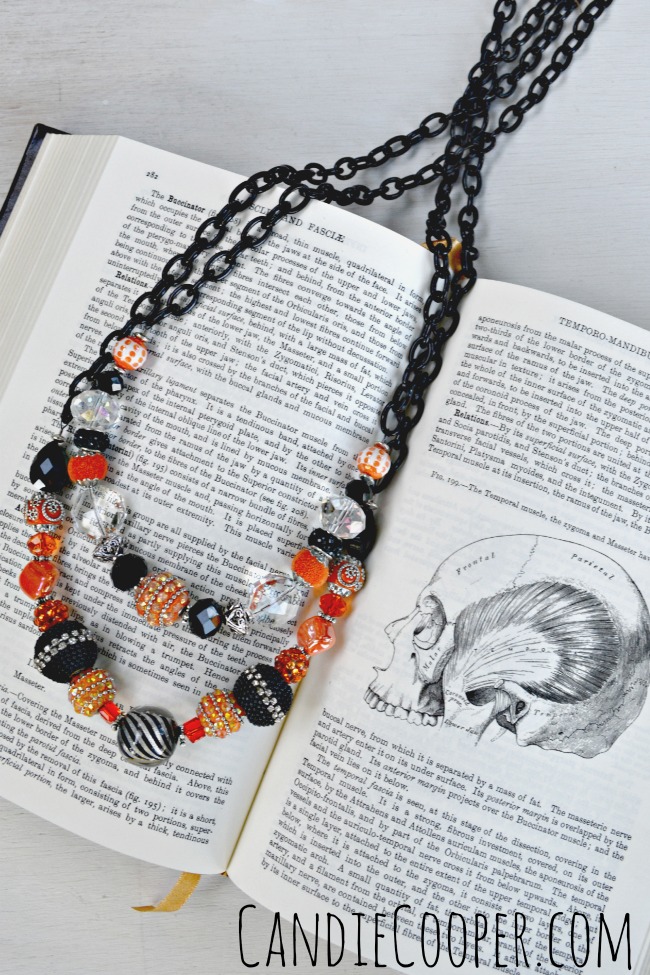
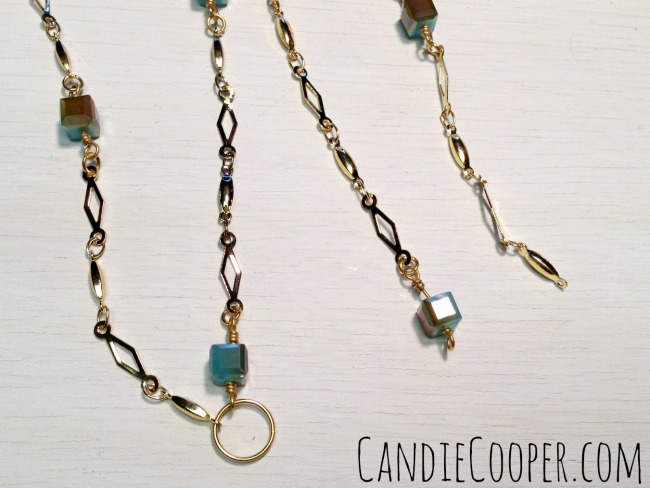
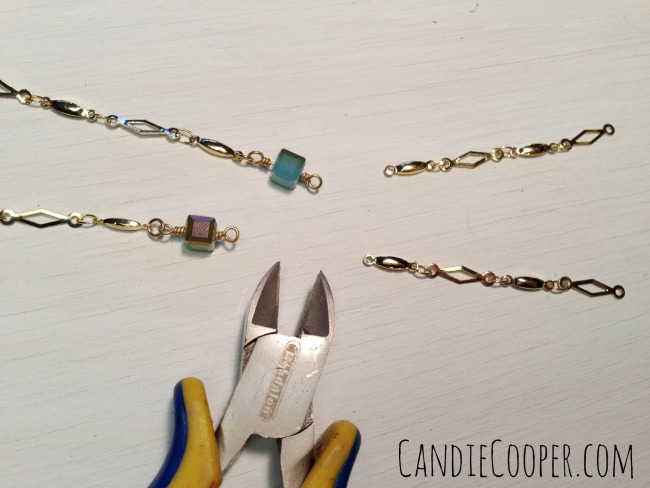
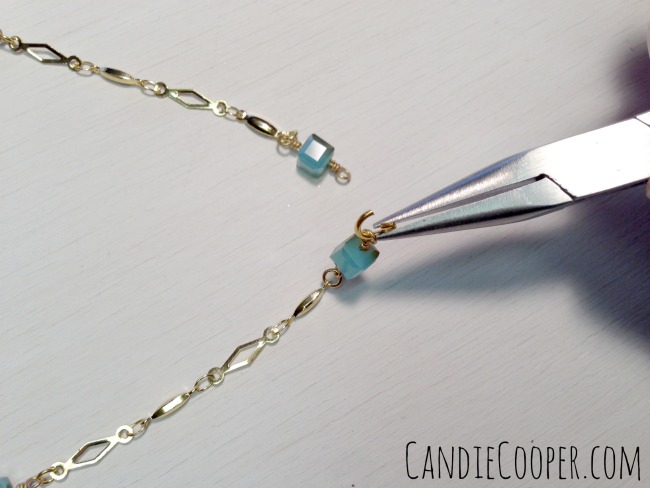
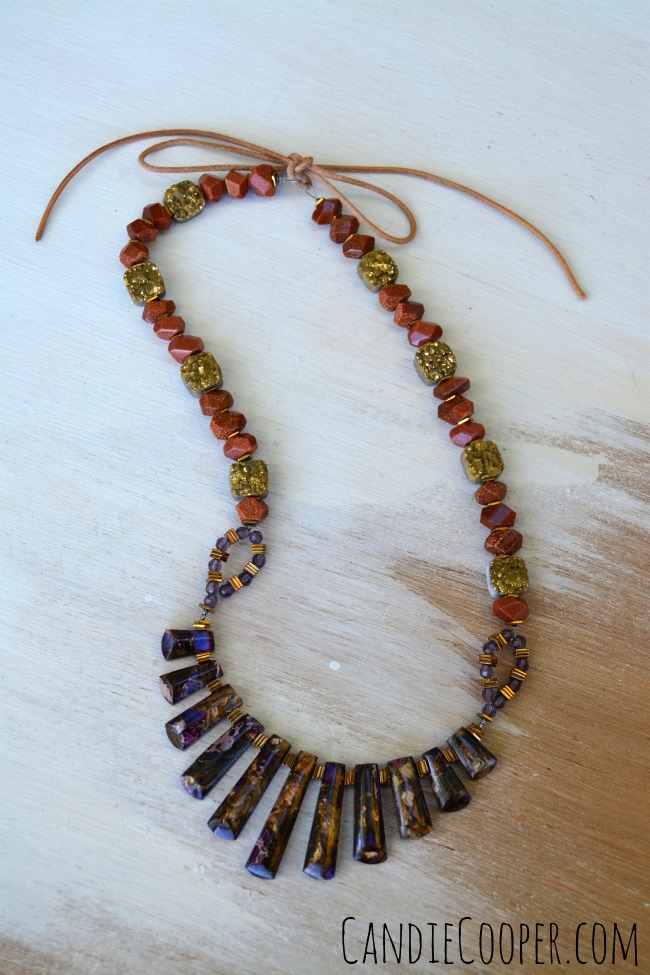
Don’t stop here–You can attach leather, chain or ribbon to the sides of this focal front piece too!

We’re watching The Voice tonight so if there are typos or errors in this post, please direct complaints to Pharell and Blake Shelton.  Ok?  Ok.

How to Make a Bracelet

This post is brought to you by Beadalon.How to Make Easy Bracelets on Candie Cooper's blogLooking to add a little spice to your fall wardrobe?  These DIY statement bracelets will do the trick and they only take about ten minutes each to make.
Candie Cooper Jewelry Work BenchWelcome back to my work table up here in my studio nest.  Admittedly,  it’s gotten a little more cluttered because I moved more stuff up from the back porch.  It takes me awhile to figure out where I want things, plus I’d rather be making than cleaning.  Anyone with me?
Jewelry Making Easy Tassel Bracelet Tutorial with Beadalon Elasticity via Candie CooperSo the other day I rode along with my husband to a fun little town where he had to meet some clients.  I worked at a coffee shop for the first couple hours, then we explored during lunch time.  Guess what we stumbled upon?  A bead shop, closing, everything 50% off.  It was bittersweet.  I hate seeing a cute shop closing like this, but the lady was happily retiring so I guess it was bittersweet for her too.  She had a great collection of Czech glass that I loaded up on and that’s what I used to make these bracelets.

You will also need some Beadalon Elasticity, perhaps some sweet charms and tassels, and metal spacer beads.
Chain nose pliers for attaching charms to braceletsFirst things first, grab your chain nose pliers and add a jump ring to each charm so they are ready to string.
How to attach a charm to a braceletOpen your jump ring from side to side (not like a “C”) and attach a charm.  Close the ring how you opened it.  This keeps it perfectly circular.  Beadalon makes findings like these jump rings in a ton of metal finishes and thicknesses.
Beadalon clear beading elastic, ElasticityLet’s talk a little bit about beading elastic.  Elasticity comes in different diameters–.8 and 1mm seen above are the two I use the most.  I use as thick of elastic as I can that will fit through the bead holes so my bracelet is strong.
Beadalon Elasticity in size .8mm for smaller holed beadsWe all know no two beads are alike so check all your beads to the diameter of Elasticity before stringing.
How to make an elastic braceletThank the Lord for bead boards.  I use Beadalon’s version with the case so it stays nice and clean plus it travels well (from my studio to my lazy girl chair or even in a suitcase).  Lay out your beads and charms on the outer row.  This one is in inches so you can see how long your bracelet will be.  Start stringing…How to tie beading elasticWhen you’re happy with the bracelet, check the back of the Elasticity package for how to tie a secure knot.  It’s helpful to slide the knot towards the beads and then pull the tails apart to cinch the knot even more.
How to make an elastic bracelet, seal the knot with nail polish so it stays tightSecure the knot with a touch of clear nail polish.  Leave to dry, give it one last tug and then trim the ends leaving little tails.
Charm Bracelet tutorial on Candie Cooper's Blog
Charm Bracelets on Candie Cooper's blog with Beadalon jewelry making findingsI’ve been wearing these one at a time and all together with some metal bangles, comfy sweaters, brown boots, and my favorite orange scarf.  Cozy.

DIY Halloween Party Jewelry

DIY Jewelry Making  Halloween Style on Candie Cooper's blogIt’s officially October people, so I’m kicking off the month with a quick Halloween Jewelry project!  I love October.  My husband and I got up super early to go to the store for a few things, including some pumpkins.  We found some with long stems.   Is it me, or is a pumpkin without a stem a little bit sad looking?
Halloween Jewelry Idea from Candie CooperFor this necklace, I used JesseJamesBeads.com bead mix in strands and funky singles along with that sassy black chain.  The “bones” of the necklaces are connected with black Beadalon wire and gunmetal crimps.  Take a peek!
Halloween Beads from Jesse James BeadsBlack acrylic chain from JesseJamesBeads.comBlack beading wire from BeadalonHalloween Party Jewelry from Candie CooperUse this tutorial if you’re new to stringing beads on wire.  It will show you how to crimp, connecting the wire to the chain.

Lately, I seem to be stuck on making slip-over-the-head necklaces and I made them two different lengths so I could wear them together.  This striped bead in the next picture is one of my very favorites.
Halloween Jewelry Idea with Jesse James Beads from Candie CooperHalloween Party JewelryHalloween Jewelry Idea from Candie CooperSo, I’ve got a pretty big to-do list that’s calling my name.  Top secret projects await.  Don’t you hate teasers?  😉  You’re going to love this surprise though!  October 3rd at the White House

On another note:  Tomorrow our children’s gallery, the Wabash White House (I know, I still need to post about this special little place!) is open from 5 to 8 pm for First Friday in Wabash.  If you’re local, come get in the Halloween spirit with us!

How To Make Steampunk Jewelry

This post brought to you by Beadalon. How to Make Steampunk Jewelry  Earring tutorial with Beadalon's Conetastic ToolHere we are with October knocking on the door!  Already!  This post is going to show you the basics of using Beadalon’s new Artistic Wire Conetastic tool designed by the lovely, Sandra Lupo.  This is my first tutorial from my new home office.
Candie Cooper studio work table
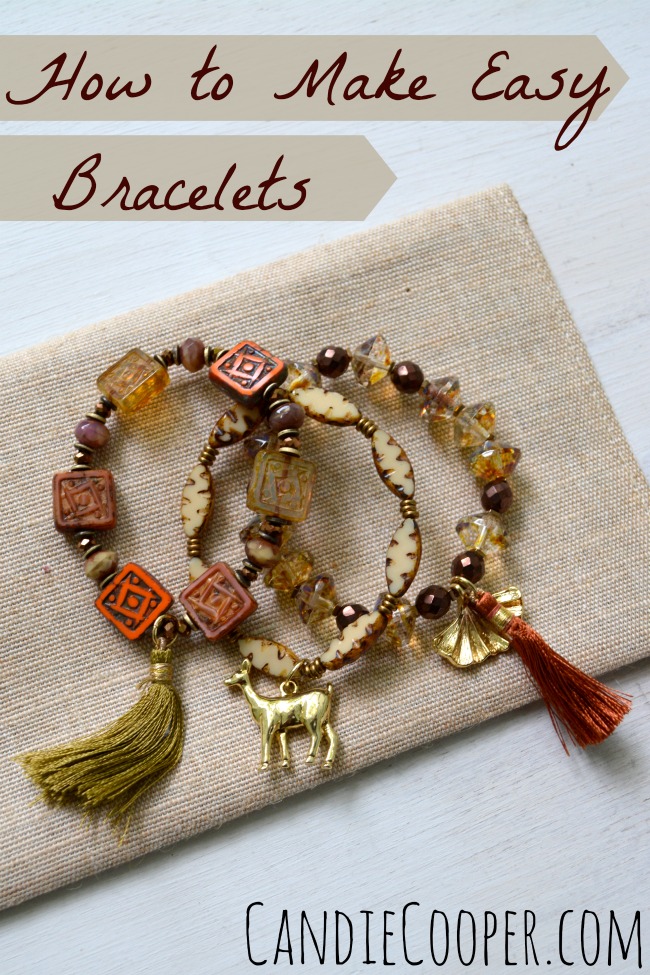
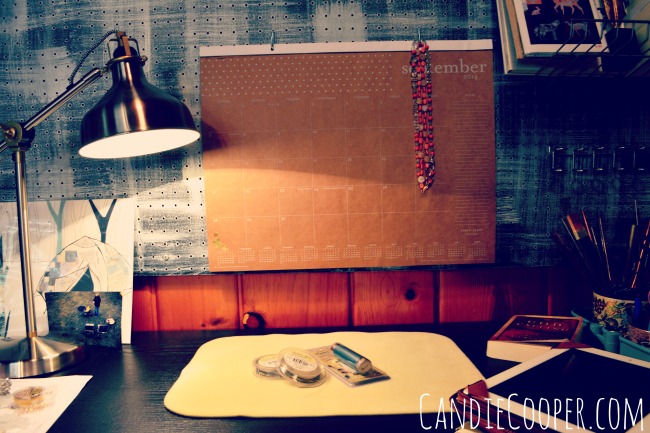
So welcome!  I had my work table downstairs for the summer because we don’t have air conditioning.  Now that it’s cooling off, I’m back up in my nest and LOVIN’ IT!!!  Do you like my Ikea task lamp?  I’m still in the stage of trying to keep my desk really clean.  Day 3: so far so good.  By Christmas it will look like a tornado went through the craft store.
How to Make Bead cones with wire and Beadalon's Conetastic Tool on Candie Cooper's BlogBack to the Conetastic!  This jewelry making tool is designed to work with Artistic Wire so you can make your own coiled bead cones.  It’s a really nifty little tool!  This is my first time taking it for a test drive and after sleeping on it, I have some more ideas to try.
Artistic Wire and Conetastic tool from BeadalonThe first thing I really liked is how compact it is.  For this tutorial, I’m using it with Artistic Wire 18g. in Tinned Copper (my fave).
Conetastic wire working tool from BeadalonWhen you open the packaging, you’ll find awesome instructions.  To get rolling, you twist open the end cap and all the parts come out.  Also, I liked how heavy the pieces are–definitely a tool made to last.
How to use the Conetastic tool
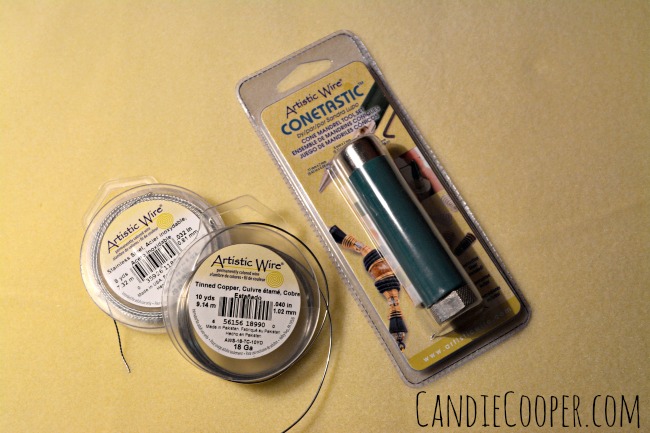
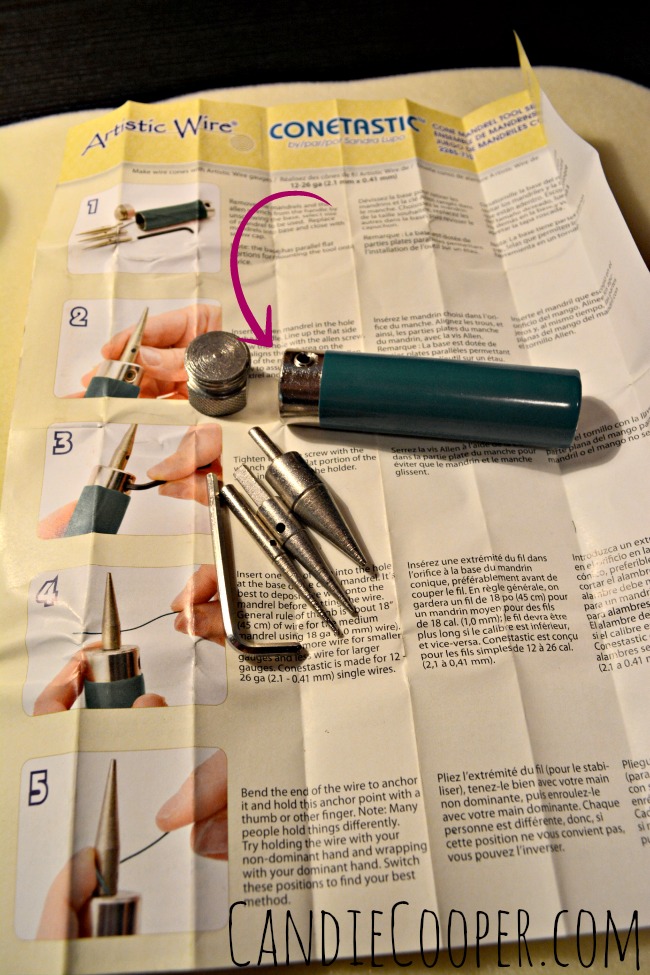
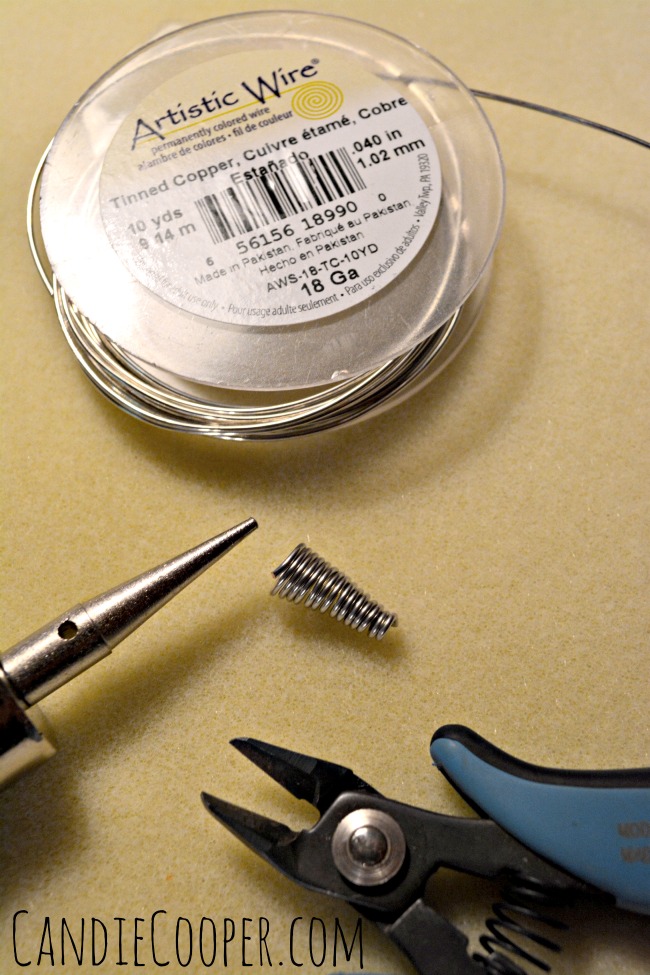
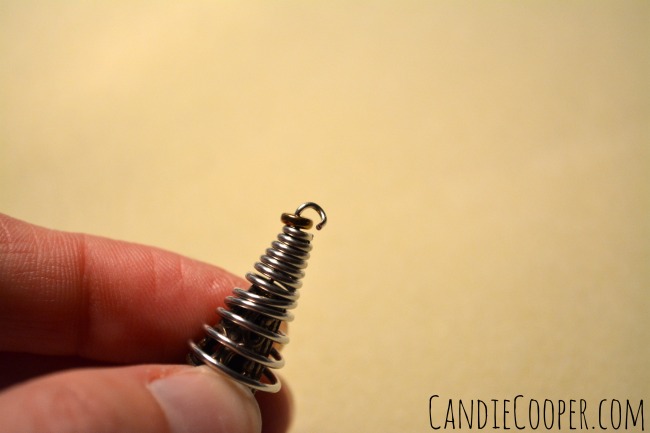
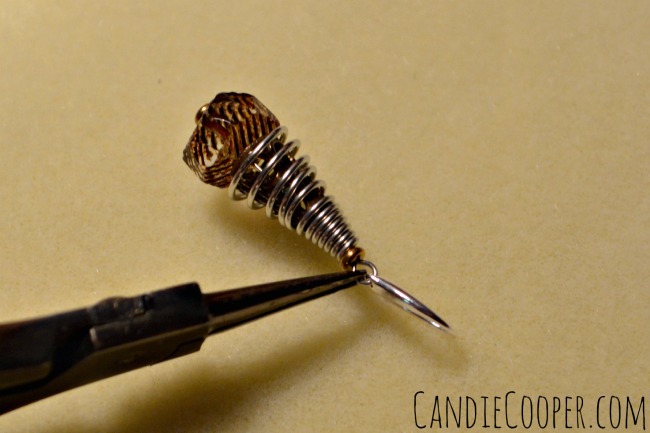
There are three different cone sizes and a little wrench.  The wrench loosens the pin so you can set the desired cone size in the tool and then tighten it in place.  Super easy!  I practiced with the tiny cone first.
How to coil wire for jewelry makingIt took me about 30 seconds to make one coiled bead cone.  Already I’m thinking I need some silver plated Artistic Wire so I can oxidize it with liver of sulphur and then distress it to highlight all those coils.  I love the liver of sulphur patina.
Artistic Wire 18g. along with Conetastic toolWrapping the 18g. wire really made for a heavy look.  Depending on your project, you might want to play with wire gauges and cone sizes to get just what you want.

When you are finished coiling, all you have to do is snip the ends of wire away from the tool and spool.
Making earrings with coiled bead conesFor my next experiment, I used the largest cone to make some more playful and loose coiled bead cones.  That’s when DIY steampunk jewelry popped into my head.  Playing with layers in jewelry making is a love of mine so these Conetastic bead cones fit right in.  Here’s my first attempt with brass bead cones under the coiled pieces with glass pearls.  Fail.  The glass pearls just weren’t cuttin’ it.
How to make earrings with coiled bead cones on Candie Cooper's blogWhen you are settled with the bead stack, string everything onto a regular head pin and then finish the end with a simple loop using round nose pliers.
Making coiled cones for jewelry making with Conetastic toolGrab some chain nose pliers and open the loop from side to side.
Attaching the ear wire to earringConnect the Modern ear wire and close the loop.  I accidentally squashed one of the coils down too much, making it look a little wiggly, but I’m ok with it.
How to make coiled bead cones on Candie Cooper's blog

Earring Tutorial with DIY Wrapped Bead Cones on Candie Cooper's BlogWire Wrapped Bead Cone Tutorial

Wire wrapped bead cone tutorial from Candie Cooper using Beadalon's Conetastic tool

Here’s a link to shopping for the Conetastic tool in case you want to add it to your Christmas list. 😉

How to Make Popsicle Bracelets

Decoupaged Popsicle stick bracelets from Candie Cooper and the Graphics FairyToday, I’m guest posting on the Graphics Fairy blog!  Check out my popsicle bracelet tutorial there!

How to Make a Crystal Layering Necklace

This post is brought to you by Beadalon.com.  All opinions are yours truly.DIY Jewelry Making  Crystal Quartz Layering Necklace from Candie CooperHave you been to a bead show lately?  I have and I can tell you there are so many stunning strands of quartz crystals and druzy beads.  It’s not good for the pocket book.  Take a peek at some of the ones I brought home from Bead Fest Philly Summer.Quartz and Geode Necklace Beads

Quartz and Geode Necklace Beads

Geode Crystal Beads

Orange Crystal Necklace BeadsI am especially smitten with, well all of them.  Well.  Except maybe the blue ones.  I don’t know what happens to me when I’ve been around beads too long (it also happens when I’m in Walmart too long), but I inevitably end up with something that I just. don’t. know. why. I. bought.  Sigh.  It’s cool, but is it jewelry worthy?  The verdict is still out and may be for a very very long time.  It’s over indulging I think.  Eating dessert when you’ve already had a slice of pumpkin pie at Thanksgiving.  Just too much of a good thing!Jewelry Making Quartz Layering Necklace Tutorial from Candie Cooper with Beadalon Champagne colored beading wireThe main materials are Beadalon‘s Champagne colored beading wire in 49 strand, .024″, brass stamped chain, #2 or 3 crimp tubes will work and some crimping pliers and wire cutters.

I also worked in some added strands from Dakota Stones–more purplish quartz chips and gold hematite squares.

These colors are all over the Fall look books so I know this necklace is going to get a workout in the next couple of months.String the quartz onto Champagne colored Beadalon WireI was so happy to find I still had 10″ of my very favorite colored Beadalon wire to use for this.  I love champagne anything!  However, Beadalon makes beading wire in pretty much every color in the rainbow!

Note! These stones are heavy and have rough edges that can potentially saw through thinner beading wires.  That happened to me once (love learning those lessons the hard way!) so take it from me, get the good stuff!  Beadalon, .024″ 49 strand is the way to go because it’s super embarrassing to say you “make jewelry” and then have gems and beads scattering all over the floor.  Even more humiliating to be on your hands and knees picking them up at a party.  None the less, when using stones like this, it’s always a good idea to take a peek at how the wire is doing and holding up.How to use crimp beadsString the tail of your wire through a crimp bead, the last link of chain and back through the crimp bead.  Grab your crimping pliers!How to Crimp wire to chain in jewelry makingPlace the crimp bead in the opening closest to the handles and smoosh down like so.How to Crimp beads to wire step 2Turn the crimp bead 90 degrees, place in the next opening away from the handles and fold it on over like this:Crimping wire to chain layering necklace tutorialSee how it folds the crimp bead over?How to open a link of chain
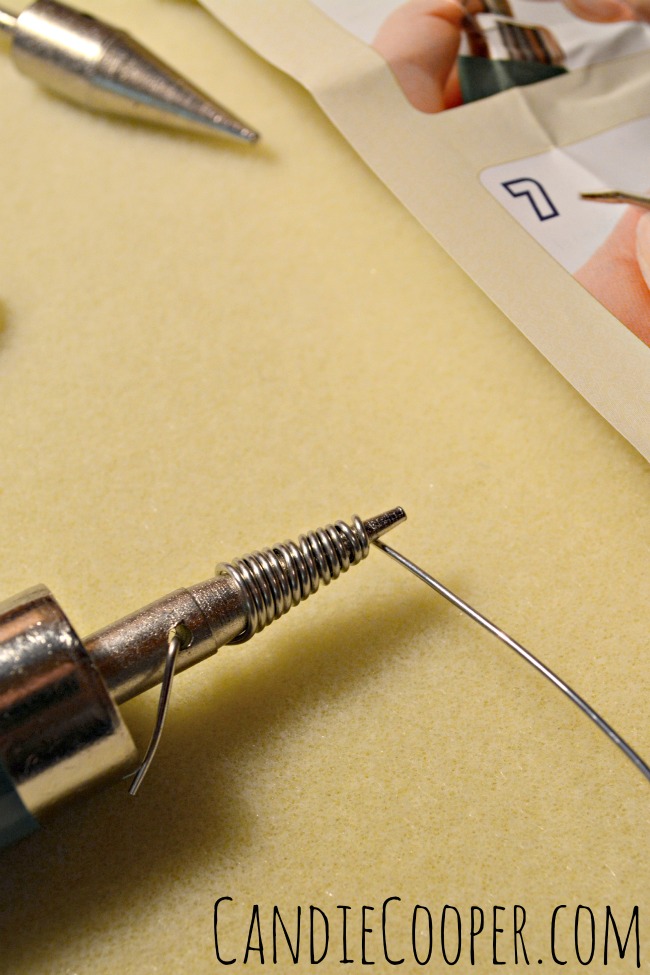
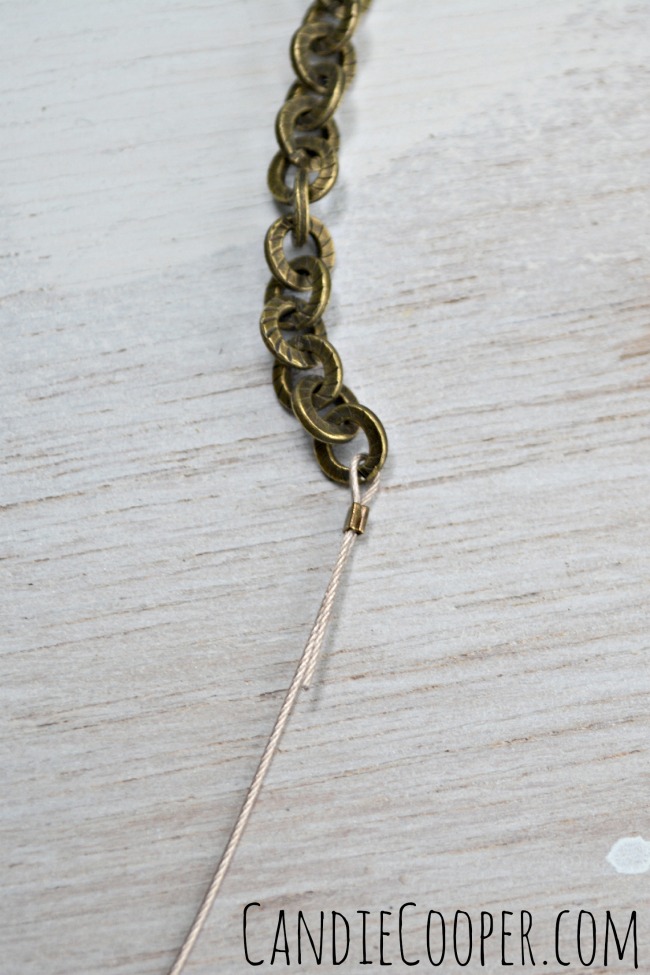
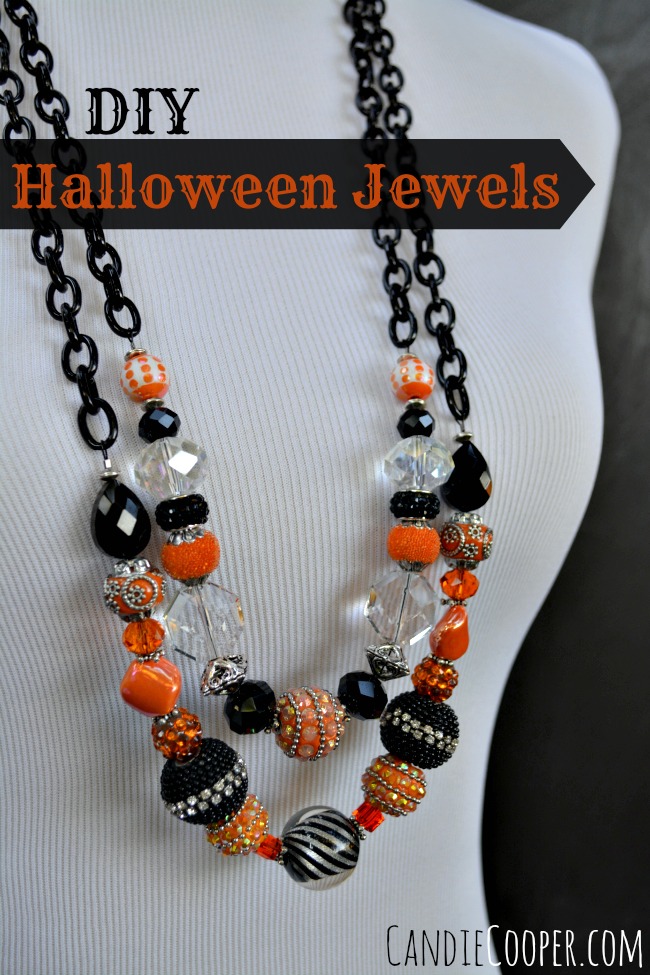
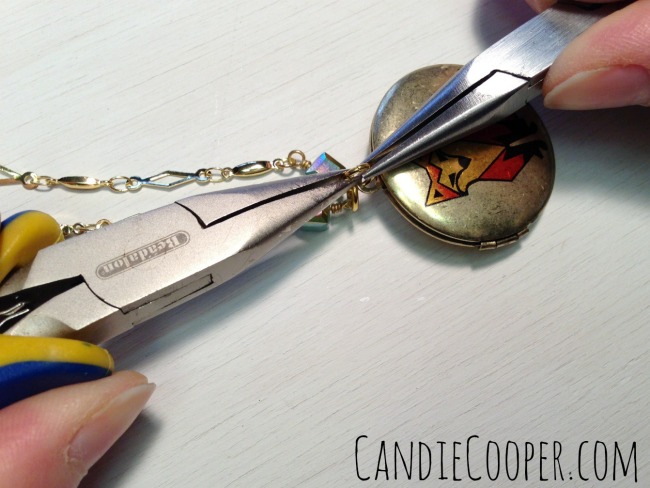
This necklace does not have a clasp.  I simply determined how long I wanted the necklace to be so I could slip it on and off, opened a link of chain from side to side and removed the extra which will be used for a rainy day.Layering Necklace TutorialSlide all the beads to the finished end, string a crimp onto the wire and through the last link of chain and crimp again.  Trim the excess wire.Autumn Layering Necklace TutorialBlissfully simple!
Layering Necklace Tutorial from CandieCooper.comMeet your new favorite necklace!  She can roll solo or party with a few necklaces.

DIY Layering Locket Necklace

Candie Cooper Fox Locket 2There’s something magical about a locket.  Maybe because you just never know what’s inside.  I have a small stash of these sweet little printed lockets.  Ok, let’s face it–what don’t I have a small stash of in terms of jewelry making supplies?!  They’re perfect for quick necklaces like this one.

Candie Cooper Fox Locket MaterialsThis locket dangles from sparkly Jesse James Beads chain.  Split Ring on Chain ReactionTo get started, remove the split ring from the ends of chain.Connect the beaded links
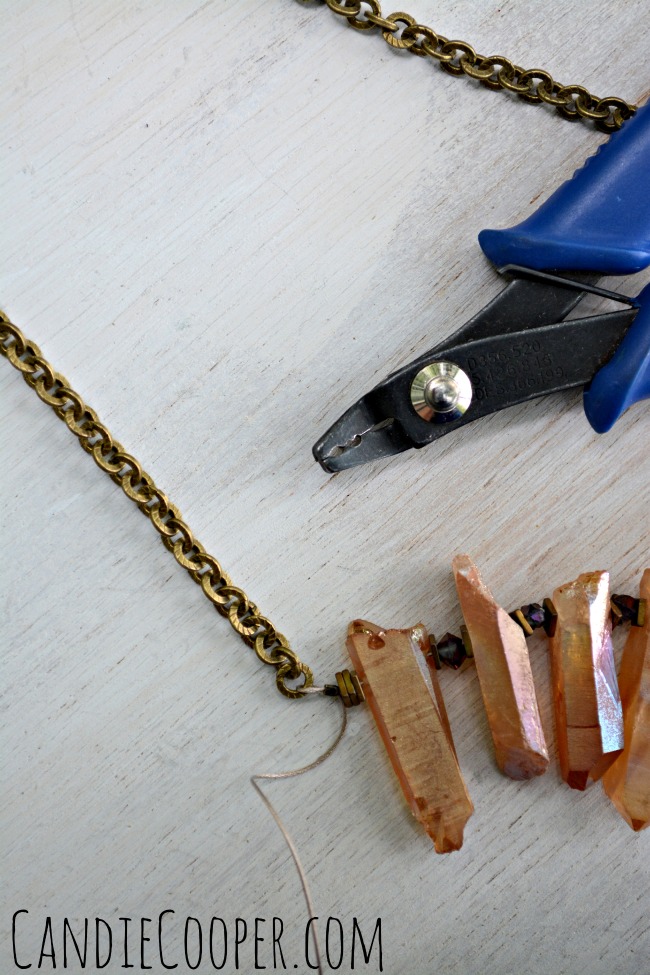
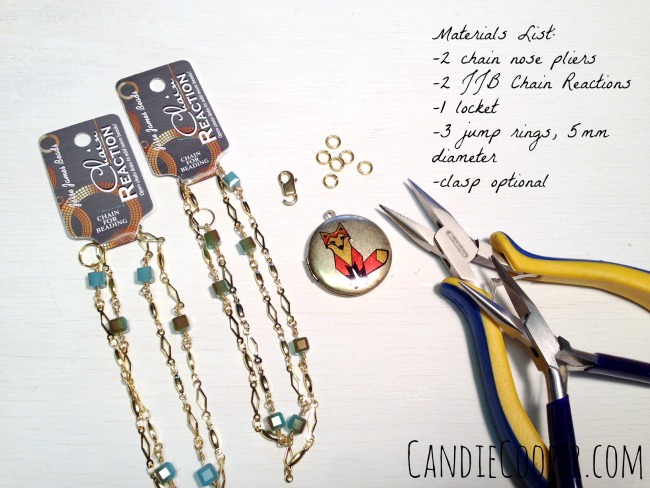
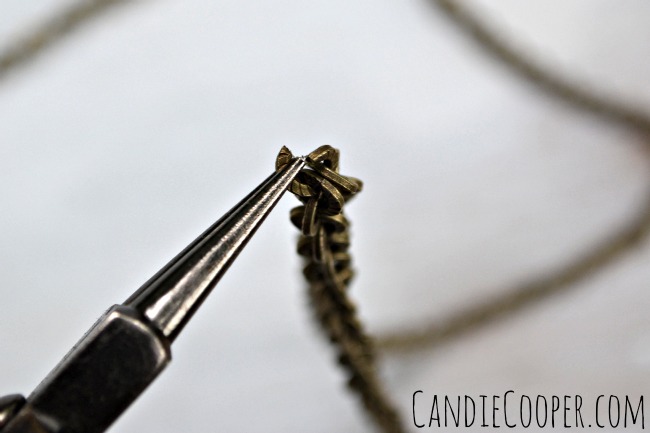
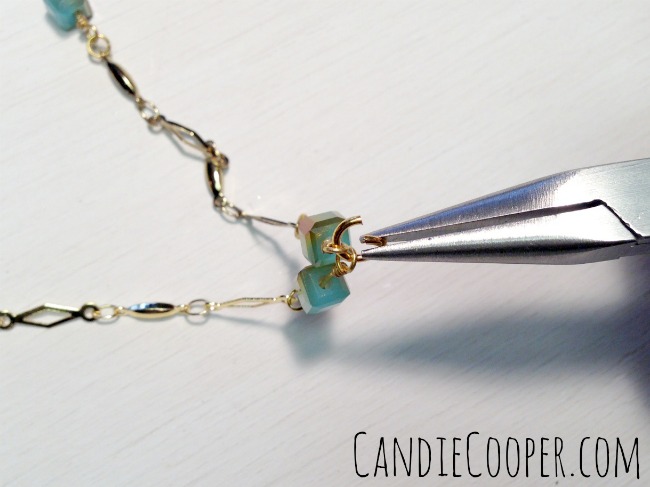
Connect the ends together with a jump ring.
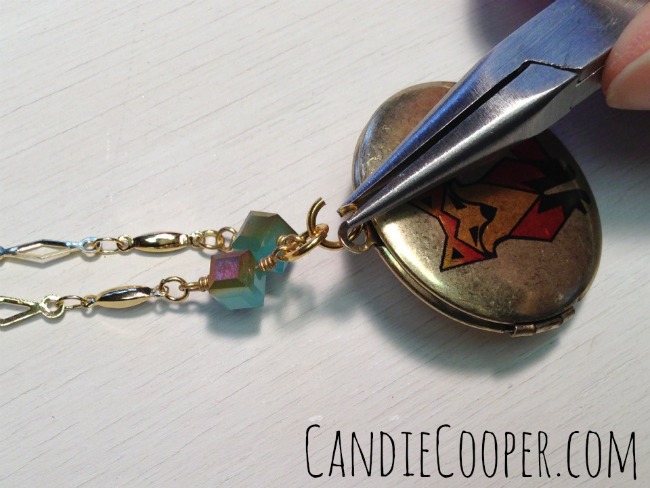
Connect the locket with a jump ringConnect the first jump ring to the locket with a second jump ring. Close the jump ringClose up the ring.  Almost finished!Break Chain sectionsHold the necklace up around your neck to determine the length.  Trim away excess and link the ends together with a jump ring.

Instant craftification, at your service.Bike Locket from Candie CooperHere’s a bike version I made with an added tassel charm.  Just when you thought a bike locket couldn’t be more sweet, the tassel sends it over the edge of cuteness.

It’s so crisp and cool out today.  I’m loving this Fall weather!  We’ve been without internet and television for almost a week now. Yes, hubs has practically broken out in hives.  Me, I’m embracing Pandora radio and hand stitching.  Now, I’m here at my grandparent’s house using their WIFI.  Gram just made a lunch of the most ooziest grilled cheese sandwich and a side salad.  Delightful.  Now I’m back on the front porch writing with the glow of the lamp nearby and listening to her washing dishes.  Someone is outside mowing.  I could take a nap it’s so peaceful.  But, instead I’m going to post one more tutorial and call it a day!  Our high school homecoming is tonight and my sis is coming down.  I can’t wait to see her.